How to Manage Users, Groups, and Permissions in Linux: A Complete Sysadmin Guide
Every Linux breach story you read this year seems to trace back to the same root cause: somebody, somewhere, got the permissions wrong. A world-writable directory. A sudoers entry that was too generous. A user account that never should have been in the wheel group in the first place. None of this requires exotic malware — it just requires an administrator who never fully mastered the fundamentals.
This isn’t a copy-paste man page. It’s a practical walkthrough of the commands, files, and concepts you’ll actually use day to day, plus the security context that explains why each control matters.
Why User and Permission Management Still Matters in 2026
It’s tempting to assume Linux is “secure by default” and move on. The data says otherwise. Independent security teams tracking 2025–2026 incident trends found that <cite index=”19-1″>a large majority of Linux attacks last year involved no malware at all — attackers simply exploited misconfigurations and stolen credentials</cite>. Permission and ownership mistakes are exactly the kind of misconfiguration that shows up on that list.
Analysts covering the broader Linux threat landscape have made a similar point: <cite index=”18-1″>attackers increasingly succeed not by defeating Linux’s design but by exploiting misconfiguration, human error, and standing privileges that were never cleaned up</cite>. A single careless chmod -R 777 / or an orphaned account with sudo rights can undo years of otherwise solid hardening work.
The takeaway isn’t that Linux is fragile — it’s that the operating system gives you excellent tools for access control, and the responsibility for using them correctly sits with whoever is managing the box. That’s you.
Understanding Linux User Accounts
The /etc/passwd File
Every local user account on a Linux system has an entry in /etc/passwd. A typical line looks like this:
mjohn:x:1001:1001:IT Support Specialist:/home/mjohn:/bin/shReading left to right, that’s: username, password placeholder, user ID (UID), group ID (GID), a comment/description field, the home directory, and the default login shell. The x in the password field simply tells the system to look elsewhere — which brings us to the next file.
Want to see which shells are available on your system? Run:
cat /etc/shellsThe /etc/shadow File
Actual password hashes never live in /etc/passwd — they’re stored in /etc/shadow, which is readable only by root. A shadow entry might look like:
mjohn:$y$j9T$TRbV6B5mItoV1BroRvDoT/$Zzyfpny2PfGrN9KOv6NUjQe8CTHh93Nt3VYPUFs2Cy5:19760:0:99999:7:::The dollar-sign prefix tells you which hashing algorithm protected that password:
| Hash Type | Prefix | Description |
|---|---|---|
| MD5 | $1$ | Legacy MD5 hashing (avoid on modern systems) |
| Blowfish | $2a$, $2b$, $2y$, $2x$ | Blowfish-based, various implementation versions |
| bcrypt | $2b$ | Blowfish-derived adaptive hashing |
| SHA-256 | $5$ | SHA-256 based hash |
| SHA-512 | $6$ | SHA-512 based hash (common modern default) |
| DES crypt | No prefix | Original, weak DES-based hashing — should not appear on current systems |
If you ever audit a server and find $1$ or no prefix at all in /etc/shadow, that’s a red flag worth escalating — those algorithms are considered obsolete for password storage.
Creating and Managing Users
The useradd command is your entry point for provisioning accounts:
useradd -c "User One" -s /bin/ksh user1Useful flags include -c for the comment/description field, -e for setting an account expiration date, -s to define the default shell, and -M if you don’t want a home directory created automatically. Running useradd -D shows you the current defaults applied to any new account — worth checking before you provision at scale.
To change a password:
sudo passwd            # changes the root password
sudo passwd mjohn      # changes a specific user's password
And if you need to repeat that last sudo command without retyping it, sudo !! re-runs the previous command with elevated privileges.
Image suggestion: split-screen graphic showing /etc/passwd and /etc/shadow file structures — alt text: “Diagram comparing /etc/passwd and /etc/shadow file fields” — title: “etc-passwd-shadow-comparison”
Locking, Unlocking, and Removing Accounts
Not every account needs to be deleted outright — sometimes you just need to freeze it:
passwd -l username     # lock the account
usermod -L username    # equivalent lock method
passwd -u username     # unlock the account
usermod -U username    # equivalent unlock method
When an employee leaves or an account is retired for good, userdel removes it — add -r if you also want the home directory deleted:
userdel -r usernameUse chage to control password expiration policy and expiration warnings, and usermod for broader account modifications, like adding a user to a supplementary group:
usermod -aG GroupName UserNameThat -a flag matters more than people realize — without it, usermod -G overwrites all of a user’s existing group memberships instead of appending to them.
Managing Groups
Groups let you assign permissions to a collection of users instead of managing each account individually — a much saner approach once you’re past a handful of accounts.
- View group data directly in
/etc/group - Create a group:
groupadd [options] groupname(use-gto set a specific GID,-fto force) - Modify a group:
groupmod(rename it or change its GID) - Delete a group:
groupdel groupname
Auditing Users and Groups
A few commands you’ll reach for constantly during troubleshooting or audits:
w/who— see who’s currently logged in and what they’re doinglast— review login/logout history (genuinely useful for forensic investigations)whoami— confirm your current effective useridorid username— display UID and GID information for the current or specified user
Key Configuration Files Worth Knowing
/etc/profile— environment configuration applied to all users at login (things likePATH)/etc/bashrc— Bash-specific customizations for interactive sessions (aliases, functions)/etc/skel— a template directory whose contents get copied into every new user’s home folder
Permissions and Ownership: The Core Model
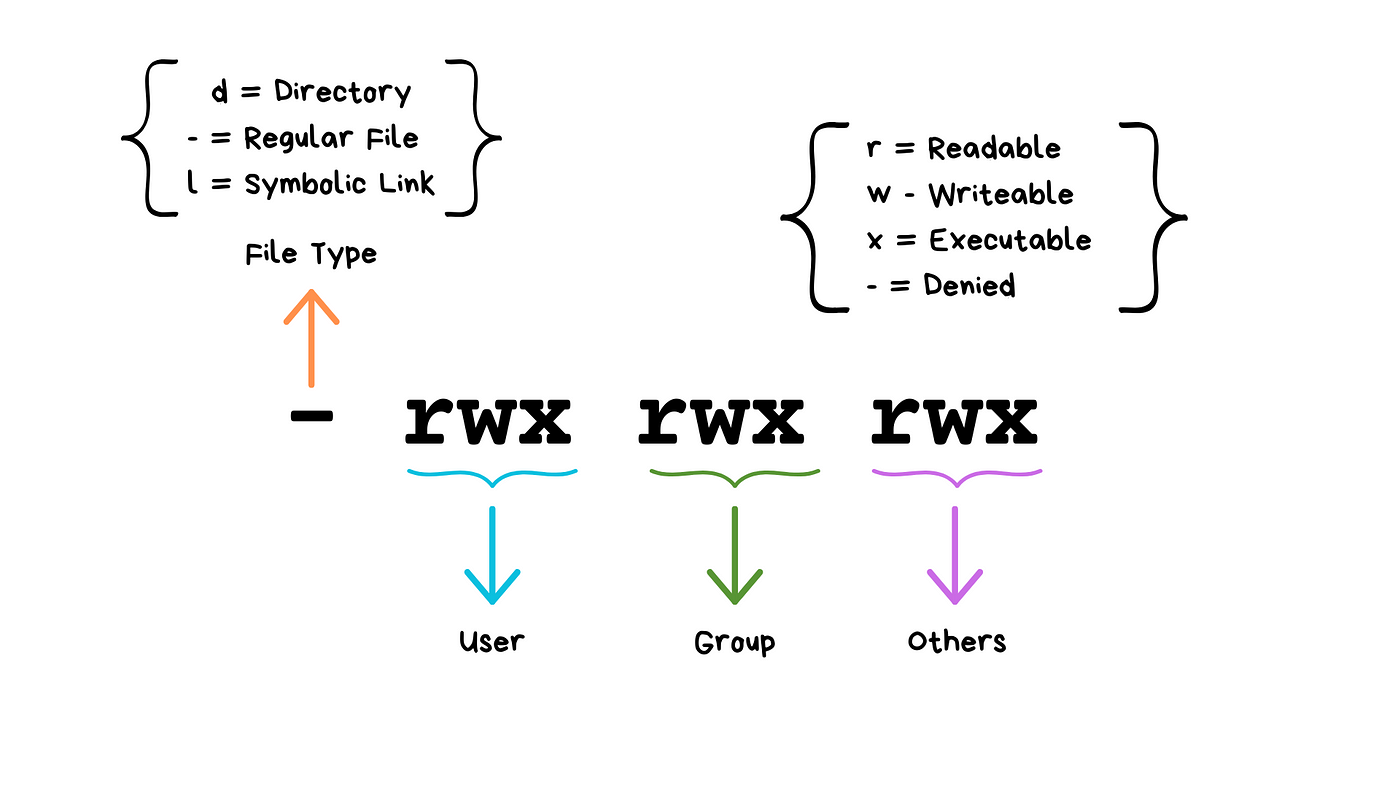
Linux permissions boil down to three actions — read, write, execute — applied across three contexts: owner (u), group (g), and others (o).
| Permission | Symbol | Numeric Value |
|---|---|---|
| Read | r | 4 |
| Write | w | 2 |
| Execute | x | 1 |
| Full control | rwx | 7 |
Run ls -al in any directory and you’ll see this model in action on the left-hand column of the output.
Using chmod
chmod changes permissions using either symbolic (+, -, =) or numeric notation:
chmod u+r file.txt      # grant read to the owner
chmod g-w file.txt      # remove write from the group
chmod o+x script.sh     # grant execute to others
chmod 766 script.py     # numeric equivalent: rwxrw-rw-
chmod -R 755 /var/www   # recursive change across a directory tree
That -R flag is powerful and dangerous in equal measure — double-check your target path before running a recursive chmod, especially as root.
Setting Sane Defaults with umask
New files default to 666 (read/write for everyone) and new directories to 777 before your umask value subtracts permissions. Common umask values:
umask 022   # files become 644, directories become 755
umask 027   # files become 640, directories become 750
umask 077   # files become 600, directories become 700 — private by default
To make a umask setting persistent across logins rather than resetting every session, add it to .bash_profile:
export PATH
umask 027
Changing Ownership with chown and chgrp
chown mjohn myfile.txt          # change owner
chown mjohn:IT myfile.txt       # change owner and group
chown :IT myfile.txt            # change only the group
chown -R mjohn /srv/app         # recursive ownership change
Image suggestion: infographic showing rwx permission triplet broken down by owner/group/other — alt text: “Linux permission triplet diagram for owner group and others” — title: “linux-rwx-permission-breakdown”
Advanced Permission Controls
Basic read/write/execute isn’t always enough. Linux offers several special-purpose controls for edge cases:
SUID and SGID
Setting the SUID bit lets a program run with the privileges of its file owner rather than the user who launched it — useful for tools that need elevated rights to do one specific job. SGID does the same for group ownership, and is especially handy on shared directories where you want every new file to inherit the parent directory’s group automatically.
chmod u+s /path/to/file    # set SUID
chmod g+s /path/to/dir     # set SGID
Treat SUID binaries as a standing audit item — an unnecessary or outdated SUID root binary is a textbook privilege-escalation target.
The Sticky Bit
Set on a directory, the sticky bit restricts file deletion to the file’s owner or the superuser — even if other users technically have write access to the directory. /tmp is the classic example.
chmod +t /shared/directorySecurity researchers have flagged this specifically: a directory that’s missing an expected sticky bit is a known privilege-escalation path, not just a cosmetic misconfiguration. If you’re auditing a server that’s had incidents in the past, checking sticky bits on world-writable directories belongs on your checklist alongside <cite index=”21-1″>reviewing lsattr flags for evidence of prior root-level tampering</cite>.
The Immutable Flag
For files that should resist changes even from root or the file’s own owner, Linux offers the immutable attribute:
chattr +i /etc/important-config-file
lsattr /etc/important-config-file   # verify the flag is set
Access Control Lists (ACLs)
When the standard owner/group/other model isn’t granular enough — say, you need a specific department to have read access to a folder they don’t own — ACLs fill the gap.
setfacl -R -m g:MarketingDept:r /Graphics
setfacl -m u:mjohn:r /home/directory
setfacl -x u:mjohn /home/directory
getfacl script.txt| Flag | Function |
|---|---|
-R | Apply recursively |
-s | Replace the entire existing ACL |
-m | Modify (add to) the existing ACL |
-x | Remove a specific ACL entry |
-b | Strip all ACL entries |
-k | Remove default ACL entries |
One important gotcha: an ACL entry can silently override what a plain ls -l output implies about a file’s access — always run getfacl when a permission issue doesn’t make sense at first glance.
Why This Actually Matters for Security
This isn’t purely academic. Threat intelligence teams tracking 2026 activity have repeatedly linked permission and privilege mistakes to real intrusions. Cloud security researchers note that <cite index=”17-1″>a large share of major cloud breaches trace back to misconfiguration — open storage, overly permissive access rules, and exposed credentials</cite> rather than sophisticated exploits. And kernel-level flaws only make sloppy permission hygiene worse: unpatched vulnerabilities compound the risk when local accounts already have more access than they need, since a foothold that shouldn’t exist becomes the launchpad for kernel-level privilege escalation.
The practical lesson: patch your kernel, yes — but also treat every SUID binary, every wide-open umask, and every account sitting in the wheel or sudo group as something to review on a schedule, not something to configure once and forget.
A Simple Troubleshooting Model
When something’s not working — or when you’re auditing a system you didn’t build — walk through this sequence:
- Confirm ownership and permissions with
ls -al - Verify the user actually has the access they need for the task
- Check for unexpected or excessive permissions granted in the past
- Remove immutable flags if they’re blocking a legitimate change
- Confirm whether SUID is appropriate for any executable that needs elevated rights
- Apply the sticky bit on shared, world-writable directories
- Review group membership for accounts that no longer need it
- Use
lidandgetentto cross-check group membership at scale
Frequently Asked Questions
What’s the difference between /etc/passwd and /etc/shadow? /etc/passwd stores general account metadata and is world-readable. /etc/shadow stores the actual password hashes and is restricted to root, which is why passwords were split into a separate file in the first place.
Do I need SUID if sudo already exists? Usually no. sudo gives you logging, granular rules, and easy revocation. SUID binaries should be reserved for specific tools that genuinely need to run with elevated rights regardless of who invokes them, and every one should be periodically reviewed.
Is chmod 777 ever a good idea? Almost never in production. It grants full read, write, and execute rights to everyone on the system, which is precisely the kind of misconfiguration attackers look for.
What’s a fast way to check if an account has too much access? Run id username to see group memberships, then check /etc/sudoers (or sudo -l -U username) for any standing sudo rights that weren’t intentionally granted.
Conclusion
Linux’s access control system — user accounts, groups, and layered permissions — is deceptively simple to learn and easy to get subtly wrong. The commands themselves (useradd, chmod, chown, setfacl) aren’t hard to memorize. The discipline is in applying least privilege consistently: locking accounts that should be locked, keeping umask values tight, auditing SUID binaries, and never treating a one-time chmod -R 777 as a harmless shortcut.
Get this foundation right, and you’ve closed off one of the most common paths attackers use to move from “got a shell” to “got root.” Get it wrong, and no amount of kernel patching will fully compensate.
Want more articles and tutorials like this?
Get new tutorials, security alerts, and IT tips straight to your inbox.
That’s a really important reminder – it’s so easy to overlook those fundamental details when setting up permissions.
indeed, thanks for the comment