How to Build a Hands-On Lab: Running Proxmox on Hyper-V — From First Boot to Production-Ready Virtualization
Proxmox Virtual Environment has become the go-to open-source hypervisor for teams leaving VMware. But installing the ISO is only the beginning. This guide walks you through the real-world tasks every administrator faces: configuring nested virtualization, managing guests, building software-defined networks, clustering for high availability, and designing a backup strategy that actually protects your data.
Table of Contents
- Getting Proxmox Ready
- Essential Post-Install Configuration
- Managing Virtual Machines and Containers
- Networking That Actually Works
- Building Resilient Infrastructure
- Backup Strategy That Saves Your Job
- Shared Storage with NFS
- Running Media Workloads
- Conclusion
Getting Proxmox Ready
Installing on Bare Metal vs Nested Virtualization
Most administrators install Proxmox directly on server hardware. However, many homelab users and developers prefer running Proxmox as a virtual machine first. This lets you test configurations without dedicating physical hardware.
If you choose the nested route, you must expose virtualization extensions to the guest. Without this step, Proxmox cannot launch KVM virtual machines inside the VM.
On a Hyper-V host, run this PowerShell command against your Proxmox VM:
Set-VMProcessor -VMName "Proxmox02" -ExposeVirtualizationExtensions $trueAfter you apply this setting, shut down and restart the Proxmox VM. Once it boots, verify that KVM acceleration is active by running:
kvm-okIf the output confirms KVM acceleration, your nested environment is ready.
Dynamic DNS with No-IP
Most residential and small-business connections use dynamic public IP addresses. To maintain reliable remote access, you need a Dynamic DNS (DDNS) service. No-IP offers a free tier that pairs well with Proxmox.
Install the No-IP update client on your Proxmox host:
apt update && apt install noip-duc -yThen configure it with your credentials and domain:
noip-duc -g yourdomain.ddns.net -u your-username -p your-passwordAdd this command to your /etc/crontab or create a systemd service if you want the DDNS client to run continuously after reboots.
Essential Post-Install Configuration
Installing the QEMU Guest Agent
The QEMU Guest Agent creates a communication channel between the Proxmox host and the guest operating system. With this agent running, Proxmox can gracefully shut down VMs, freeze filesystems during snapshots for consistent backups, and display the guest IP address in the web interface.
On Debian or Ubuntu guests, install and enable the agent:
apt update
apt install qemu-guest-agent -y
systemctl enable --now qemu-guest-agent
After installation, open the Proxmox web interface, select the VM, navigate to Hardware, and enable the QEMU Guest Agent option. Restart the VM to apply the change.
For Windows guests, mount the VirtIO driver ISO, install the vioserial driver through Device Manager, then run the qemu-ga-x86_64.msi installer from the ISO.
Keeping VMs Updated with Cockpit
Cockpit provides a clean web-based dashboard for managing individual Linux VMs. It complements Proxmox nicely because it gives guest-level visibility without requiring you to log in to each machine separately.
Install Cockpit on any Debian-based guest:
sudo apt update
sudo apt install cockpit -y
sudo systemctl enable --now cockpit.socket
After installation, browse to https://<vm-ip>:9090 and log in with your system credentials. From there, you can apply updates, inspect logs, and manage services without leaving your browser.
Managing Virtual Machines and Containers
Day-to-Day Operations with qm and pct
Proxmox provides two primary command-line tools for guest management: qm for virtual machines and pct for LXC containers. Learning these commands saves time when the web interface feels slow or when you need to script repetitive tasks.
List all VMs and check the status of a specific guest:
qm list
qm status 100
Start, stop, or restart a VM:
qm start 100
qm stop 100
qm reboot 100
For containers, use the pct equivalent:
pct list
pct start 200
pct stop 200
These commands also work inside scripts and Ansible playbooks, making them essential for automation.
Expanding Disks on the Fly
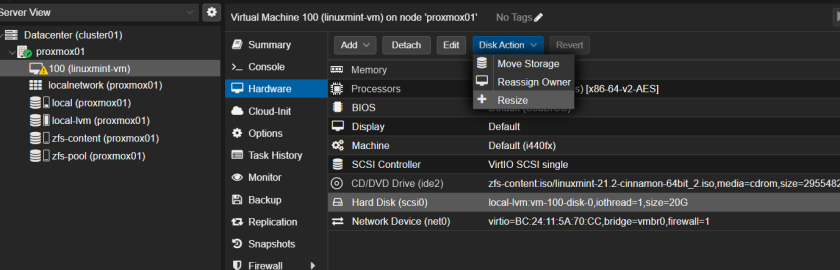
Running out of disk space inside a VM happens to everyone. If your VM uses LVM inside the guest, you can expand the virtual disk from Proxmox and then resize the logical volumes without downtime.
First, increase the virtual disk size through the Proxmox web interface. Then, inside the VM, rescan the partition table and resize the LVM structure:
cfdisk
# Select the free space and choose Resize, then Write and Quit

partprobe
pvresize /dev/sda3
lvextend -l +100%FREE /dev/ubuntu-vg/ubuntu-lv
resize2fs /dev/ubuntu-vg/ubuntu-lv
df -h
This sequence extends the physical volume, grows the logical volume, and resizes the filesystem to match. Always take a snapshot before modifying disk partitions.
Networking That Actually Works
Building Isolated Networks with SDN and NAT
Proxmox includes a Software-Defined Networking (SDN) module that lets you create isolated virtual networks without touching physical switches. This is ideal for lab environments, multi-tenant setups, or simply separating your management traffic from guest traffic.
To build a NAT network with automatic DHCP, first install the required packages:
apt install dnsmasq -y
systemctl disable --now dnsmasq.service
Then, in the Proxmox web interface:
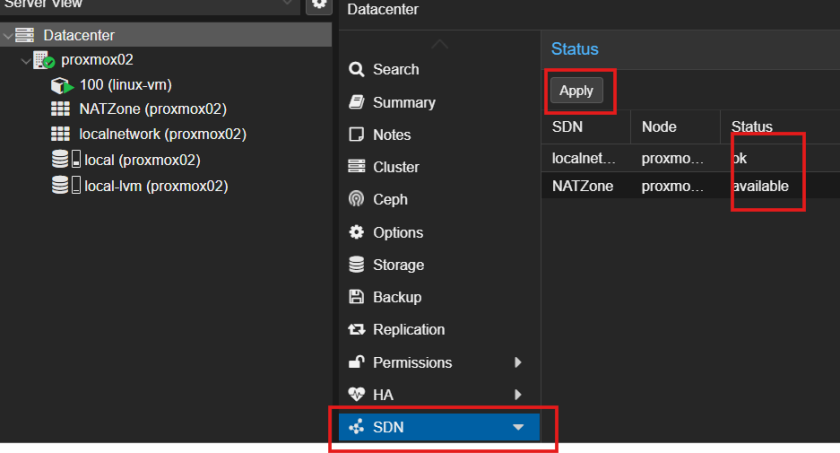
- Go to Datacenter > SDN > Zones and add a Simple zone. Name it
NATZone. - Go to VNets, create a VNet called
NATNet, and attach it toNATZone. - Select
NATNet, create a subnet such as10.10.10.0/24, set the gateway to10.10.10.1, and enable SNAT. - Click Apply on the SDN overview page.
Finally, attach a new network device to your VM or container and select the NATNet bridge. The guest will receive an IP address via DHCP and can reach the internet through NAT.
Port Forwarding for External Access
By default, SDN NAT only allows outbound connections. If you want to expose a service such as a web server or Plex to the outside world, you need port forwarding.
For a Linux Bridge-based NAT setup, add these lines to /etc/network/interfaces under your NAT bridge:
post-up iptables -t nat -A PREROUTING -i vmbr0 -p tcp --dport 8080 -j DNAT --to-destination 10.10.10.10:80
post-down iptables -t nat -D PREROUTING -i vmbr0 -p tcp --dport 8080 -j DNAT --to-destination 10.10.10.10:80
Replace vmbr0 with your public-facing bridge, 8080 with your external port, and 10.10.10.10 with your internal VM IP. Restart networking to apply:
systemctl restart networking.serviceBuilding Resilient Infrastructure
Forming Your First Cluster
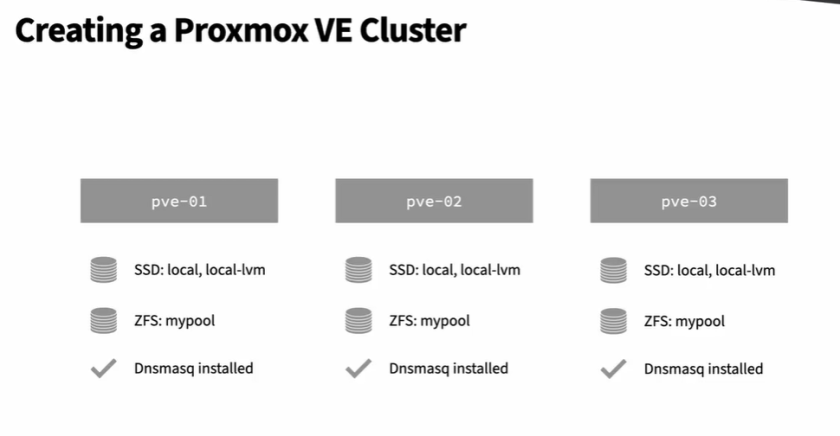
Proxmox clustering lets you manage multiple nodes from a single web interface and enables features like live migration and High Availability. However, Proxmox prevents you from creating a cluster on a node that already hosts VMs. Start with a clean node.
On your first node, create the cluster:
pvecm create my-cluster
pvecm status
On each additional node, join the cluster:
pvecm add <ip-of-first-node>Verify the cluster health:
pvecm nodes
pvecm status
Keep cluster traffic on a dedicated network with latency under 5 milliseconds. Do not share this network with storage traffic or heavy VM migration traffic, because corosync is sensitive to latency spikes.
Adding a QDevice for Two-Node Quorum
A two-node cluster presents a well-known problem: if one node fails, quorum disappears and the cluster stops. A QDevice acts as an external tie-breaker, giving you a third vote without requiring a full Proxmox node.
Set up a lightweight Debian or Ubuntu machine as your QDevice server. Install the required package:
apt install corosync-qnetd -y
systemctl enable --now corosync-qnetd
From one of your Proxmox nodes, connect the QDevice:
pvecm qdevice setup <qdevice-ip>
pvecm status
You should now see Qdevice listed in the votequorum information. If you ever need to remove a node from the cluster, use these commands:
pvecm delnode <node-name>
pvecm expected 1
systemctl stop pve-cluster
pmxcfs -l
rm -f /etc/pve/cluster.conf /etc/pve/corosync.conf
rm /var/lib/pve-cluster/.pmxcfs.lockfile
systemctl start pve-cluster
ZFS Replication vs Backups
ZFS replication offers fast, incremental copies of VM disks between nodes. It works entirely within the cluster and provides a low Recovery Point Objective (RPO), often as low as 15 minutes. However, replication is not a backup. If ransomware encrypts your cluster or someone deletes a VM, the replica disappears too.
Use ZFS replication for High Availability and fast failover. Use Proxmox Backup Server for true backups with retention, encryption, and offsite capability. These two tools complement each other; they do not compete.
To configure replication from the command line:
pvesh create /nodes/pve-01/replication \
  --id 100-0 \
  --target pve-02 \
  --schedule "*/15 * * * *" \
  --type local
Backup Strategy That Saves Your Job
Setting Up Proxmox Backup Server
Proxmox Backup Server (PBS) uses block-level deduplication and incremental transfers to store backups efficiently. A typical deduplication ratio ranges from 2:1 to 10:1 depending on how similar your VMs are.
Install PBS on a dedicated machine or VM. Once installed, create a datastore:
zfs create -o mountpoint=/mnt/datastore/backups rpool/backups
proxmox-backup-manager datastore create local-backups /mnt/datastore/backups
proxmox-backup-manager datastore list
Configure a sensible retention policy:
proxmox-backup-manager datastore update local-backups \
  --keep-last 3 \
  --keep-daily 7 \
  --keep-weekly 4 \
  --keep-monthly 6 \
  --keep-yearly 1
From Proxmox VE, add the PBS server under Datacenter > Storage > Add > Proxmox Backup Server. Copy the TLS fingerprint from the PBS dashboard and paste it into the PVE storage configuration. Always enable client-side encryption; store the AES-256-GCM key in a password manager, because losing it makes your backups unrecoverable.
Schedule daily backups from PVE:
pvesh create /cluster/backup \
  --id daily-backup \
  --schedule "0 2 * * *" \
  --storage pbs-local \
  --mode snapshot \
  --all 1
Backing Up External Linux Hosts
PBS is not limited to Proxmox guests. You can back up physical servers and cloud instances using the proxmox-backup-client.
On an external Debian or Ubuntu machine, add the PBS client repository:
echo "deb http://download.proxmox.com/debian/pbs-client bookworm main" \
  | sudo tee /etc/apt/sources.list.d/pbs-client.list

wget -qO- http://download.proxmox.com/debian/proxmox-release-bookworm.gpg \
  | sudo tee /etc/apt/trusted.gpg.d/proxmox-release-bookworm.gpg > /dev/null

sudo apt update
sudo apt install proxmox-backup-client -y
Run a standard backup:
export PBS_REPOSITORY="backup@pam@192.168.10.40:backup01"
proxmox-backup-client backup root.pxar:/
For encrypted backups, create a key first:
proxmox-backup-client key create my-backup.key
proxmox-backup-client backup root.pxar:/ --keyfile my-backup.key
List available backups:
proxmox-backup-client listMount a backup to inspect files without restoring the entire archive:
proxmox-backup-client mount host/nas/2025-09-07T13:45:04Z root.pxar /mnt/myback/ --keyfile my-backup.keyAutomating and Verifying Restores
A backup you have never restored is a gamble, not a strategy. Automate your backup jobs with cron, but also schedule quarterly restore tests.
Add a cron job for automated backups:
crontab -e
0 2 * * * /usr/bin/proxmox-backup-client backup root.pxar:/ --repository backup@pam@192.168.10.40:backup01
To test a restore, pick a non-critical VM and restore it with a new ID:
qmrestore pbs:backup/vm/100/2026-08-07T02:00:05Z 9100 \
  --storage local-zfs \
  --unique true
Start the restored VM, verify that services respond correctly, and document the restore time. Delete the test VM once you confirm success.
Shared Storage with NFS
Configuring an NFS Server
Network File System (NFS) remains one of the simplest ways to share storage across Proxmox nodes. You can mount an NFS share as Proxmox storage for ISOs, templates, or even VM disks.
On your Debian or Ubuntu NFS server, install the required packages:
sudo apt update
sudo apt install nfs-kernel-server -y
Create and permissions the shared directory:
sudo mkdir -p /srv/nfs_share
sudo chown nobody:nogroup /srv/nfs_share
sudo chmod 777 /srv/nfs_share
Edit /etc/exports to define access:
/srv/nfs_share 192.168.1.0/24(rw,sync,no_subtree_check)Apply the configuration:
sudo exportfs -ra
sudo systemctl restart nfs-kernel-server
Verify the export:
showmount -e localhostFrom Proxmox VE, go to Datacenter > Storage > Add > NFS and point to your server. The share becomes available to all nodes in the cluster immediately.
Running Media Workloads
Hosting Plex on Proxmox
Many administrators use Proxmox to host media servers. Plex runs well inside either a VM or an LXC container. For best performance, allocate at least two CPU cores and 4 GB of RAM. Pass through an Intel iGPU or NVIDIA GPU if you want hardware-accelerated transcoding.
Create a Debian or Ubuntu container, mount your media library from an NFS share or ZFS dataset, and install Plex following the official repository instructions. Keep the Plex container on the same network as your clients, or configure port forwarding if you placed it behind an SDN NAT zone.
Conclusion
Proxmox rewards administrators who take the time to configure it properly. Start with a solid foundation: enable nested virtualization if you need it, install the QEMU Guest Agent on every VM, and build isolated networks with SDN. When you are ready to scale, form a cluster, add a QDevice for quorum safety, and implement ZFS replication for fast failover. Most importantly, treat backups as a separate discipline from replication. Proxmox Backup Server gives you deduplication, encryption, and offsite capability that replication alone cannot provide. Test your restores regularly, document your procedures, and your infrastructure will survive hardware failures, user errors, and worse.
Want more articles and tutorials like this?
Get new tutorials, security alerts, and IT tips straight to your inbox.
That’s a really thorough guide, I’ve been meaning to get into Proxmox. The nested virtualization section seems particularly useful for testing.