How to Configure a DHCP Server with Cisco Switches and Set Up VLANs with Scope IP Addresses
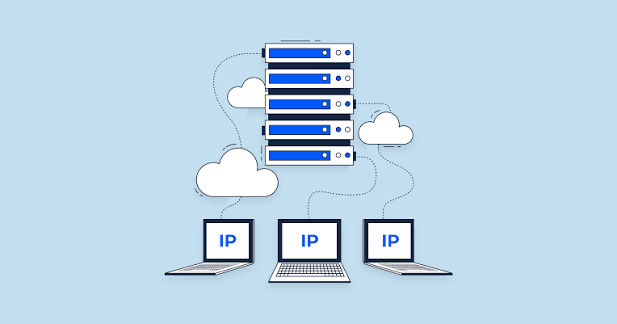
Managing IP addresses by hand in a growing network quickly becomes a headache. This guide walks you through building a centralized DHCP setup using Windows Server and Cisco switches, complete with VLAN segmentation, relay agents, and scoped IP ranges. Whether you run a small office or a multi-site environment, the steps below will help you automate address assignment and keep traffic organized.
In short: You will create VLANs on a Cisco router or switch, point each VLAN to a central Windows DHCP server using the ip helper-address command, and configure separate scopes so that laptops, servers, and switches each receive addresses from the correct pool.
Table of Contents
- Why Centralized DHCP Beats Local Scopes
- How DHCP Relay Works Across VLANs
- Designing Your VLAN and Scope Layout
- Configuring VLANs on Cisco Equipment
- Setting Up the Windows DHCP Server
- Using IP Helper-Address to Bridge VLANs and DHCP
- Understanding Superscopes for Overflow and Failover
- Option Priority: Server, Scope, and Reservation
- Filtering Clients with Allow and Deny Lists
- Configuring DNS Options for Clients
- Troubleshooting Commands You Should Know
- A Full Walkthrough Example
- Best Practices to Keep in Mind
- Conclusion
Why Centralized DHCP Beats Local Scopes
When every VLAN runs its own DHCP service, you end up with scattered configurations, inconsistent lease times, and no single place to check when something breaks. A centralized Windows DHCP server solves this by giving you one console to manage every scope, reservation, and option.
Cisco routers and Layer 3 switches do not hand out addresses themselves in this design. Instead, they act as relay agents. They listen for DHCP broadcasts on each VLAN, package those requests into unicast packets, and forward them to your Windows server. The server then chooses the correct scope based on the source subnet and replies with an appropriate lease.
This setup also makes redundancy easier. With Windows Server’s built-in failover feature, you can pair two DHCP servers so they share lease information. If the primary goes offline, the partner continues assigning addresses without anyone noticing.
How DHCP Relay Works Across VLANs
A client that joins a network does not know where the DHCP server lives. It sends a broadcast discovery packet to 255.255.255.255. By default, routers do not forward broadcasts, so if your DHCP server sits on a different subnet, the discovery packet dies at the VLAN boundary.
The ip helper-address command fixes this. When you configure it on a Cisco VLAN interface, the device intercepts the broadcast, inserts its own VLAN interface IP as the gateway address in the packet, and forwards the request as a unicast message to the DHCP server. The server uses that gateway IP to figure out which scope to use.
For example, if a laptop on VLAN 30 sends a discovery packet and the router interface for VLAN 30 has the address 10.213.13.1, the server sees 10.213.13.1 as the relay agent. It then looks for a scope matching the 10.213.13.0/24 network and offers an address from that pool.
Designing Your VLAN and Scope Layout
Before touching any command line, map out your address plan. A clean layout prevents overlaps and makes future expansion simple. Here is a sample design:
| VLAN | Purpose | Network | Gateway | DHCP Range |
|---|---|---|---|---|
| 10 | Switches / Network Gear | 10.213.16.0/24 | 10.213.16.1 | 10.213.16.10 – 10.213.16.200 |
| 20 | Servers | 192.168.1.0/24 | 192.168.1.1 | 192.168.1.10 – 192.168.1.200 |
| 30 | Laptops / End Users | 10.213.13.0/24 | 10.213.13.1 | 10.213.13.10 – 10.213.13.200 |
Reserve the first ten addresses in each subnet for routers, switches, and statically assigned infrastructure. Keep the DHCP pool in the middle of the range so you have room at the top for future reservations or expansion.
Configuring VLANs on Cisco Equipment
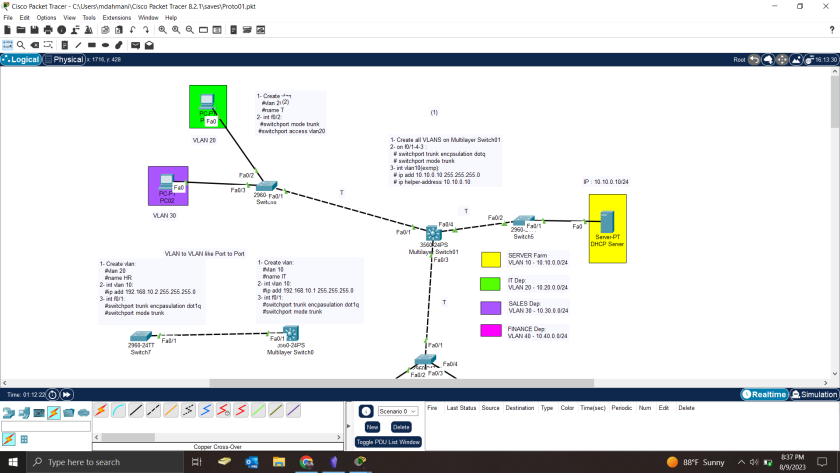
Start by creating the VLANs on your Cisco router or Layer 3 switch. Give each one a descriptive name so the next person who reads the config knows exactly what belongs there.
Router(config)# vlan 10
Router(config-vlan)# name SwitchesScoop
Router(config-vlan)# exit

Router(config)# vlan 20
Router(config-vlan)# name ServersScoop
Router(config-vlan)# exit

Router(config)# vlan 30
Router(config-vlan)# name LaptopsScoop
Router(config-vlan)# exit
Next, create Switched Virtual Interfaces (SVIs) for each VLAN. These interfaces act as the default gateway for devices in that VLAN and also serve as the relay point for DHCP traffic.
Router(config)# interface VLAN10
Router(config-if)# ip address 10.213.16.1 255.255.255.0
Router(config-if)# no shutdown
Router(config-if)# exit

Router(config)# interface VLAN20
Router(config-if)# ip address 192.168.1.1 255.255.255.0
Router(config-if)# no shutdown
Router(config-if)# exit

Router(config)# interface VLAN30
Router(config-if)# ip address 10.213.13.1 255.255.255.0
Router(config-if)# no shutdown
Router(config-if)# exit
If you are using a separate Layer 2 switch, make sure the trunk port between the switch and router carries all three VLANs. Devices connected to access ports will then land in the correct VLAN based on the port configuration.
Setting Up the Windows DHCP Server
Install the DHCP Server role through Server Manager or PowerShell. Once installed, open the DHCP MMC console and authorize the server in Active Directory if your environment requires it.
Create one scope for each VLAN:
- Right-click IPv4 and choose New Scope.
- Enter the scope name (for example,
VLAN10-Switches). - Set the start and end IP addresses based on your plan.
- Add exclusions if you need to reserve specific addresses outside the dynamic pool.
- Set the lease duration. Eight days works well for wired devices; mobile devices often do better with shorter leases.
- Configure the router option (003) so clients receive the correct gateway.
- Activate the scope when prompted.
Repeat this process for every VLAN. The server will now have three separate scopes, each tied to a different subnet.
Using IP Helper-Address to Bridge VLANs and DHCP
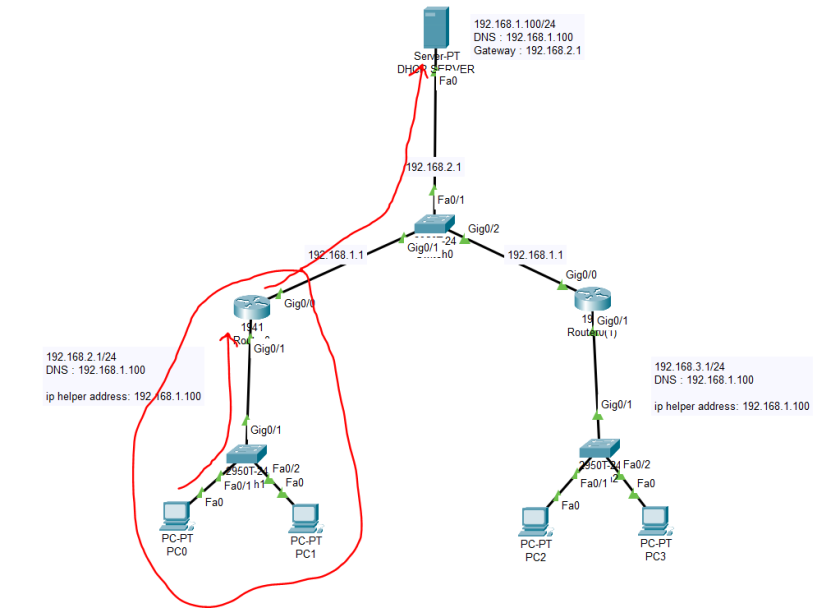
Here is the critical step that ties everything together. Without the helper address, clients in VLAN 10, 20, or 30 will never reach the DHCP server sitting at 192.168.1.150.
Add the helper address to each SVI:
Router(config)# interface VLAN10
Router(config-if)# ip helper-address 192.168.1.150

Router(config)# interface VLAN20
Router(config-if)# ip helper-address 192.168.1.150

Router(config)# interface VLAN30
Router(config-if)# ip helper-address 192.168.1.150
You can list multiple helper addresses if you run two DHCP servers for redundancy. The router forwards the discovery packet to every address in the list. The first server to respond with an offer usually wins, though the client ultimately decides which offer to accept.
If you also want the router to forward other broadcasts such as NetBIOS or TFTP, the helper address command handles those automatically. If you prefer to limit forwarding to DHCP only, you can explicitly define which UDP ports to relay.
Understanding Superscopes for Overflow and Failover
A superscope groups multiple standard scopes under one umbrella. It does not hand out addresses itself; it simply tells the server, “If Scope A is full, you may offer an address from Scope B.”
Imagine VLAN 10 (Switches) runs low on addresses during a hardware refresh. If you place the Switches scope and a backup scope inside a superscope, the server can assign an IP from the backup pool when the primary pool exhausts. The client still receives a valid address, and you gain time to resize the original scope.
To create a superscope in Windows DHCP:
- Right-click IPv4 and choose New Superscope.
- Name it (for example,
NetworkInfrastructure). - Select the member scopes (for example,
VLAN10-SwitchesandVLAN10-Overflow). - Finish the wizard.
Keep in mind that modern Windows Server versions offer true DHCP failover, which often replaces the need for superscopes in redundancy scenarios. Failover replicates lease data between two servers in real time, while a superscope merely expands the available pool on a single server.
Option Priority: Server, Scope, and Reservation
DHCP options control everything from DNS servers to domain names. Windows applies these options in a strict hierarchy. When a client requests a lease, the server looks for options in this order:
- Reservation options — Highest priority. Use these when one device needs unique settings.
- Scope options — Apply to every client within that specific scope.
- Server options — Apply globally unless a scope or reservation overrides them.
For example, if you set DNS servers at the server level but then configure different DNS servers for a specific reservation, the reservation wins. This hierarchy lets you define baseline settings for the entire network while still customizing individual devices.
If you need to push a setting to every scope at once, configure it under Server Options. If the setting applies only to one VLAN, use Scope Options instead.
Filtering Clients with Allow and Deny Lists
Windows DHCP supports MAC address filtering. You can create allow lists so only known devices receive addresses, or deny lists to block unwanted hardware. This works well in high-security environments where rogue devices pose a risk.
Before filtering takes effect, you must enable it:
- Open the DHCP console.
- Right-click IPv4 and choose Properties.
- Go to the Filters tab.
- Enable Allow list or Deny list as needed.
Once enabled, right-click Allow or Deny under the Filters node and add MAC addresses. Remember that MAC filtering only protects against casual connections. A determined user can spoof a MAC address, so pair this feature with switch port security and network access control for stronger protection.
Configuring DNS Options for Clients
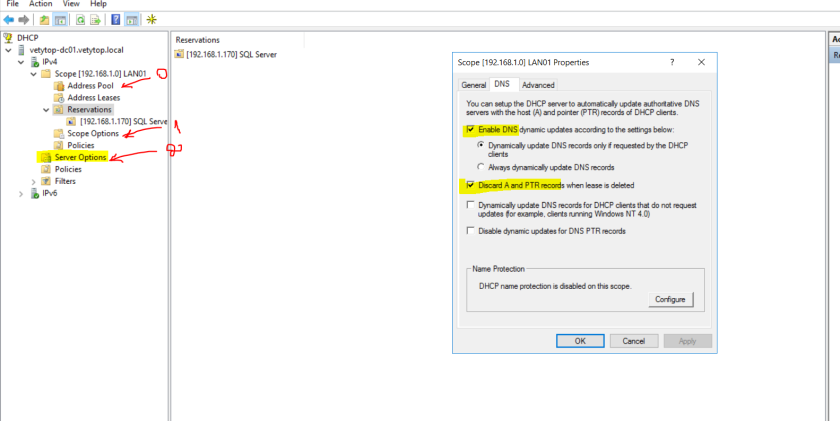
Most networks need clients to register with DNS automatically. In the Windows DHCP console, open the scope properties and navigate to the DNS tab. Enable these two options:
- Dynamically update DNS A and PTR records for DHCP clients that do not request updates
- Discard A and PTR records when lease is deleted
These settings ensure that forward and reverse DNS entries stay current as devices join and leave the network. Without them, you will end up with stale records pointing to old IP addresses, which breaks applications that rely on hostname resolution.
Troubleshooting Commands You Should Know
When a client fails to obtain an IP address, work through these commands on both the client and the infrastructure.
On the Windows client:
ipconfig /allThis shows the current lease, DHCP server, and gateway.
If the address looks wrong or missing, release the old lease:
ipconfig /releaseThen request a fresh one:
ipconfig /renewOn the Cisco device, verify that the helper address exists:
Router# show run interface VLAN10Check that the VLAN interface is up and has an IP:
Router# show ip interface briefConfirm that the router can reach the DHCP server:
Router# ping 192.168.1.150On the Windows DHCP server, review the event logs under Applications and Services Logs > Microsoft > Windows > DHCP-Server for errors about scope exhaustion, authorization failures, or replication issues.
A Full Walkthrough Example
Let us put everything together. A new laptop connects to a switch port assigned to VLAN 30. Here is what happens:
- The laptop powers on and sends a DHCP discover broadcast.
- The switch forwards the broadcast to the router via the trunk link.
- The router interface VLAN30 (
10.213.13.1) receives the broadcast. Becauseip helper-address 192.168.1.150is configured, the router converts the broadcast to a unicast packet and sends it to the DHCP server. - The DHCP server sees the relay agent IP
10.213.13.1, matches it to theVLAN30-Laptopsscope, and picks an available address from10.213.13.10 – 10.213.13.200. - The server sends a DHCP offer back to the router, which forwards it to the laptop.
- The laptop accepts the offer, sends a DHCP request, and receives a DHCP acknowledgment.
- The laptop now has an IP address, knows its gateway is
10.213.13.1, and can reach the rest of the network.
If VLAN 30 ever runs out of addresses and you configured a superscope, the server could offer an address from the backup scope instead. The user would never notice the difference.
Best Practices to Keep in Mind
- Size your scopes generously. A
/24gives 254 usable addresses. If you expect growth, move to a/23early rather than renumbering later. - Exclude infrastructure addresses. Always reserve the first ten to twenty addresses in each subnet for routers, switches, and manually configured servers.
- Use reservations for printers and access points. These devices need stable IPs but benefit from central management.
- Enable DHCP failover on production scopes. A single DHCP server is a single point of failure. Pair two servers in load-balance or hot-standby mode.
- Document your VLAN-to-scope mapping. Keep a spreadsheet or diagram that shows which VLAN serves which department and what IP range it uses.
- Monitor lease utilization. The DHCP console shows percentage used per scope. Set an alert before you hit eighty percent.
- Keep lease times reasonable. Too short and you create unnecessary broadcast traffic; too long and you waste addresses on devices that rarely connect.
Conclusion
Setting up a centralized DHCP server with Cisco VLANs is not complicated once you understand the relay process. You create VLANs on your Cisco gear, assign SVIs with helper addresses, and build matching scopes on Windows Server. The result is a clean, scalable network where every device lands in the right IP pool automatically.
Want more articles and tutorials like this?
Get new tutorials, security alerts, and IT tips straight to your inbox.
That sounds like a really efficient solution for handling IP addresses – I’ve definitely struggled with that as networks grow! It’s great to see how VLANs and scoped IPs can be integrated.