How to Configure RADIUS on Windows Server: A Complete Step-by-Step Guide
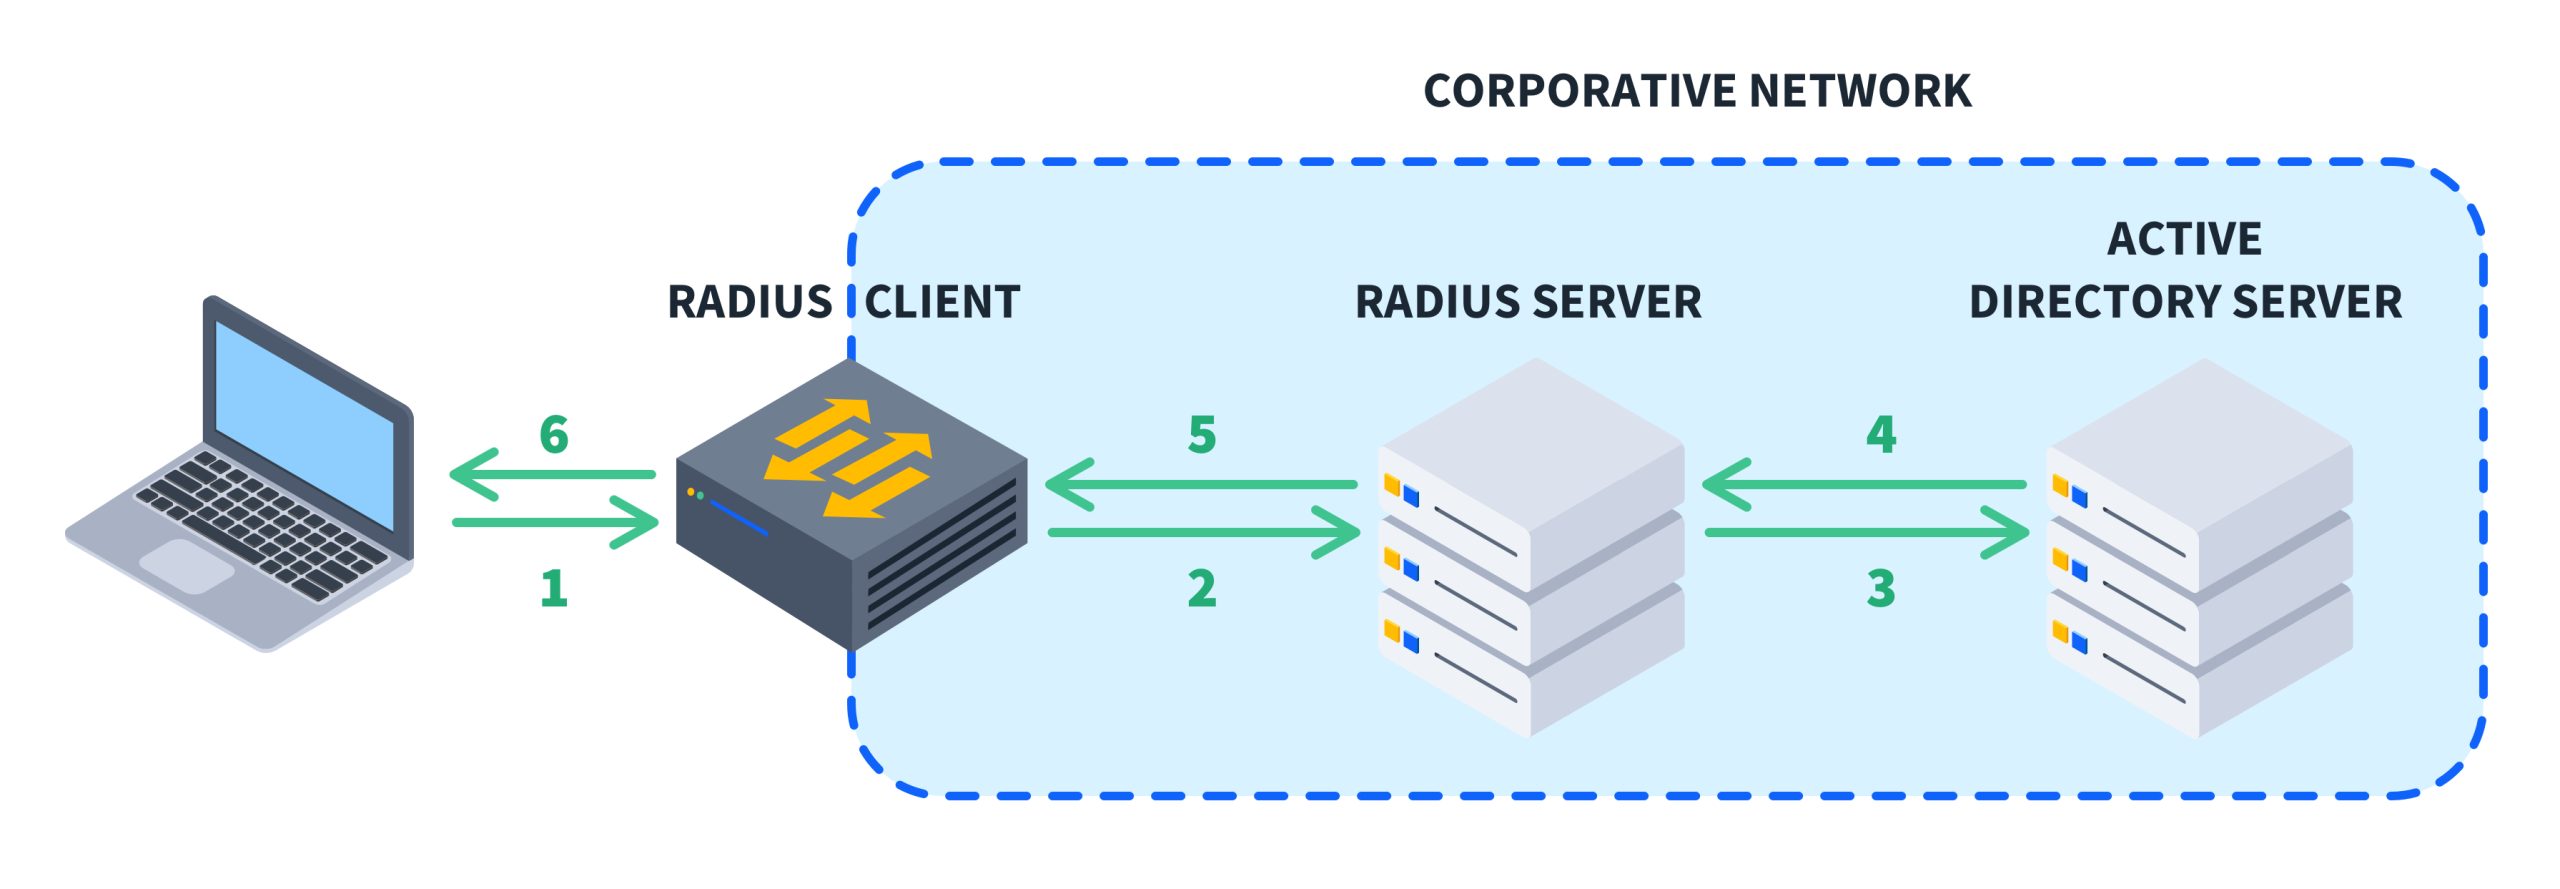
Table of Contents
- What Is NPS and Why Use It as a RADIUS Server?
- Prerequisites Before You Start
- Installing the NPS Role
- Registering NPS in Active Directory
- Creating a Security Group for RADIUS Users
- Adding RADIUS Clients
- Building Network Policies
- Configuring the VPN Server (RRAS) to Use RADIUS
- Wiring Up a Network Switch for RADIUS Authentication
- PowerShell: Automate the Entire NPS Setup
- Security Hardening and Best Practices
- Troubleshooting Common RADIUS Failures
- Conclusion
What Is NPS and Why Use It as a RADIUS Server?
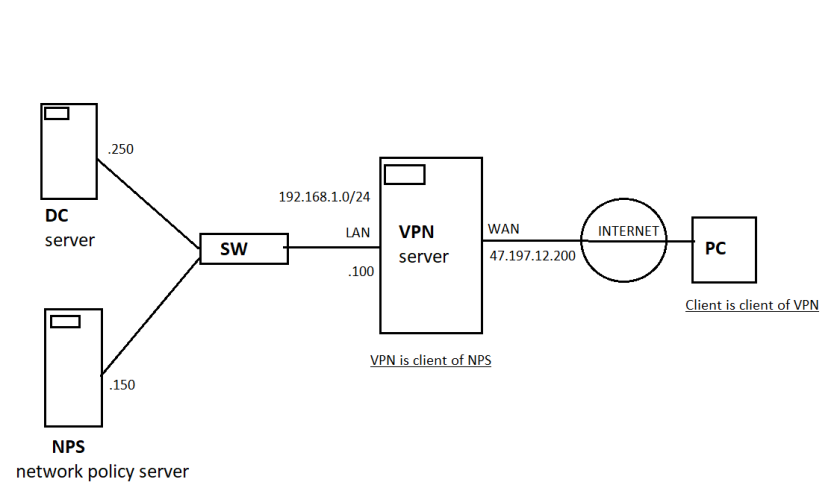
Network Policy Server (NPS) is a Windows Server role that provides Authentication, Authorization, and Accounting (AAA) services using the RADIUS protocol. When a user tries to connect to your network — whether through a VPN tunnel, a corporate Wi-Fi access point, or a managed switch — the access device forwards the login request to NPS. NPS then checks the credentials against Active Directory and applies the rules you have defined.
Without NPS, your Domain Controller only validates passwords. It does not decide who gets network access, when they can connect, or which encryption standards they must use. NPS fills that gap. It acts as a policy enforcement point between your access devices and your identity store.
Microsoft recommends installing NPS on domain controllers in production environments to improve performance, though you can also run it on member servers if you prefer to reduce the attack surface of your DCs.
Prerequisites Before You Start
Before you install anything, confirm the following:
- A Windows Server (2022, 2019, or 2016) with Desktop Experience
- The server is joined to an Active Directory domain
- A static IP address assigned to the NPS server
- Firewall rules allowing UDP ports 1812 (authentication) and 1813 (accounting)
- Devices that support RADIUS (VPN concentrator, wireless controller, or managed switch)
If your NPS server sits behind a firewall, open those ports now. Silent drops on UDP/1812 are the number one reason new RADIUS deployments fail.
Installing the NPS Role
You have two options: Server Manager or PowerShell. PowerShell is faster and repeatable, which matters if you are building multiple NPS nodes.
Option A: Server Manager
- Open Server Manager and click Manage > Add Roles and Features.
- Click Next until you reach the Server Roles page.
- Check Network Policy and Access Services.
- Click Add Features when prompted.
- On the Role Services page, select Network Policy Server.
- Complete the wizard and reboot if required.
Option B: PowerShell
# Install the NPS role
Install-WindowsFeature -Name NPAS -IncludeManagementTools

# Verify the installation
Get-WindowsFeature -Name NPAS
The IncludeManagementTools switch installs the NPS console snap-in so you can manage the server locally or remotely.
Registering NPS in Active Directory
NPS needs permission to read user and group information from Active Directory. You grant that permission by registering the server.
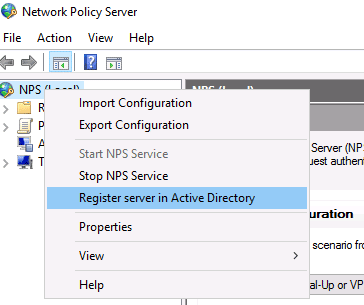
Using the NPS Console
- Open Server Manager > Tools > Network Policy Server.
- Right-click NPS (Local) in the console tree.
- Select Register server in Active Directory.
- Click OK to confirm.
Using the Command Line
# Register the NPS server in Active Directory
netsh nps add registeredserver
Verify the Registration
On your Domain Controller, open Active Directory Users and Computers, navigate to Users > RAS and IAS Servers, and confirm your NPS server appears as a member. If it does not appear, the registration failed and NPS cannot authenticate anyone.
Creating a Security Group for RADIUS Users
Do not grant VPN or network access to individual user accounts. Instead, create a dedicated security group and add authorized users to it. This keeps your policies clean and scalable.
- On your Domain Controller, open Active Directory Users and Computers.
- Right-click the Users container and choose New > Group.
- Name the group (for example,
VPN-Authorized-Users). - Set the group scope to Global and the type to Security.
- Add the users who need remote or RADIUS-based network access.
You will reference this group later when you build your network policy.
Enable Dial-In Access for Users
For each user in the group, open their account properties, go to the Dial-in tab, and set Network Access Permission to Control access through NPS Network Policy. This hands control over to your NPS rules rather than a static allow/deny flag on the account.
Adding RADIUS Clients
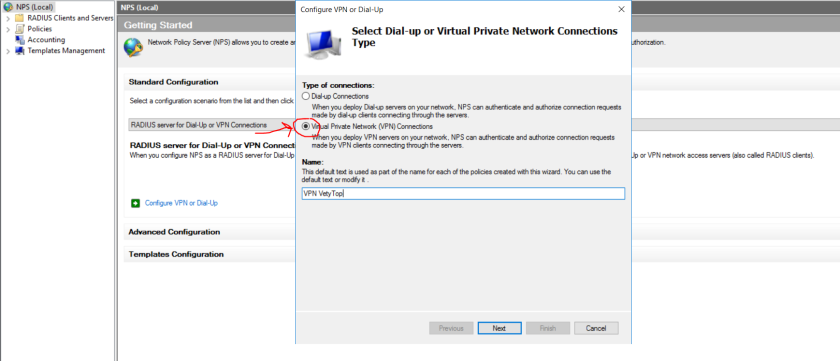
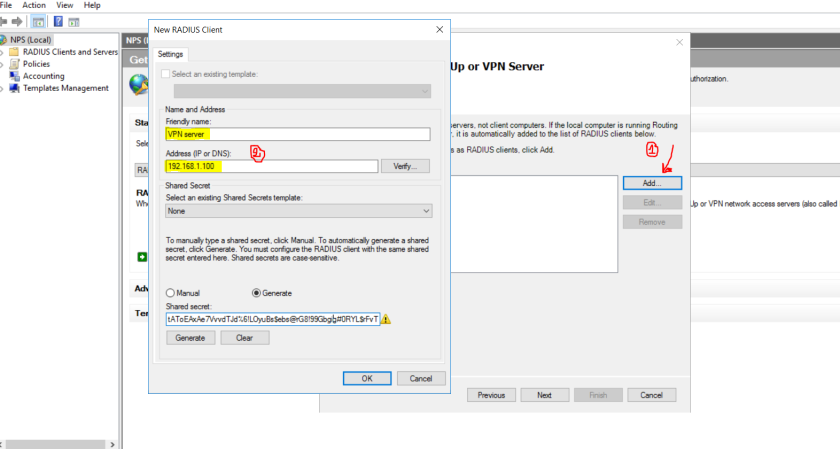
A RADIUS client is any device that forwards authentication requests to NPS. This could be a VPN server, a wireless access point, a Cisco switch, or a firewall.
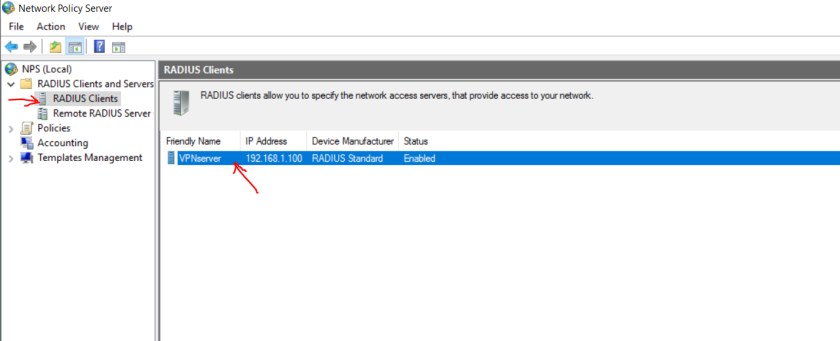
- In the NPS console, expand RADIUS Clients and Servers.
- Right-click RADIUS Clients and select New.
- Enter a Friendly name (for example,
Corp-VPN-Server). - Enter the IP address of the device. This must be the address from which the device sends RADIUS requests.
- Create a Shared secret. This password must match exactly on both NPS and the client device. Use a strong, random string — at least 16 characters.
PowerShell Alternative
# Add a new RADIUS client
New-NpsRadiusClient -Name "Corp-VPN-Server" -Address "10.10.10.50" -SharedSecret "YourStrongSharedSecret123!" -VendorName "RADIUS Standard"
Vendor Selection
On the Advanced tab of the RADIUS client properties, select the vendor that matches your device. Choose RADIUS Standard for Windows-based clients or VPN servers, or select Cisco if you are connecting a Cisco router or switch. The vendor setting tells NPS how to format certain attribute exchanges.
Building Network Policies
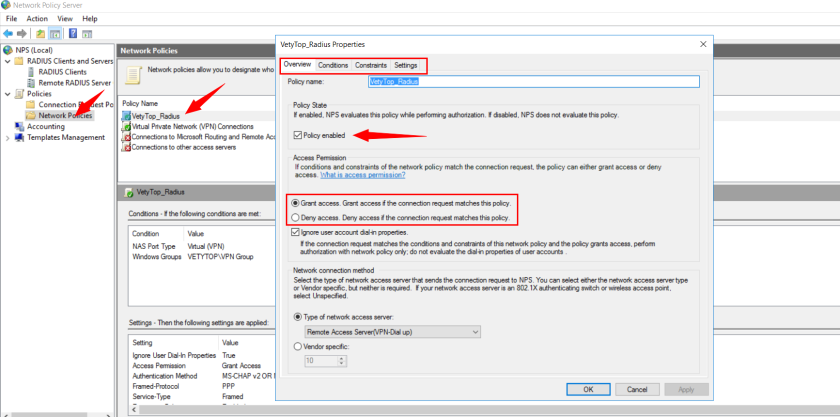
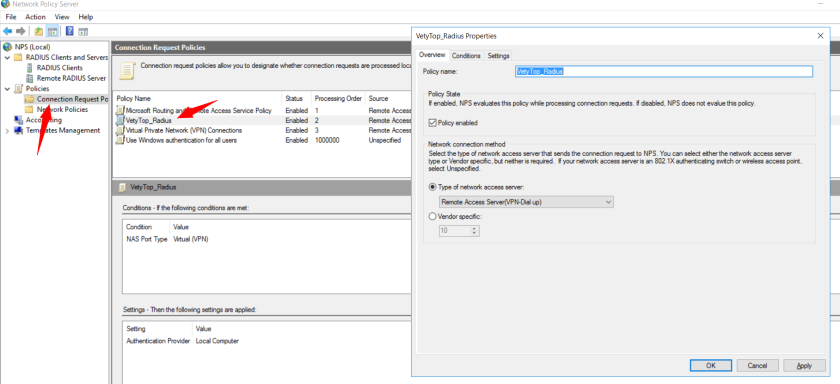
Network policies are the heart of NPS. They define who can connect, how they must authenticate, and what constraints apply.
Create a New Network Policy
- In the NPS console, expand Policies and right-click Network Policies.
- Select New.
- Name the policy (for example,
Allow-VPN-Access). - Leave Type of network access server set to Unspecified.
- Click Next.
Define Conditions
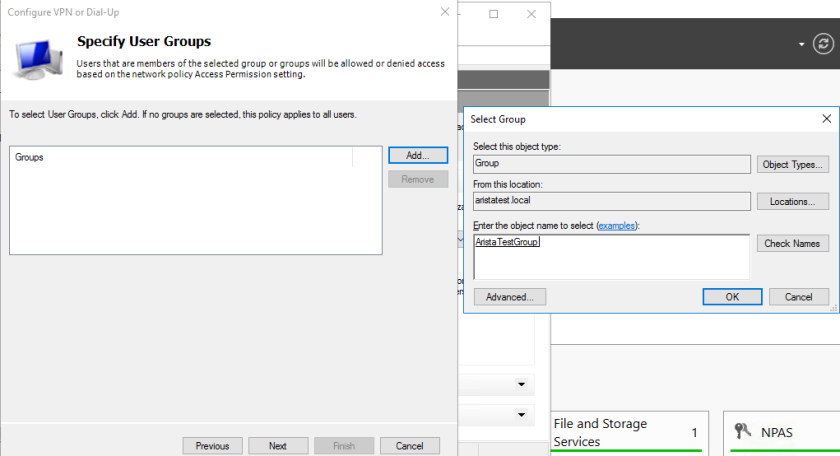
- Click Add and select Windows Groups.
- Add the security group you created earlier (for example,
VPN-Authorized-Users). - Click Next.
Set Access Permission
Choose Access granted and click Next.
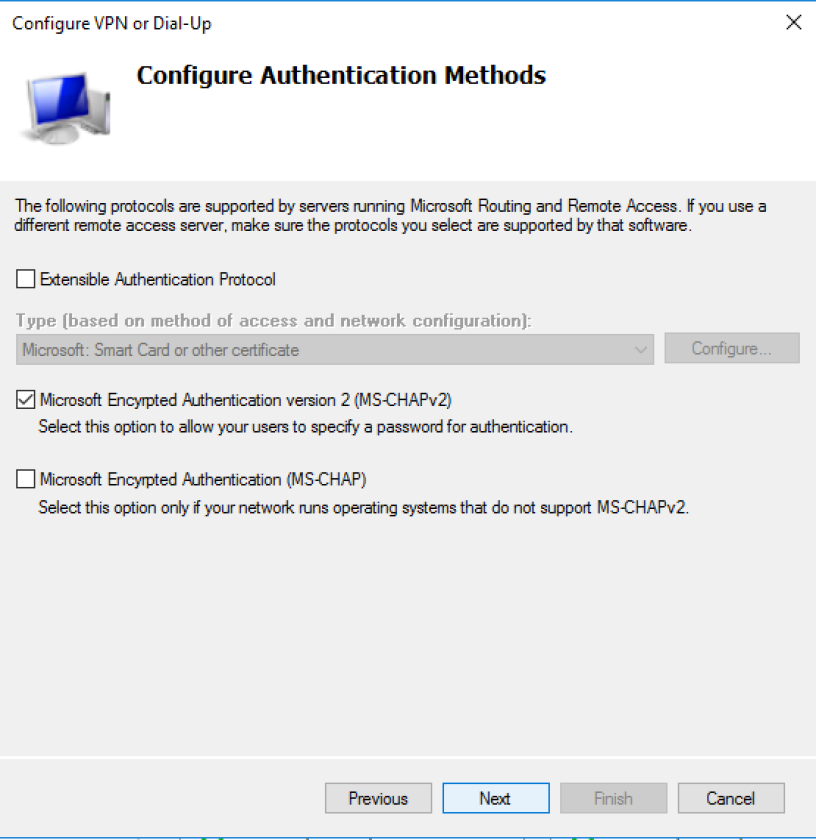
Configure Authentication Methods
Select the methods your environment supports:
- Microsoft: Secured Password (EAP-MSCHAP v2) — Best for VPN and wireless
- Microsoft Challenge-Handshake Authentication Protocol (MS-CHAP v2) — Widely compatible
- Encrypted Authentication (CHAP) — For legacy devices
- Unencrypted Authentication (PAP, SPAP) — Only if absolutely required
For most modern VPN deployments, EAP-MSCHAP v2 strikes the right balance between security and compatibility.
Configure Constraints
On the Constraints tab, you can enforce:
- Idle timeout — Disconnect inactive sessions
- Session timeout — Hard limit on connection duration
- Encryption levels — Require strong or strongest encryption only
Configure Settings
On the Settings tab, under RADIUS Attributes > Standard, you can add a Class attribute that returns a group name to the access device. This is useful if your firewall or switch needs to assign users to specific VLANs or permission levels based on the RADIUS response.
Click Finish to save the policy. Make sure the policy appears in the list and shows as Enabled.
Configuring the VPN Server (RRAS) to Use RADIUS
If you are using Routing and Remote Access Service (RRAS) as your VPN server, you need to point it at your NPS server for authentication.
During Initial RRAS Setup
- Open Server Manager > Tools > Routing and Remote Access.
- Right-click your server and select Configure and Enable Routing and Remote Access.
- Choose Custom configuration, then check VPN access and NAT.
- When the wizard asks for authentication, select RADIUS authentication.
- Enter the IP address of your NPS server and the shared secret you configured earlier.
Changing an Existing RRAS Configuration
- In the RRAS console, right-click your server and select Properties.
- Go to the Security tab.
- Under Authentication provider, select RADIUS Authentication.
- Click Configure and add your NPS server IP and shared secret.
Restart the RRAS service after making changes:
Restart-Service RemoteAccessWiring Up a Network Switch for RADIUS Authentication
NPS does not only handle VPNs. You can also use it to authenticate administrators logging into managed switches. Here is a Cisco-style configuration you can adapt for your hardware.
Basic AAA Configuration
! Set the RADIUS shared secret
SW01(config)# radius-server key 0 YourStrongSharedSecret123!

! Point the switch to your NPS server
SW01(config)# radius-server host 10.10.10.20

! Use RADIUS for login authentication, fall back to local if RADIUS is unreachable
SW01(config)# aaa authentication login default group radius local

! Keep console access local-only for emergency recovery
SW01(config)# aaa authentication login console local

! Use RADIUS for exec authorization
SW01(config)# aaa authorization exec default group radius local

! Define the source interface for RADIUS packets
SW01(config)# ip radius source-interface Management1
Accounting Configuration
Accounting logs who did what and when. This is essential for compliance and forensic investigations.
! Log exec sessions
SW01(config)# aaa accounting exec default start-stop group radius

! Log system-level events
SW01(config)# aaa accounting system default start-stop group radius

! Log all command usage
SW01(config)# aaa accounting commands all default start-stop group radius
Verification Commands
After you save the configuration, test it:
! Verify RADIUS server reachability and statistics
SW01# show radius

! Check authenticated sessions
SW01# show users detail
If show radius shows timeouts or authentication failures, check that UDP ports 1812 and 1813 are open between the switch and NPS, and that the shared secret matches exactly.
PowerShell: Automate the Entire NPS Setup
If you deploy NPS regularly — for example, in a multi-site environment — scripting the configuration saves hours and eliminates human error.
# 1. Install the NPS role
Install-WindowsFeature -Name NPAS -IncludeManagementTools

# 2. Register the server in Active Directory
netsh nps add registeredserver

# 3. Add a RADIUS client (VPN server)
New-NpsRadiusClient -Name "VPN-Gateway-01" -Address "10.10.10.50" -SharedSecret "SuperSecretKey2026!" -VendorName "RADIUS Standard"

# 4. Create a network policy for VPN users
$condition = New-Object -TypeName System.Collections.ArrayList
$windowsGroupCondition = New-Object -TypeName Microsoft.Management.Infrastructure.CimInstance -ArgumentList "MSFT_NpsConditionWindowsGroup", "root/StandardCimv2/MSFT_Nps"
$windowsGroupCondition.WindowsGroup = "CONTOSO\VPN-Authorized-Users"
$condition.Add($windowsGroupCondition)

# Note: The exact cmdlet syntax for New-NpsNetworkPolicy varies by PowerShell version.
# For detailed policy creation, use the NPS console or the netsh nps commands below.

# 5. Export the NPS configuration for backup
netsh nps export filename="C:\NPS-Backup.xml" exportPSK=YES

# 6. Import the configuration on a secondary NPS server
netsh nps import filename="C:\NPS-Backup.xml"
The exportPSK=YES switch includes shared secrets in the backup. Store that file in a secure location — anyone with access to it has the keys to your network.
Security Hardening and Best Practices
A poorly configured RADIUS server is a tempting target. Follow these rules to keep yours secure.
Use Strong Shared Secrets
Shared secrets are the weakest link in many RADIUS deployments. Generate them with at least 20 random characters, and rotate them annually. Never reuse the same secret across multiple clients.
Deploy Server Certificates for EAP
MS-CHAP v2 is acceptable for basic setups, but certificate-based EAP-TLS offers far stronger security. Issue a server certificate to your NPS server from your internal Certificate Authority, and configure clients to validate it during connection. This prevents man-in-the-middle attacks where an attacker impersonates your RADIUS server.
Enable NPS Auditing
Turn on detailed auditing so you can spot brute-force attempts or misconfigured clients early:
auditpol /set /subcategory:"Network Policy Server" /success:enable /failure:enableRestrict RADIUS Ports at the Firewall
Only allow UDP 1812 and 1813 from known RADIUS client IP addresses. Do not expose these ports to the internet or to general-purpose VLANs.
Run NPS on Multiple Domain Controllers
For high availability, install NPS on at least two domain controllers. Configure your access devices with primary and secondary RADIUS server entries. If the primary goes offline, authentication fails over automatically.
Review Logs Weekly
NPS writes accounting logs to:
C:\Windows\System32\LogFiles\These files follow the naming pattern IN####.log where the numbers represent year and month. Review them for repeated failed authentication attempts from the same IP or user account.
Troubleshooting Common RADIUS Failures
Even experienced administrators hit snags. Here is a diagnostic playbook for the failures you are most likely to see.
Symptom: Event ID 13 — Invalid RADIUS Client IP
NPS logs Event ID 13 when it receives a request from an IP address that is not in its RADIUS Clients list. Verify the source IP on your access device matches the address configured in NPS. NAT and multiple network interfaces often cause mismatches here.
Symptom: Event ID 18 — Invalid Message Authenticator
This event means the shared secret on the client does not match the shared secret on NPS. Shared secrets are case-sensitive. Copy and paste them rather than retyping, and watch for trailing spaces.
Symptom: Event ID 6273, Reason Code 16 — Access Denied
Reason code 16 usually means the username or password is wrong, but it can also mean the user is not in the Windows Group referenced by your network policy. Double-check the group membership and the dial-in settings on the user account.
Symptom: Event ID 6273, Reason Code 65 — Network Access Permission Denied
This happens when a user’s Dial-in tab in Active Directory is set to Deny access. Change it to Control access through NPS Network Policy so your network policy takes precedence.
Symptom: No Response from NPS at All
- Check Windows Firewall on the NPS server:
Get-NetFirewallRule -DisplayGroup "Network Policy Server" | Where-Object { $_.DisplayName -like "*RADIUS*" }- If the rules look correct but traffic still drops, reset the service SID type and reboot:
sc sidtype IAS unrestricted- Verify basic connectivity with a simple ping from the RADIUS client to the NPS server.
Symptom: Authentication Works, But Accounting Does Not
Accounting uses UDP port 1813. Confirm your access device sends accounting packets to the same NPS server, and check that accounting is enabled in the NPS console under Accounting > Change Log File Properties.
Conclusion
Configuring RADIUS on Windows Server through NPS gives you a centralized, domain-integrated authentication platform without the cost of third-party software. You have learned how to install the role, register it in Active Directory, define RADIUS clients, build network policies, connect VPN and switch infrastructure, automate the setup with PowerShell, and troubleshoot the most common failures.
The key to a reliable RADIUS deployment is consistency: use security groups instead of individual accounts, document your shared secrets in a password vault, enable auditing from day one, and always configure a secondary NPS server for redundancy.
Want more articles and tutorials like this?
Get new tutorials, security alerts, and IT tips straight to your inbox.
That’s a really thorough guide, I appreciate the inclusion of PowerShell automation – it’s definitely saving me some time!