How to Configure SSH Tunneling in Linux: A Practical Guide to Secure Port Forwarding
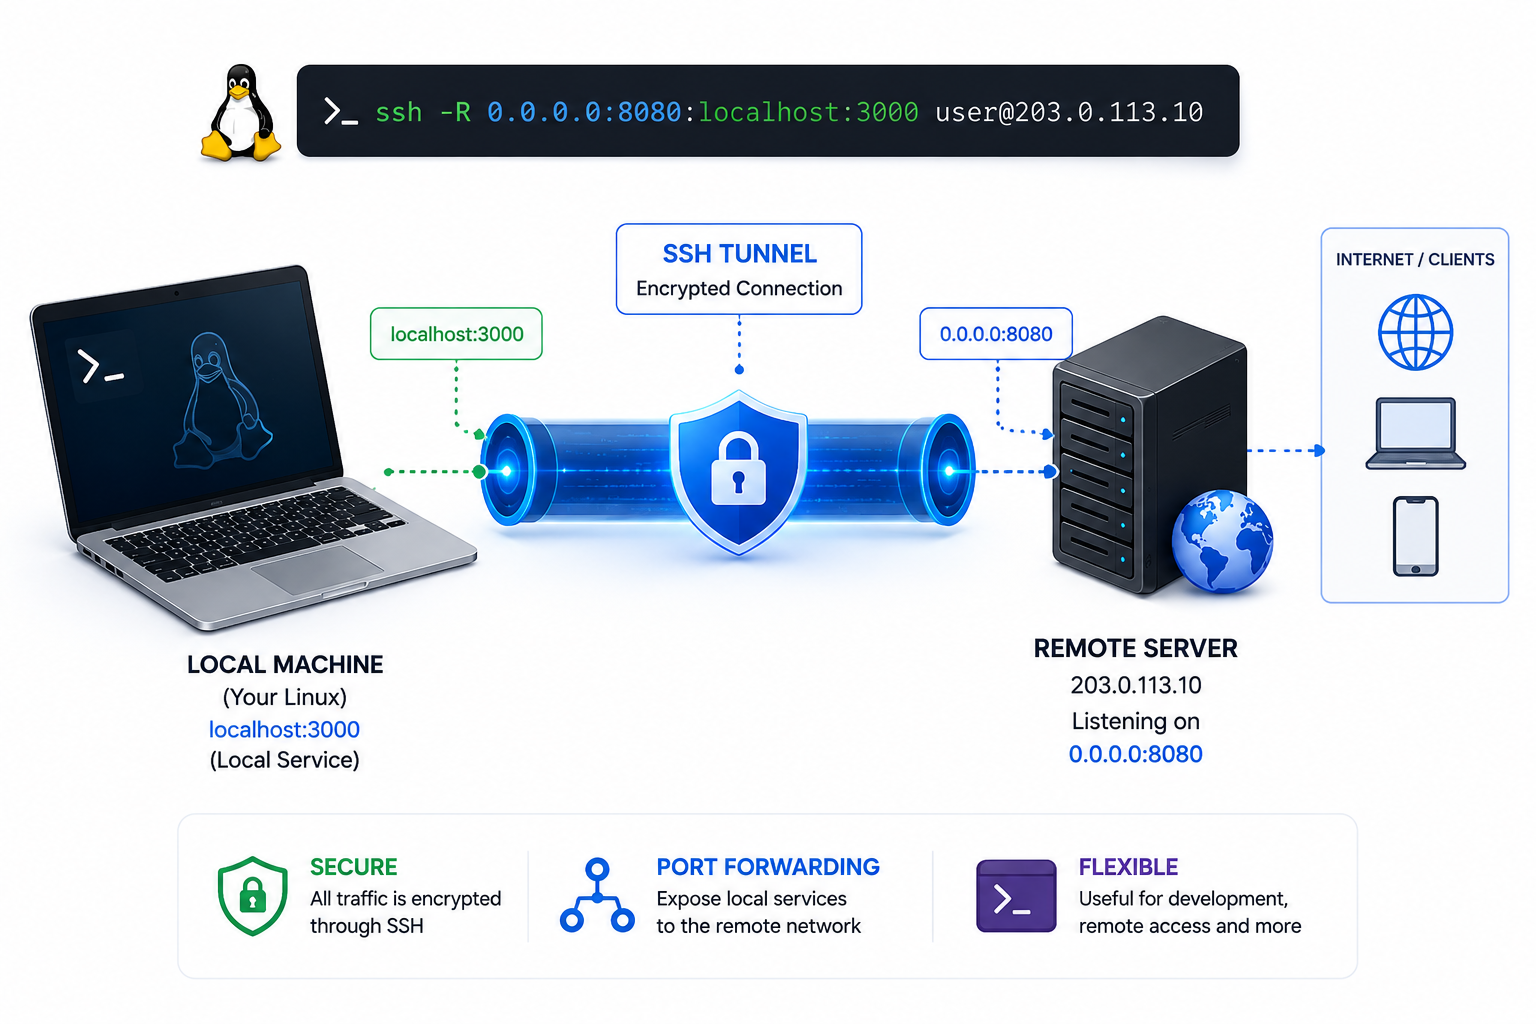
SSH tunneling opens an encrypted path through untrusted networks, letting you reach remote services safely. Many admins know the basics, but few use the full toolkit. This guide breaks down local, remote, and dynamic forwarding with real commands you can run today.
Table of Contents
- What Is SSH Tunneling?
- The Three Types at a Glance
- Why Admins Rely on SSH Tunnels
- Prepare Your SSH Server
- Local Port Forwarding
- Remote Port Forwarding
- Dynamic Port Forwarding (SOCKS Proxy)
- Keep Tunnels Alive with autossh
- Security Best Practices
- Troubleshoot Common Tunnel Problems
- Conclusion
What Is SSH Tunneling?
Think of SSH tunneling as a secure pipe inside your existing SSH connection. Normally, SSH encrypts your terminal session. Tunneling takes that same encrypted channel and sends other traffic through it. The result is a private bridge between two points across a public network.
You do not need extra VPN software. You do not need complex certificates. If you have SSH access to a server, you can tunnel traffic through it. This works for web traffic, database queries, API calls, and almost any TCP-based service.
A simple analogy helps. Imagine you are mailing a postcard through a locked courier box. Anyone can see the postcard if you send it normally. Tunneling puts the postcard inside a locked box, and only the courier and the recipient have the key.
The Three Types at a Glance
SSH tunneling comes in three flavors. Each one solves a different direction problem.
Table
| Type | Direction | Best For | Command Flag |
|---|---|---|---|
| Local | Client → Server → Target | Accessing internal services | -L |
| Remote | Client ← Server ← External | Exposing local services publicly | -R |
| Dynamic | Client ↔ Server (any target) | Browsing multiple services securely | -D |
Local forwarding is the most common. Remote forwarding is the reverse. Dynamic forwarding is the most flexible because it creates a SOCKS proxy that handles many destinations at once.
Why Admins Rely on SSH Tunnels
Teams use SSH tunnels because they are fast, lightweight, and require no new infrastructure.
First, tunnels bypass firewalls. If a database sits inside a private subnet with no public IP, an SSH tunnel lets you query it from your laptop. Second, tunnels encrypt legacy protocols. An old HTTP admin panel becomes safe when it travels through SSH. Third, tunnels are temporary. You can open one for a support session and close it when the work finishes.
Developers also love tunnels for local testing. You can expose a dev server on your laptop to a public URL through a remote tunnel. You can also browse securely through a SOCKS proxy on public Wi-Fi.
Prepare Your SSH Server
Before you create tunnels, harden the server that will carry them. Open /etc/ssh/sshd_config with your favorite editor.
AllowTcpForwarding controls who can build tunnels. Set it to yes to allow all forwarding, local to allow only local forwarding, remote to allow only remote forwarding, or no to block everything. Most distros default to yes, but you should confirm this.
GatewayPorts decides who can reach remote-forwarded ports. The default no binds them to localhost on the server. Set it to yes if you want anyone on the internet to reach the forwarded port. Use clientspecified if you want the client to pick a specific IP address.
PermitRootLogin should usually be set to no or prohibit-password. Root access over SSH is risky. Create a standard user and add them to the sudo group instead.
After you save the file, restart the SSH service:
sudo systemctl restart ssh.serviceYou can also create per-user rules. Block tunneling for most accounts but allow it for the admins group:
Match Group admins
    AllowTcpForwarding yes
Local Port Forwarding
Local port forwarding is the most common type. It lets you reach a service inside a remote network from your local machine. The SSH client listens on a local port and forwards traffic through the SSH server to the final destination.
Consider this setup:
- Web server:
192.168.10.100running a service on port80 - SSH server:
192.168.7.20 - Your client machine:
192.168.7.10
You cannot reach the web server directly, but you can SSH into 192.168.7.20. Run this command from your client:
ssh root@192.168.7.20 -p 22 -L 1234:192.168.10.100:80 -NHere is what each flag does:
-L 1234:192.168.10.100:80forwards local port1234to192.168.10.100:80through the server.-Nstops SSH from opening a remote shell. The connection only handles forwarding.-p 22sets the SSH port. Omit this if the server uses the default.
Now open your browser and visit http://localhost:1234. Your traffic travels through the encrypted tunnel to the SSH server, which then passes it to the web server.
Run the Tunnel in the Background
If you want the tunnel to keep running while you use the terminal, add the -f flag:
ssh -f -N -L 1234:192.168.10.100:80 root@192.168.7.20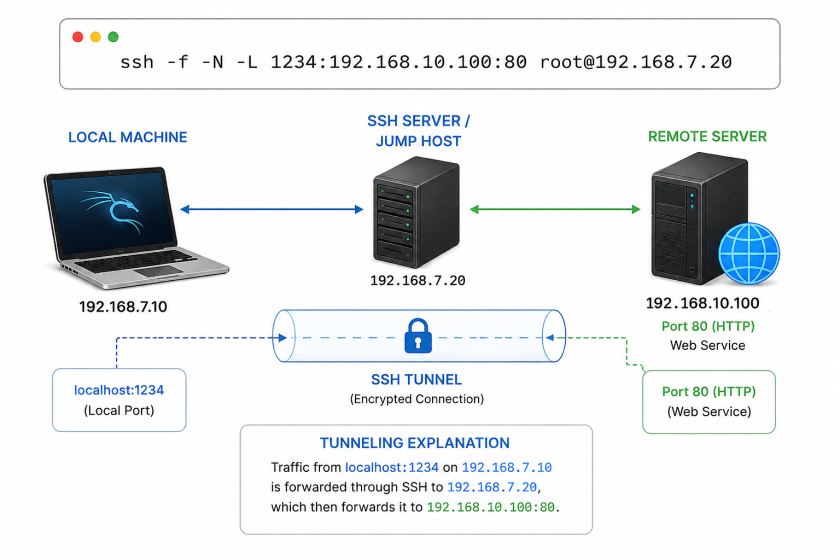
The -f flag sends SSH to the background after authentication. You can close the terminal and the tunnel stays active.
Connect with SSH Keys Instead of Passwords
You can also build tunnels without typing a password each time. First, generate a key pair on your local machine:
ssh-keygen -t ed25519 -C "tunnel-key"Copy the public key to the SSH server with ssh-copy-id:
ssh-copy-id -i ~/.ssh/id_ed25519.pub root@192.168.7.20Then connect using the private key:
ssh -i ~/.ssh/id_ed25519 root@192.168.170.2 -L 1000:127.0.0.1:1000 -NThis command forwards port 1000 on your local machine to port 1000 on the remote server. Using keys is safer than passwords and works great for scripts or autossh.
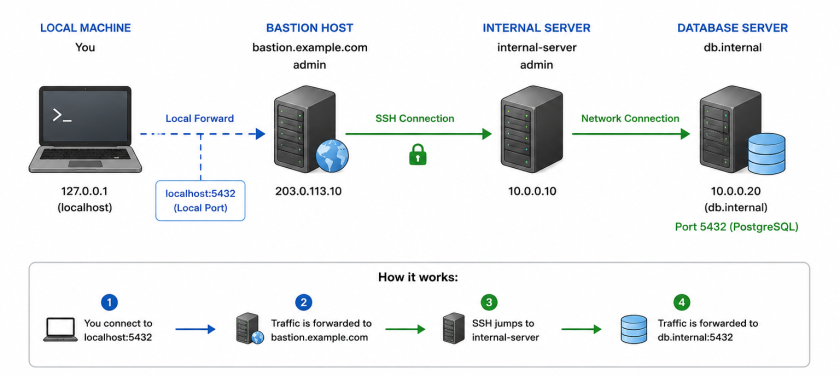
Jump Through Multiple Hosts
Sometimes the SSH server is not the final hop. You can chain tunnels with ProxyJump. Imagine you must first reach a bastion host, then the internal server:
ssh -J admin@bastion.example.com -L 5432:db.internal:5432 admin@internal-serverThis creates the tunnel through the bastion in one command. It is cleaner than nesting multiple SSH sessions.
Remote Port Forwarding
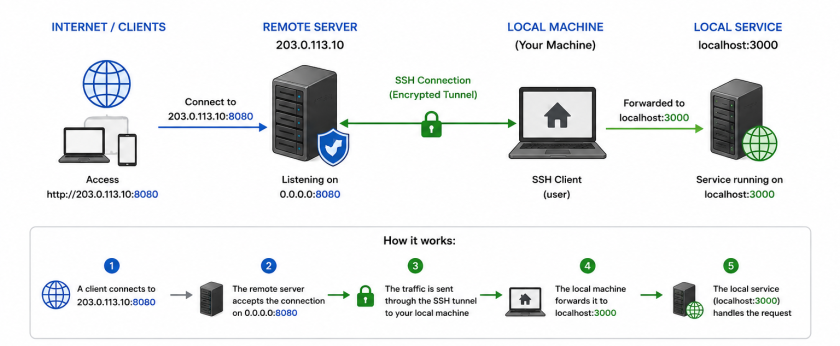
Remote port forwarding does the opposite. It exposes a service running on your local machine to the remote SSH server. This is often called a reverse tunnel.
Imagine you are building a webhook handler on your laptop at localhost:3000. A payment provider needs to send callbacks to a public URL, but your laptop sits behind NAT and has no public IP. You can forward a port on a public SSH server back to your laptop.
First, ensure the SSH server allows remote forwarding. Set GatewayPorts to clientspecified or yes in /etc/ssh/sshd_config, then restart the service.
From your laptop, run:
ssh -R 0.0.0.0:8080:localhost:3000 user@203.0.113.10Now the payment provider can send webhooks to http://203.0.113.10:8080. The SSH server receives the traffic and pushes it back through the tunnel to your laptop.
Persistent Reverse Tunnels with autossh
For a reverse tunnel that survives network drops, use autossh:
autossh -M 0 -fN \
  -o "ServerAliveInterval=30" \
  -o "ServerAliveCountMax=3" \
  -R 0.0.0.0:9000:localhost:22 \
  user@public-server.com
This keeps a tunnel open so you can SSH back into your laptop from the public server anytime.
Dynamic Port Forwarding (SOCKS Proxy)
Dynamic port forwarding turns your SSH client into a local SOCKS proxy. Instead of forwarding one specific port, you can route many types of traffic through the tunnel. This is perfect for browsing multiple internal web apps or securing all traffic on a public Wi-Fi network.
Start the proxy with this command:
ssh -D 127.0.0.1:1080 -C -N user@ssh-serverThe -D flag creates the SOCKS proxy on port 1080. The -C flag enables compression. The -N flag skips the remote shell.
Configure your browser to use SOCKS5 at 127.0.0.1:1080. In Firefox, open Settings, search for Network, and click Settings. Choose Manual proxy configuration, leave HTTP and SSL empty, set SOCKS Host to 127.0.0.1, port to 1080, and select SOCKS v5.
All browser traffic now routes through the SSH server. You can also test it from the terminal:
curl --socks5 localhost:1080 http://ifconfig.meThe output should show the SSH server’s public IP, not your local one.
Route Any App Through the Proxy
Setting a proxy for every app is tedious. Install proxychains to force any command through the tunnel:
sudo apt install proxychains4Edit /etc/proxychains4.conf and add this line at the bottom:
[ProxyList]
socks5  127.0.0.1  1080
Now prefix any command with proxychains:
proxychains curl http://ifconfig.me
proxychains git clone https://github.com/user/repo.git
This works for APT updates too. Remove any existing proxy config in /etc/apt/apt.conf.d/ first, then run:
sudo proxychains apt updateAlternative: tsocks
If you prefer a lighter tool, install tsocks:
sudo apt install tsocksEdit /etc/tsocks.conf:
server = 127.0.0.1
server_type = 5
server_port = 1080
Now prefix commands with tsocks:
tsocks curl http://ifconfig.meKeep Tunnels Alive with autossh
Standard SSH tunnels die when the network hiccups. For production use, install autossh. It watches the connection and restarts it automatically.
Install it on Debian or Ubuntu:
sudo apt install autosshRun a persistent local forward:
autossh -M 0 -fN \
  -o "ServerAliveInterval=30" \
  -o "ServerAliveCountMax=3" \
  -L 5432:db.internal:5432 \
  user@203.0.113.10
The -M 0 flag disables autossh’s built-in monitoring and uses SSH’s own keep-alive. The -f flag sends the process to the background.
Run autossh as a systemd Service
For a tunnel that survives reboots, create a systemd service. Save this file to /etc/systemd/system/ssh-tunnel-db.service:
[Unit]
Description=SSH Tunnel to Database
After=network.target
StartLimitIntervalSec=0

[Service]
User=tunnel-user
ExecStart=/usr/bin/autossh -M 0 -4 -N \
    -o "ServerAliveInterval=30" \
    -o "ServerAliveCountMax=3" \
    -o "ExitOnForwardFailure=yes" \
    -i /home/tunnel-user/.ssh/tunnel_key \
    -L 127.0.0.1:5432:db.internal:5432 \
    tunnel@203.0.113.10
Restart=always
RestartSec=10

[Install]
WantedBy=multi-user.target
Reload systemd, enable the service, and start it:
sudo systemctl daemon-reload
sudo systemctl enable ssh-tunnel-db
sudo systemctl start ssh-tunnel-db
Check the status anytime with sudo systemctl status ssh-tunnel-db.
Security Best Practices
Tunnels are powerful, so treat them with care. Follow these rules to keep your setup safe.
Always use key-based authentication. Generate an Ed25519 key for the best balance of speed and security:
ssh-keygen -t ed25519 -C "your-email@example.com"Disable root login over SSH. Set PermitRootLogin no in sshd_config. Create a standard user and use sudo for admin tasks.
Restrict forwarding by user. Not everyone needs tunnel access. Use a Match block in sshd_config to allow forwarding only for specific groups.
Create dedicated keys for tunneling. On the server, add restrictions to ~/.ssh/authorized_keys:
no-pty,no-X11-forwarding,permitopen="localhost:5432" ssh-ed25519 AAAAC3...Lock down the firewall. On Ubuntu, allow SSH only from trusted IPs:
sudo ufw default deny incoming
sudo ufw allow from 203.0.113.5 to any port 22
sudo ufw enable
Monitor active tunnels regularly. List listening ports tied to SSH:
sudo ss -tlnp | grep sshCheck logs for unusual activity. On systemd distros, run:
sudo journalctl -u ssh -fOn older systems, tail the auth log:
sudo tail -f /var/log/auth.logConsider installing Fail2Ban to block brute-force attempts automatically.
Troubleshoot Common Tunnel Problems
When a tunnel fails, check these items first.
If you see “Connection refused,” verify the target service is running and listening on the correct port. Use ss -tlnp on the remote host to confirm.
If the tunnel times out, check that the SSH server allows forwarding. Look at AllowTcpForwarding in /etc/ssh/sshd_config. Also check local and remote firewalls. ufw or firewalld might block the port.
If the tunnel starts but you cannot reach the service, confirm GatewayPorts is set correctly for remote forwards. For local forwards, make sure you used localhost or 127.0.0.1 on the correct side.
If authentication fails, check file permissions. ~/.ssh should be 700, and authorized_keys should be 600.
If the tunnel drops randomly, the network may be unstable. Switch to autossh or add keep-alive settings to your SSH config:
Host *
    ServerAliveInterval 30
    ServerAliveCountMax 3
Conclusion
SSH tunneling gives you a flexible, encrypted way to move traffic across networks. You can reach hidden services with local forwarding, expose dev builds with remote forwarding, and secure your browsing with a dynamic SOCKS proxy. Pair your tunnels with autossh for uptime and lock down your server with keys, user limits, and proper logging. With these tools, you can handle almost any network access challenge without deploying a full VPN.
Want more articles and tutorials like this?
Get new tutorials, security alerts, and IT tips straight to your inbox.