How to Manage Storage on Linux: A Practical Guide to Partitions, LVM, and Disk Health

Every Linux system administrator eventually hits the same wall: a disk fills up, a volume needs to grow overnight, or a mystery process is hammering I/O and nobody knows why. Storage management isn’t the flashiest part of running a Linux box, but it’s one of the areas where a small mistake — a botched partition table, a missed fstab entry — can cost you hours of downtime or, worse, data. This guide walks through the full lifecycle of Linux storage: partitioning a raw disk, formatting it, mounting it permanently (including encrypted volumes), scaling space with LVM, protecting critical directories, applying user quotas, and diagnosing performance problems when things slow down. Whether you’re setting up your first VPS or maintaining a fleet of production servers, this is the reference you’ll want bookmarked.
Understanding Partition Tables — MBR vs GPT
Before you touch a single command, you need to decide how the disk itself will be organized. Linux supports two partition table formats, and the one you choose determines how large your partitions can be and how many you can create.
MBR (Master Boot Record) is the older standard. It caps individual partitions at 2TB and limits you to four primary partitions — one of which needs to hold your operating system. For small drives or legacy systems, MBR still works fine.
GPT (GUID Partition Table) is the modern replacement. It supports partitions up to 256TB, allows up to 128 primary partitions, and does away with the primary/extended distinction entirely. Unless you have a specific compatibility reason to stick with MBR, GPT is the sensible default for anything built today.
One concept that trips up newcomers is swap space — a dedicated partition (or file) that Linux uses as overflow when physical RAM runs low. The kernel pushes unused pages out of RAM into swap to free up memory, though heavy, sustained reliance on swap is usually a sign you need more RAM, not more swap.
The /dev/ Directory and Discovery Commands
Every storage device on a Linux system — physical disks, partitions, virtual drives — is represented as a file inside /dev/. Before you can manage storage, you need to be able to see what’s actually attached to the machine. A handful of commands cover almost every discovery scenario:
lsblk— lists all block devices and their partitions in a tree viewsudo parted /dev/sda1 print— shows a partition’s size and filesystem typesudo e2label /dev/sda1 DataBackup— assigns a human-readable label to a partitionlsblk -f— shows filesystem types and labels alongside the device treedf -h— displays disk usage as a percentage, in human-readable unitssudo apt install ncdu— installs a genuinely excellent interactive tool for visualizing which directories are eating your disk space before it hits 100%
ncdu in particular deserves a permanent spot in your toolbox. Running df -h tells you a filesystem is 90% full; ncdu tells you why, letting you drill into directories interactively instead of guessing with du -sh */.
The Storage Setup Process, Step by Step
Once you know what device you’re working with, setting it up for use follows a consistent four-step process:
- Partition the device using
fdiskorparted - Format the partition with a filesystem using
mkfs - Register the partition in
/etc/fstabso it mounts automatically on boot - Refresh the kernel’s view of the partition table with
sudo partprobe
Creating Partitions with fdisk
fdisk remains the workhorse utility for creating, modifying, or deleting partitions interactively:
fdisk /dev/sdb
Command (m for help): g      # create a new empty GPT partition table
Command (m for help): n      # create a new partition
Command (m for help): p      # list existing partitions
When prompted for partition size, you can accept the full disk by default, or specify an exact size (for example, typing +5G at the “Last sector” prompt to carve out a 5GB partition).
Creating Partitions with parted
parted offers similar functionality with a slightly different interface, and it’s often preferred for scripting because it accepts non-interactive commands. Running parted /dev/sdb followed by help shows the full command set.
Whichever tool you use, always run sudo partprobe afterward. This tells the running kernel about your partition table changes without requiring a reboot — a step that’s easy to forget and leads to confusing “partition doesn’t exist” errors.
Formatting with mkfs
The mkfs command builds an actual filesystem on top of your new partition:
mkfs.ext4 /dev/sdb1The filesystem type you choose matters more than it might seem:
| Filesystem | Best for |
|---|---|
| ext4 | The most common default on Linux; solid, well-tested, good general-purpose choice |
| XFS | High-performance workloads, large file servers, VM hosts |
| Btrfs | Snapshots, checksumming, built-in compression, RAID-like multi-device setups |
| NTFS | Interoperability with Windows systems |
| FAT32 | Removable media — but capped at 4GB files and 2TB partitions |
| exFAT | Removable media needing larger files than FAT32 allows |
It’s worth noting that the “ext4 vs. XFS vs. Btrfs” debate has genuinely shifted in recent years. Independent 2026 filesystem benchmarking found dramatic differences depending on workload — in one large-scale file-count test, XFS completed a billion-file operation in roughly 12 hours while ZFS took nearly 92 hours under the same conditions, underlining that there’s no universally “best” filesystem, only the best one for your specific access pattern. As a rough rule of thumb: ext4 for boot partitions and general use, XFS for large file servers and virtualization hosts, and Btrfs when you specifically want snapshotting and checksums baked into the filesystem layer.
If you do go the XFS route, it’s worth knowing there’s a dedicated toolset for managing it day-to-day rather than relying on generic utilities:
| Command | Function |
|---|---|
xfs_admin | Change XFS filesystem parameters |
xfsdump | Back up an XFS filesystem |
xfs_freeze | Suspend write access to a filesystem (useful for consistent snapshots) |
xfs_quota | Manage XFS-native disk quotas |
Making it Permanent with /etc/fstab
Mounting a partition manually only lasts until reboot. To make it permanent, add an entry to /etc/fstab referencing the partition’s UUID (found via blkid or lsblk -f):
UUID="b20b7646-9ed8-48b8-9574-32aec29b7957" /mnt/sdb1 ext4 defaults 0 2The last two fields matter: the first 0 tells the dump backup utility to skip this filesystem, and the 2 tells fsck to check this filesystem after the root filesystem during boot.
After editing fstab, run sudo mount -a to test for syntax errors without rebooting, then confirm everything mounted correctly with df -h.
A note on encrypted volumes: if any of your partitions are encrypted, /etc/fstab isn’t where that configuration lives. Instead, Linux uses a companion file, /etc/crypttab, which serves the same purpose as fstab but specifically tracks which encrypted devices need to be unlocked — and in what order — before they can be mounted. If you’re building a server that handles sensitive data, setting up crypttab alongside fstab is worth the extra ten minutes.
Protecting Mount Points from Accidental Changes
Once a volume is mounted somewhere important, it’s worth locking down the mount point directory itself so it can’t be accidentally modified or deleted before the volume is attached. The chattr +i command sets the immutable attribute on a file or directory — once set, not even the root user can modify or remove it without first unsetting the attribute (chattr -i). This is a small habit that prevents an entire class of “someone rm -rf‘d the wrong empty folder” incidents on production systems.
Scaling Storage Dynamically with LVM
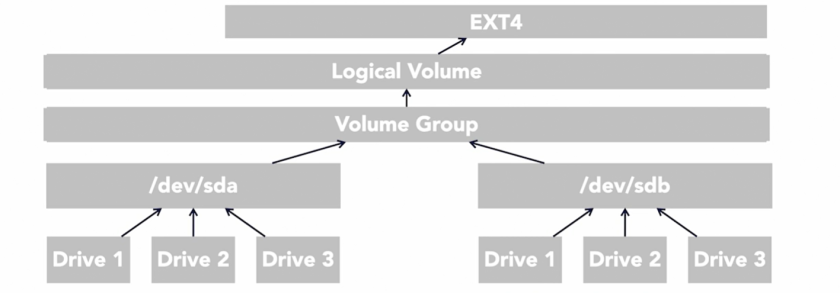
Partitions are static by nature — resizing them later is possible but risky. This is where Logical Volume Manager (LVM) earns its keep. LVM adds an abstraction layer between your physical disks and the filesystems sitting on top of them, letting you resize, add, or move storage without downtime.
LVM works in three layers:
- Physical Volumes (PVs) — the raw disks or partitions you initialize for LVM use
- Volume Groups (VGs) — a pool combining one or more PVs into a single storage pool
- Logical Volumes (LVs) — the flexible, resizable “virtual partitions” carved out of a VG
Setting Up LVM from Scratch
sudo apt install lvm2
sudo pvcreate /dev/sdb1 /dev/sdc2 /dev/sdd1
sudo vgcreate IT_GROUP /dev/sdb1 /dev/sdc2 /dev/sdd1
sudo lvcreate --name IT_VOLUME01 --size 10GB IT_GROUP
sudo mkfs.ext4 /dev/IT_GROUP/IT_VOLUME01
sudo mkdir /mnt/DISK_IT_VOL01
sudo mount /dev/IT_GROUP/IT_VOLUME01 /mnt/DISK_IT_VOL01
Use pvs, vgs, and lvs any time you want a quick summary of your physical volumes, volume groups, and logical volumes respectively — they’re the fastest way to sanity-check your layout, and pvdisplay gives you the fuller breakdown when you need it.
Growing and Shrinking Logical Volumes
Extending a volume is safe and can be done live:
lvextend -L +10G /dev/IT_GROUP/IT_VOLUME01
resize2fs /dev/IT_GROUP/IT_VOLUME01
Shrinking is riskier and requires the filesystem to be unmounted first:
umount /dev/IT_GROUP/IT_VOLUME01
e2fsck -f /dev/IT_GROUP/IT_VOLUME01
lvreduce -L -5G /dev/IT_GROUP/IT_VOLUME01
resize2fs /dev/IT_GROUP/IT_VOLUME01
Confirm the result with lvdisplay and df -hT afterward — always check both the logical volume size and the filesystem size, since a mismatch between the two usually means the resize step was skipped.
Always back up before shrinking a volume. Unlike extending, a reduce operation that goes wrong can truncate live data.
LVM vs. Btrfs — Which Should You Actually Use?
This is one of the more common questions Linux admins ask once they’ve outgrown basic partitions, and the honest answer is: it depends on what you’re protecting against. LVM is filesystem-agnostic — it works underneath ext4, XFS, or anything else you already trust, which matters if the filesystem choice itself isn’t up for debate on a given server. Btrfs, by contrast, folds volume management and snapshotting into the filesystem itself using a copy-on-write model, which gives it stronger protection against partial writes and data corruption, at the cost of being a bigger architectural shift if you’re migrating an existing ext4/LVM setup. A common middle ground — increasingly popular on file servers — is running Btrfs on top of LVM, combining LVM’s flexible resizing with Btrfs’s snapshot and integrity features. For most general-purpose servers, though, sticking with the well-worn ext4-on-LVM combination remains a safe, low-drama default.
Restoring an Accidentally Removed Volume
If a logical volume gets deleted by mistake, LVM’s configuration backups can often save you:
vgcfgrestore --list /dev/IT_GROUP
lvremove /dev/IT_GROUP/IT_VOLUME01
vgcfgrestore -f /etc/lvm/archive/IT_GROUP_00003-858522082.vg IT_GROUP
vgscan
lvscan
vgchange -ay IT_GROUP
lvchange -ay IT_VOLUME01
The vgscan and lvscan steps matter here — they confirm the volume group and logical volume are actually recognized as active again before you try mounting anything. It’s good practice to run sudo vgcfgbackup periodically (or immediately after any structural change) so a recent archive is always available if something goes wrong.
Setting Disk Quotas for Users and Groups
On shared servers — university labs, hosting platforms, multi-tenant environments — unrestricted disk usage from one user can starve everyone else. Linux’s quota system lets you cap usage per user or group.
- Install the quota tools:
sudo apt-get install quota - Remount the filesystem with quota support enabled — either by editing
/etc/fstabto add theusrquota,grpquotaoptions, or remounting directly withsudo mount -o usrquota,grpquota /dev/sda1 /mnt/mydata - Initialize the quota database:
sudo quotacheck -acug - Turn quotas on:
sudo quotaon /mnt/mydata - Set limits per user:
sudo edquota username
Inside edquota, you’ll set both soft and hard limits, measured in both storage (blocks) and file count (inodes):
- Soft limit — a warning threshold (e.g., 200MB or 4 files); the user is notified but not blocked
- Hard limit — the absolute ceiling (e.g., 300MB or 7 files); writes fail once reached
You can also set a grace period with sudo edquota -t, which defines how long a user is allowed to stay over their soft limit before it’s enforced as a hard block.
Monitor usage across all users with sudo repquota -a, or check a single filesystem with repquota -v /mnt/mydata. When you need to disable quotas entirely, sudo quotaoff -ug /mnt/mydata turns enforcement off without deleting the underlying configuration.
Troubleshooting Storage Performance and Limits
When a disk feels slow — or a process mysteriously can’t open new files — guessing rarely helps. Measuring does.
System Resource Limits with ulimit
Before assuming a storage problem is about disk speed, check whether it’s actually a resource-limit problem. ulimit -a displays all current limits for the running shell, including the maximum number of open file descriptors — a limit that’s frequently the real culprit behind “disk is fine but the app is throwing errors” situations on busy servers. You can raise it for the current session with, for example, ulimit -n 512, though permanent increases belong in /etc/security/limits.conf.
Measuring Throughput with iostat
iostat (from the sysstat package, installed via sudo apt install sysstat) reports throughput per device — reads and writes per second, in kilobytes, both as a rate and a running total:
Device    tps    kB_read/s    kB_wrtn/s    kB_read    kB_wrtn
sdb       0.14   2.82         0.00         21157      0
It’s the first place to look when you suspect a specific disk is the bottleneck rather than the CPU or network.
Measuring Latency with ioping
ioping measures I/O latency in real time by continuously pinging a device, similar in spirit to how ping measures network latency (sudo ioping -c 5 /dev/sda1). It’s particularly useful for catching intermittent slowdowns that averaged throughput stats can mask — a disk can show perfectly reasonable average throughput while still having occasional latency spikes that make an application feel sluggish.
Choosing the Right I/O Scheduler
I/O schedulers act like a traffic controller for your storage device, deciding the order in which read and write requests get processed. The right choice depends heavily on your hardware:
- mq-deadline — prioritizes requests based on their deadlines; a solid general default
- BFQ — improves responsiveness for interactive workloads by preventing any single program from monopolizing access
- CFQ / none (noop) — minimal reordering; often the best choice for fast SSDs and NVMe drives, where the drive’s own controller handles ordering more efficiently than the kernel can
Check your current scheduler with cat /sys/block/sda/queue/scheduler, and change it (temporarily) with echo none > /sys/block/sda/queue/scheduler.
Finally, if a device refuses to mount cleanly and you’ve ruled out a hardware fault, a fresh mkfs.ext4 /dev/sdX may be your last resort — but only after you’re certain there’s nothing worth recovering on it.
Frequently Asked Questions
Do I need LVM if I’m only running one disk? Not strictly, but even on a single disk, LVM makes it far easier to resize a root or data partition later without repartitioning from scratch. Many distributions now enable LVM by default during installation for exactly this reason.
What’s the difference between fstab and crypttab? /etc/fstab tells the system which partitions to mount and where. /etc/crypttab handles the extra step needed for encrypted partitions — unlocking them — which has to happen before fstab’s mount instructions can take effect for that device.
How do I know if I actually need to worry about disk quotas? If your server has multiple independent users or tenants writing to shared storage, quotas are worth the setup time. On a single-user VPS or personal server, they’re usually unnecessary overhead.
Is Btrfs mature enough for production use in 2026? Yes, for most workloads — it’s the default filesystem on several major distributions and is well-suited to snapshotting and data-integrity-sensitive use cases. That said, ext4 and XFS remain the more battle-tested choices for high-file-count workloads and legacy compatibility.
Conclusion
Linux storage management isn’t a single skill — it’s a stack of smaller, learnable pieces: choosing a partition table, formatting with the right filesystem, making mounts permanent through fstab (and crypttab, if encryption is involved), locking down critical mount points with chattr, scaling gracefully with LVM, keeping shared systems fair with quotas, and diagnosing slowdowns with iostat, ioping, and ulimit before they become outages. None of these tools are complicated in isolation, but knowing when to reach for each one — and having the commands ready before 2am when a disk actually fills up — is what separates a smooth incident from a long night.
Want more articles and tutorials like this?
Get new tutorials, security alerts, and IT tips straight to your inbox.
That’s a really helpful overview. I’ve definitely had to deal with those sudden storage issues and it’s good to have a structured approach like this.
thank you for your comment and feel free to register in order to receive more content