How to Manage Security & SSH: A Practical Guide for Linux Admins

If you administer Linux servers, two topics come up constantly: how to control what processes are actually allowed to do on the system, and how to make sure the door you use to log in remotely — SSH — can’t be kicked open by an attacker. SELinux and SSH sit at the center of both problems. This guide breaks down how they work, how to configure them safely, and which habits separate a hardened server from an easy target.
Table of Contents
- What SELinux Actually Does
- Enforcing vs. Permissive Mode
- Installing and Configuring SELinux
- SSH Fundamentals and Configuration Files
- Setting Up Key-Based SSH Authentication
- SSH Tunneling Explained
- Security Best Practices Beyond the Basics
- Conclusion
What SELinux Actually Does
Security-Enhanced Linux (SELinux) is a kernel-level security module that adds mandatory access control on top of the traditional Linux permissions system. Where standard Unix permissions only ask “does this user own the file,” SELinux asks a much stricter question for every single interaction on the system.
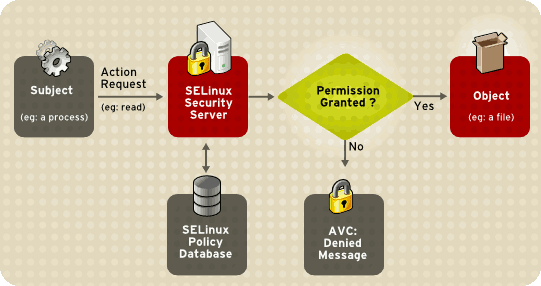
That question follows a simple relationship:
Subject → (SELinux Policy) → Object
A subject is anything that tries to act — a service, an application, a user, or a running process. An object is anything being acted upon — a file, a network port, another process, or a user account. SELinux policy sits between the two and decides, action by action, whether the interaction is allowed.
A classic example: the Apache web server (httpd) needs to bind to port 80 and read files inside /var/www/html. Under standard permissions, if httpd were compromised, an attacker could potentially use it to read or write almost anything the www-data user has access to. Under SELinux, httpd is confined to a policy that says, in effect, “you may only touch port 80 and the web root — nothing else, even if the Linux file permissions would otherwise allow it.” That extra layer is what makes SELinux valuable even on well-maintained servers.
Enforcing vs. Permissive Mode
SELinux operates in one of three states, and understanding the difference matters before you touch a production system.
Enforcing Mode
This is the default and the recommended setting for any live server. In enforcing mode, SELinux actively blocks any action that violates policy and writes a log entry for it. If a process tries to do something outside its allowed scope, the request is denied outright — not just logged.
Permissive Mode
In permissive mode, SELinux still evaluates every action against policy and logs what it would have blocked, but it doesn’t actually stop anything. This makes permissive mode genuinely useful for one purpose: debugging. When a legitimate application is being denied access it needs, switching temporarily to permissive mode lets you see exactly what was blocked, without taking the server offline.
Security professionals generally follow the same rule: keep production systems in enforcing mode at all times, and only use permissive mode briefly, in a controlled way, while diagnosing a specific denial. Newer versions of SELinux also support setting individual domains to permissive rather than the whole system — so if only one service is misbehaving, you don’t have to weaken protection everywhere else.
Disabled Mode
Turning SELinux off entirely is strongly discouraged. Beyond losing the protection itself, a disabled system stops labeling files correctly, which creates extra work and risk if you ever want to turn SELinux back on later.
Installing and Configuring SELinux
On Red Hat–based distributions, SELinux ships enabled by default. On Debian/Ubuntu-based systems, you’ll typically need to install it manually:
sudo apt install policycoreutils selinux-basics selinux-utilsOnce installed, the main configuration file lives at:
sudo nano /etc/selinux/configInside, the SELINUX= line controls the mode (enforcing, permissive, or disabled), and SELINUXTYPE= controls the policy set being applied (most commonly targeted, which protects specific network-facing services rather than the entire system).
A practical rollout tip: if you’re enabling SELinux on a server that previously ran without it, don’t jump straight to enforcing mode. Boot into permissive mode first, review the logs for denials over a few days of normal operation, fix anything that looks like a legitimate false positive, and only then switch to enforcing. This avoids locking yourself out of services you actually need.
SSH Fundamentals and Configuration Files
SSH (Secure Shell) is how nearly every Linux server is administered remotely, which also makes it the single most attacked service on the internet. Two configuration files control its behavior:
- Client-side:
/etc/ssh/ssh_config— governs how your machine behaves when connecting out to other servers. - Server-side:
/etc/ssh/sshd_config(and on some distributions,/etc/sysconfig/sshd) — governs how your machine accepts incoming connections.
Every hardening step described below is applied by editing sshd_config and restarting the SSH service afterward.
Setting Up Key-Based SSH Authentication
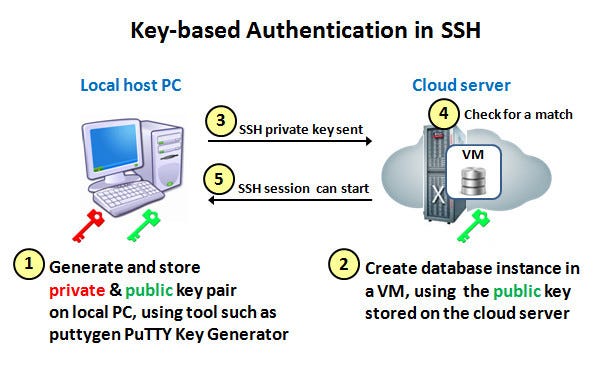
Password authentication over SSH is vulnerable to brute-force attempts, credential stuffing, and simple guessing. Key-based authentication replaces a password with a cryptographic key pair, which is exponentially harder to compromise. Here’s the typical two-machine setup:
Step 1 — Generate a key pair on the client machine:
ssh-keygenYou’ll be prompted to set a passphrase. Choose one — an unprotected private key is a single point of failure if the machine is ever compromised.
Step 2 — Copy the public key to the server:
ssh-copy-id user@192.168.10.100This copies your public key into the server’s ~/.ssh/authorized_keys file, so the server can verify future connections without asking for a password.
Step 3 — Connect using the key:
ssh user@192.168.10.100You’ll be prompted for the passphrase you set in step one, not the account’s password. Once this works reliably, disable password authentication entirely in sshd_config by setting PasswordAuthentication no. This single change eliminates almost all automated brute-force attacks against your server.
SSH Tunneling Explained
Beyond remote login, SSH can securely forward traffic between machines — useful for reaching internal services, bypassing restrictive firewalls during authorized testing, or encrypting otherwise unprotected traffic. There are three forwarding modes:
| Command Pattern | Purpose |
|---|---|
ssh -L lport:host:rport | Local port forwarding — forwards a local port to a service on a remote network |
ssh -R rport:host:lport | Remote port forwarding — exposes a local service to a remote network |
ssh -D 127.0.0.1:port | Dynamic port forwarding — turns SSH into a SOCKS proxy for flexible traffic routing |
These techniques are powerful and are used heavily in both legitimate system administration and offensive security testing, so they should only be used on systems and networks you’re authorized to access.
Security Best Practices Beyond the Basics
Strengthen Authentication
Passwords alone are no longer considered sufficient protection for anything internet-facing. Layer in additional factors where possible:
- Multi-factor authentication (MFA) — combines something you know with something you have.
- One-time passwords (OTP) — time-limited codes generated by an app or token.
- Biometrics — fingerprint or facial recognition for local or VPN-gated access.
- Centralized authentication — RADIUS, LDAP, or Kerberos let you manage credentials and access policy from one place instead of per-server.
Restrict Root Logins
Direct root access over SSH is one of the most common weaknesses found in server audits, because it removes the “who did this” trail and gives an attacker full control the moment credentials are compromised. Instead:
- Disable root SSH login entirely by setting
PermitRootLogin noinsshd_config. - Use
pam_accessto explicitly define which users and networks may authenticate at all. - Require administrators to log in as a standard user and use
sudofor privileged actions — this preserves an audit trail. - Where possible, move to PKI-based, passwordless logins using certificates issued by an internal certificate authority, which scales far better than distributing individual keys across a growing team.
A Few Additional Habits Worth Adopting
- Change the default SSH port only as a minor deterrent — not a substitute for the steps above.
- Use
fail2banor an equivalent tool to automatically block IPs after repeated failed login attempts. - Keep both SELinux policies and OpenSSH itself updated; many real-world compromises exploit known, already-patched vulnerabilities.
- Regularly review
/var/log/secureor/var/log/auth.logfor unusual authentication patterns.
Conclusion
SELinux and SSH hardening solve two different halves of the same problem. SELinux limits the blast radius if something on your server does get compromised, by strictly controlling what each process and service is allowed to touch. SSH hardening reduces the chance of that compromise happening in the first place, by closing off the weakest and most commonly attacked entry point — password-based remote login. Used together — enforcing mode in production, key-based SSH authentication, restricted root access, and centralized authentication where it makes sense — they turn a default Linux install into a genuinely defensible server.
None of these changes need to happen all at once. Start with disabling password authentication over SSH this week, confirm SELinux is running in enforcing mode, and build outward from there.
Want more articles and tutorials like this?
Get new tutorials, security alerts, and IT tips straight to your inbox.
That’s a really important reminder about SSH key management. It’s easy to overlook those details when setting things up.