How to Configure DNS on Windows Server: A Complete Step-by-Step Guide for IT Admins
Every device on your network relies on DNS to find resources, yet misconfigured DNS servers remain one of the leading causes of domain join failures, replication errors, and slow name resolution. This guide walks you through building a reliable Windows Server DNS infrastructure from the ground up. Whether you are setting up your first domain controller or refining an existing deployment, you will find practical steps, PowerShell commands, and real-world tips you can apply immediately.
Table of Contents
- What Is DNS and Why Does It Matter on Windows Server?
- How DNS Resolution Actually Works
- Installing the DNS Server Role
- Understanding DNS Zones: Primary, Secondary, and Stub
- Creating and Configuring a Forward Lookup Zone
- Managing A and AAAA Resource Records
- Configuring DNS Forwarders and Root Hints
- Authoritative vs. Non-Authoritative Responses Explained
- UDP and TCP in DNS: When Each Protocol Steps In
- Setting Up Zone Transfers for Secondary DNS Servers
- Active Directory Integrated Zones: What Changes When DNS Lives in AD
- DNS Best Practices Every Admin Should Follow
- Common DNS Issues and How to Fix Them
- Conclusion
What Is DNS and Why Does It Matter on Windows Server?
DNS (Domain Name System) acts as the phonebook of your network. It translates human-friendly hostnames like fileserver.corp.local into IP addresses that computers understand. Without DNS, users would need to memorize numeric addresses for every server, printer, and website they access.
On Windows Server, DNS takes on an even bigger role. Active Directory depends on DNS to locate domain controllers, register service records, and facilitate authentication. A poorly configured DNS server does not just slow down web browsing; it can break logons, prevent Group Policy from applying, and stop replication between domain controllers. Understanding how these pieces fit together is the first step toward a stable infrastructure.
How DNS Resolution Actually Works
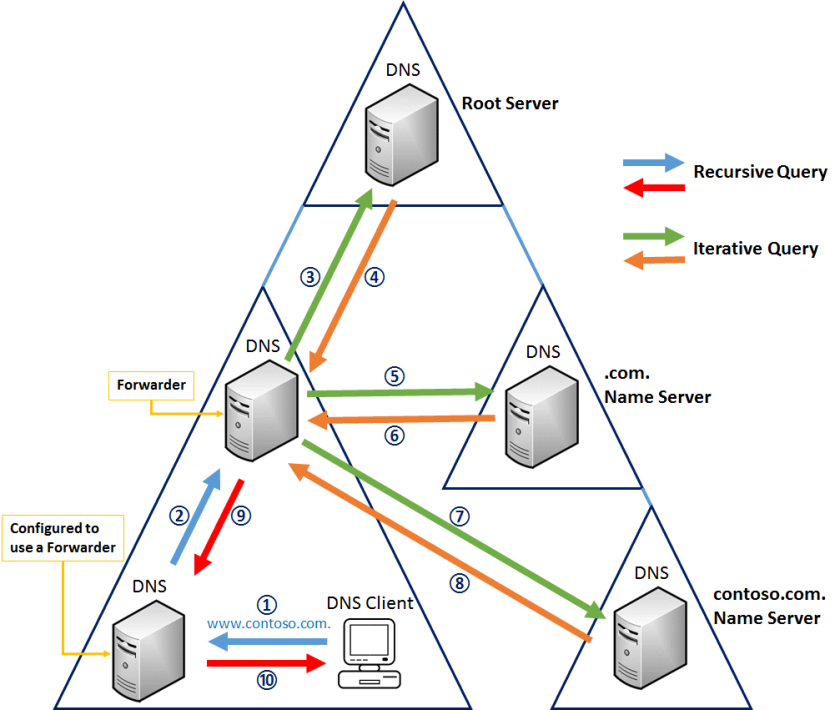
Before you configure anything, you need to understand the query path. When a client types a URL or pings a hostname, here is what happens behind the scenes:
- The client checks its local DNS cache. If the answer sits there from a recent query, the process ends immediately.
- If the cache holds no match, the client sends a query to its configured DNS server.
- The DNS server checks its own cache and its hosted zones. If it finds the record, it replies directly.
- If the server cannot answer from local data, it forwards the request to a DNS forwarder (such as your ISP router or a public resolver like Cloudflare or Google).
- If no forwarder exists, the server uses root hints to start a recursive lookup across the Internet.
- The answer travels back through the chain, and each server caches it for future requests.
A slow forwarder adds latency to every external lookup, while a missing local zone record breaks internal resource access entirely.
Installing the DNS Server Role
You can install the DNS Server role through Server Manager or PowerShell. PowerShell saves time, especially when you need to repeat the process across multiple servers.
Using Server Manager
- Open Server Manager and click Manage > Add Roles and Features.
- On the Server Roles page, check DNS Server.
- Click Next through the wizard and then click Install.
Using PowerShell
Open an elevated PowerShell window and run:
Install-WindowsFeature -Name DNS -IncludeManagementToolsAfter installation finishes, verify the service status:
Get-Service -Name DNSThe output should show the DNS service as Running. If it does not, start it with:
Start-Service -Name DNSTip: If you install DNS during Active Directory Domain Services (AD DS) promotion, the wizard configures the basic forward lookup zone automatically. However, you should still review and customize the settings afterward.
Understanding DNS Zones: Primary, Secondary, and Stub
A DNS zone is a container that holds records for a specific portion of the DNS namespace. Windows Server supports several zone types, and choosing the right one affects how you manage records, handle redundancy, and secure your environment.
Primary Zone
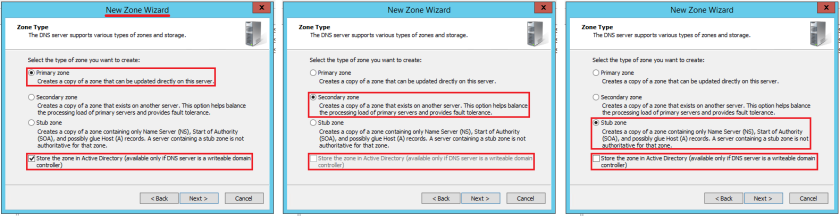
A Primary zone stores the original, read/write copy of all DNS records for a domain. By default, Windows Server stores standard Primary zones in a text file at C:\Windows\System32\Dns\. If your server also functions as a Domain Controller, you can store the zone inside Active Directory instead, which enables secure dynamic updates and multi-master replication.
Secondary Zone
A Secondary zone holds a read-only copy of the Primary zone. It exists mainly for fault tolerance and load distribution. If the Primary server goes offline, the Secondary server continues answering queries for the zone.
The Secondary zone pulls its data through a process called a zone transfer. It contacts the Primary server, compares the serial number in the SOA (Start of Authority) record, and requests an update if the numbers differ. By default, this check happens every 15 minutes.
Important: The zone name on the Secondary server must match the zone name on the Primary server exactly. A Secondary zone cannot live inside Active Directory; it always uses a standard text file.
Stub Zone
A Stub zone is a lightweight, read-only copy that contains only three record types: NS (Name Server), SOA, and optionally glue A records. It does not store the full zone data. Instead, it points clients toward the authoritative DNS servers for a specific domain.
Stub zones shine in multi-domain or multi-forest environments. For example, if Company A merges with Company B, a Stub zone on Company A’s DNS server tells clients exactly which servers hold the authoritative data for Company B’s domain. This avoids unnecessary recursion and speeds up cross-domain resolution.
Quick Comparison Table
| Zone Type | Read/Write | Stores Full Records | Use Case |
|---|---|---|---|
| Primary | Read/Write | Yes | Main authoritative source for a domain |
| Secondary | Read-Only | Yes (full copy) | Redundancy and load balancing |
| Stub | Read-Only | No (only NS/SOA) | Cross-domain or cross-forest resolution |
Creating and Configuring a Forward Lookup Zone
Forward lookup zones map hostnames to IP addresses. This is the zone type you will use most often for internal domains.
Creating a Primary Zone via DNS Manager
- Open DNS Manager (
dnsmgmt.msc). - Expand your server name, right-click Forward Lookup Zones, and select New Zone.
- Click Next, choose Primary Zone, and click Next again.
- Enter your zone name (for example,
corp.localorvetytop.local). - Choose the zone file name (the wizard suggests
zone_name.dns) or select Store the zone in Active Directory if this server is a Domain Controller. - Choose the dynamic update behavior. For production domains, select Allow only secure dynamic updates.
- Click Next and then Finish.
Creating a Primary Zone via PowerShell
Add-DnsServerPrimaryZone -Name "corp.local" -ZoneFile "corp.local.dns" -DynamicUpdate SecureIf the server is a Domain Controller and you want an Active Directory integrated zone:
Add-DnsServerPrimaryZone -Name "corp.local" -ReplicationScope Domain -DynamicUpdate SecureCreating a Secondary Zone via PowerShell
Add-DnsServerSecondaryZone -Name "corp.local" -ZoneFile "corp.local.dns" -MasterServers 192.168.1.10Replace 192.168.1.10 with the IP address of your Primary DNS server.
Creating a Stub Zone via PowerShell
Add-DnsServerStubZone -Name "partner.local" -ZoneFile "partner.local.dns" -MasterServers 10.0.0.5Managing A and AAAA Resource Records
Resource records are the actual entries inside a DNS zone. The two most common types are:
- A Record: Maps a hostname to an IPv4 address.
- AAAA Record: Maps a hostname to an IPv6 address.
Adding an A Record via DNS Manager
- In DNS Manager, expand your forward lookup zone.
- Right-click the zone name and select New Host (A or AAAA).
- Enter the host name (for example,
www) and the IP address. - Check Create associated pointer (PTR) record if you also want a reverse lookup entry.
- Click Add Host.
Adding an A Record via PowerShell
Add-DnsServerResourceRecordA -Name "www" -ZoneName "corp.local" -IPv4Address "192.168.1.50" -CreatePtrAdding an AAAA Record via PowerShell
Add-DnsServerResourceRecordAAAA -Name "www" -ZoneName "corp.local" -IPv6Address "2001:db8::1" -CreatePtrViewing All Records in a Zone
Get-DnsServerResourceRecord -ZoneName "corp.local" | Format-Table HostName, RecordType, RecordDataOther Common Records
- CNAME (Alias): Creates an alternate name for an existing host. For example,
ftp.corp.localcan point toserver01.corp.local. - MX (Mail Exchanger): Directs email traffic to your mail server.
- PTR (Pointer): Used in reverse lookup zones to map an IP address back to a hostname.
- NS (Name Server): Identifies which DNS servers are authoritative for a zone.
- SOA (Start of Authority): Holds administrative details about the zone, including the serial number and refresh interval.
A typical DNS zone contains a mix of these records:
Name            Type    Data
---------------------------------------------
(same as parent)  SOA   [serial, refresh, retry, expire, minimum TTL]
(same as parent)  NS    ns1.corp.local
ns1               A     192.168.1.10
www               A     192.168.1.50
www               AAAA  2001:db8::1
mail              A     192.168.1.60
mail              MX    [10] mail.corp.local
ftp               CNAME server01.corp.local
Configuring DNS Forwarders and Root Hints
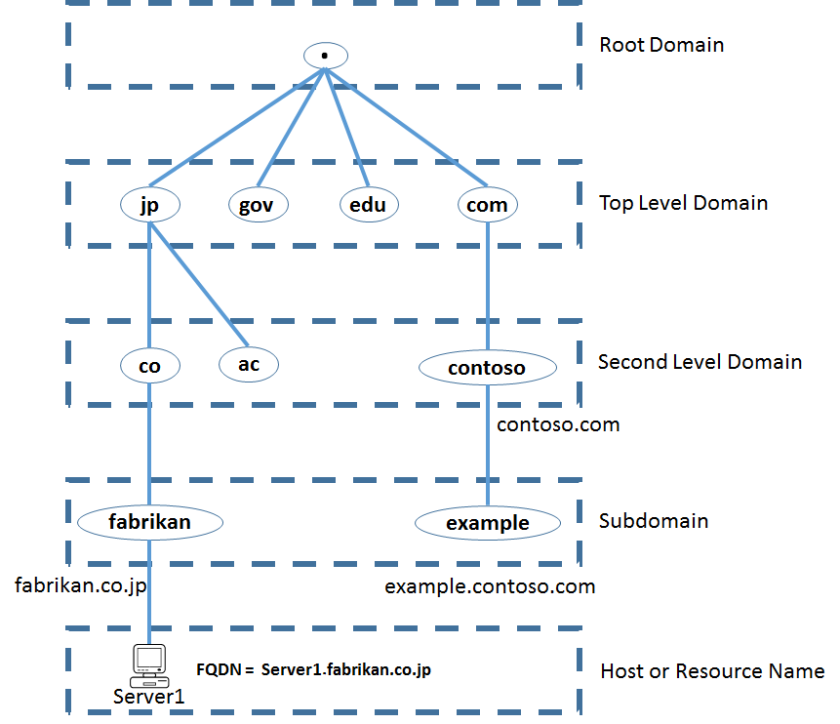
When your DNS server receives a query for a domain it does not host, it needs a path to find the answer. Windows Server offers two mechanisms for this: forwarders and root hints.
Root Hints
Root hints contain the IP addresses of the Internet root DNS servers. Windows Server ships with a preconfigured list stored in C:\Windows\System32\Dns\cache.dns. These hints tell your server where to begin recursion for external domain names. Root hints work well as a fallback, but relying on them for every external query adds latency because your server must traverse the DNS hierarchy from the root downward.
DNS Forwarders
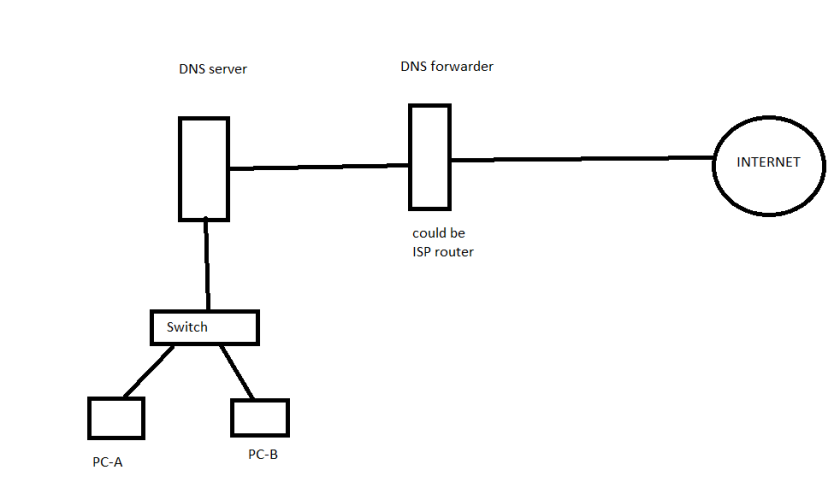
Forwarders let you send unresolved queries directly to another DNS server, such as your ISP router, a corporate upstream resolver, or a public DNS service. This approach is faster because the upstream server usually has cached answers.
Configuring Forwarders via DNS Manager
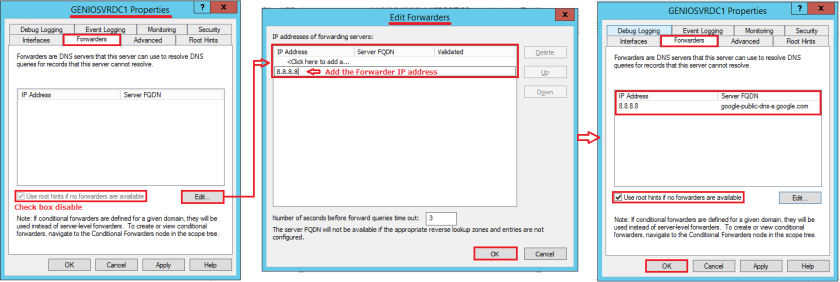
- Open DNS Manager, right-click your server name, and select Properties.
- Click the Forwarders tab.
- Click Edit, add the IP addresses of your preferred forwarders (for example,
192.168.1.1for your ISP router, or1.1.1.1and8.8.8.8for Cloudflare and Google). - Check Use root hints if no forwarders are available as a safety net.
- Click OK.
Configuring Forwarders via PowerShell
Add-DnsServerForwarder -IPAddress "192.168.1.1","1.1.1.1" -UseRootHint $trueVerify the configuration:
Get-DnsServerForwarderBest Practice: Microsoft recommends that you add your ISP or trusted upstream DNS servers as forwarders rather than configuring domain controllers to point their DNS client settings directly to external resolvers. Domain controllers must register their SRV records with an internal DNS server to keep Active Directory healthy.
Authoritative vs. Non-Authoritative Responses Explained
When a DNS server answers a query, the response carries a flag indicating whether the server truly owns the data or is simply passing along something it learned elsewhere.
Authoritative Response
Your DNS server returns an authoritative response when it hosts the zone containing the requested record. The server holds the original data and speaks with full authority about that domain. For example, if your server hosts the corp.local zone and a client asks for fileserver.corp.local, the answer is authoritative.
Non-Authoritative Response
A non-authoritative response comes from cache or from a forwarder. The server did not originate the data; it learned it from another source. This is perfectly normal for external domains like google.com, but if you see non-authoritative answers for your own internal zones, it usually means the zone is not hosted locally or a stale cache entry exists.
You can check the authority status using nslookup:
nslookup fileserver.corp.localLook for the line that says Non-authoritative answer: or the absence of it. In PowerShell, use:
Resolve-DnsName -Name "fileserver.corp.local" -Type AUDP and TCP in DNS: When Each Protocol Steps In
DNS uses both UDP and TCP, and understanding when each protocol applies helps you troubleshoot firewall and performance issues.
UDP Port 53
The vast majority of DNS queries travel over UDP. UDP is lightweight and fast, making it ideal for simple question-and-answer exchanges. When a client asks for an A record and the response fits within 512 bytes, UDP handles the entire conversation.
TCP Port 53
TCP steps in under two conditions:
- Large responses: When a DNS response exceeds 512 bytes (common with DNSSEC or large zone transfers), the server sets the TC (Truncated) bit. The client then reissues the query over TCP.
- Zone transfers: Secondary servers pull full zone data from Primary servers using TCP. AXFR (full zone transfer) and IXFR (incremental zone transfer) both require a reliable TCP connection.
Make sure your firewalls allow both UDP and TCP on port 53. Blocking TCP will break zone transfers and large queries.
Setting Up Zone Transfers for Secondary DNS Servers
Zone transfers keep Secondary servers synchronized with the Primary. Without proper configuration, your Secondary server will hold stale records or fail to load the zone entirely.
Enabling Zone Transfers on the Primary Server
- In DNS Manager, right-click the zone (for example,
vetytop.local) and select Properties. - Click the Zone Transfers tab.
- Check Allow zone transfers.
- Select Only to servers listed on the Name Servers tab for the most secure option.
- Click Notify and ensure the Secondary server’s IP appears in the list so it receives immediate updates when records change.
- Click OK.
Configuring Zone Transfers via PowerShell
Set-DnsServerPrimaryZone -Name "vetytop.local" -SecureSecondaries TransferToSecureServers -Notify NotifyServersUnderstanding the SOA Serial Number
Every DNS zone contains an SOA record with a serial number. The Secondary server compares this number with its own copy during each refresh cycle. If the Primary’s serial number is higher, the Secondary initiates a zone transfer to pull the latest data. By default, the refresh interval is 15 minutes.
You can view the SOA record with:
Get-DnsServerResourceRecord -ZoneName "vetytop.local" -RRType SOAActive Directory Integrated Zones: What Changes When DNS Lives in AD
When you install DNS on a Domain Controller, you gain the option to store zones inside Active Directory rather than in flat text files. This integration brings significant advantages:
- Secure dynamic updates: Only authenticated computers can register or update their own DNS records.
- Multi-master replication: Every Domain Controller running DNS can accept record changes. You no longer depend on a single Primary server.
- Automatic replication: AD replication handles zone data synchronization, so you do not need to configure manual zone transfers between domain controllers.
- No single point of failure: If one DC goes down, another DC can still process dynamic updates.
When you choose to store a zone in Active Directory, Windows Server writes the data into C:\Windows\NTDS\ntds.dit, the same database that holds user accounts, groups, and computer objects.
Creating an AD Integrated Zone via PowerShell
Add-DnsServerPrimaryZone -Name "corp.local" -ReplicationScope Domain -DynamicUpdate SecureThe -ReplicationScope Domain parameter stores the zone in the DomainDnsZones partition, meaning it replicates to all domain controllers in the same domain.
DNS Best Practices Every Admin Should Follow
Following Microsoft guidance and industry standards will save you from late-night troubleshooting calls. Here are the practices that deliver the biggest impact.
1. Point Domain Controllers to the Right DNS Servers
- If your domain has only one DC with DNS, point that DC to its own IP address as the preferred DNS server.
- If you have two DCs, point each DC to the other DC first, and to itself second. This prevents DNS island issues during replication.
- Never point a DC’s DNS client settings directly to an ISP or public DNS server. Use forwarders instead.
2. Use Static IPs for Critical Servers
Domain controllers, DNS servers, file servers, and printers should always use static IP addresses or DHCP reservations. If a DNS server’s IP changes, every client loses name resolution.
3. Enable Scavenging to Clean Stale Records
Stale DNS records accumulate over time, especially in environments with laptops and mobile devices. Enable scavenging on your zones to automatically remove old records.
Set-DnsServerScavenging -ScavengingState $true -ScavengingInterval 7.00:00:00
Set-DnsServerZoneAging -Name "corp.local" -AgingEnabled $true -NoRefreshInterval 3.00:00:00 -RefreshInterval 3.00:00:00
This example enables scavenging with a 3-day no-refresh interval, a 3-day refresh interval, and a 7-day scavenging cycle.
4. Restrict Zone Transfers
Only allow zone transfers to known Secondary servers. Open zone transfers expose your entire internal network topology to anyone who asks.
5. Monitor DNS Performance and Logs
Use the built-in DNS Server log in Event Viewer and Performance Monitor counters like DNS\Total Query Received and DNS\Recursive Queries to spot anomalies early.
6. Keep Your Root Hints Updated
Microsoft updates the root hints file periodically. Ensure your cache.dns file stays current, especially if your server has limited Internet access.
7. Document Your DNS Design
Maintain a simple spreadsheet or diagram showing which servers host which zones, forwarder IP addresses, zone transfer partners, and conditional forwarder rules for partner domains.
Common DNS Issues and How to Fix Them
| Symptom | Likely Cause | Quick Fix |
|---|---|---|
| Clients cannot resolve internal hostnames | DNS client points to external DNS | Update TCP/IP settings to use internal DNS |
| Domain controller promotion fails | DNS not installed or misconfigured | Verify DNS role and that the zone supports dynamic updates |
| Zone transfer fails | Firewall blocking TCP 53 or transfer not enabled | Open TCP 53 and enable transfers to the Secondary IP |
| External websites load slowly | Forwarder is unreachable or slow | Test forwarder response time and switch to a faster resolver |
| Duplicate DNS records appear | Scavenging disabled or DHCP lease too short | Enable scavenging and align DHCP lease with refresh intervals |
| “DNS Island” error | DC points to itself before replication completes | Point new DCs to an existing DC during promotion, then switch |
Flushing DNS Cache
When you make changes and clients still see old data, flush the cache:
On the client:
ipconfig /flushdnsOn the DNS server:
Clear-DnsServerCacheTesting Name Resolution
Resolve-DnsName -Name "www.corp.local" -Server 192.168.1.10
Test-NetConnection -ComputerName "dc01.corp.local" -Port 53
Conclusion
Configuring DNS on Windows Server is not just about creating zones and adding records. It is about building a name resolution backbone that keeps Active Directory healthy, users productive, and external queries fast. By choosing the right zone types, setting up forwarders correctly, securing zone transfers, and following Microsoft’s best practices for DC DNS client settings, you create a foundation that scales with your organization.
Remember to document your setup, enable scavenging early, and monitor your DNS logs regularly. A well-tuned DNS server is invisible to your users, and that is exactly how it should be.
Want more articles and tutorials like this?
Get new tutorials, security alerts, and IT tips straight to your inbox.