How to Configure NIC Teaming on Windows Server: A Complete Guide for IT Admins
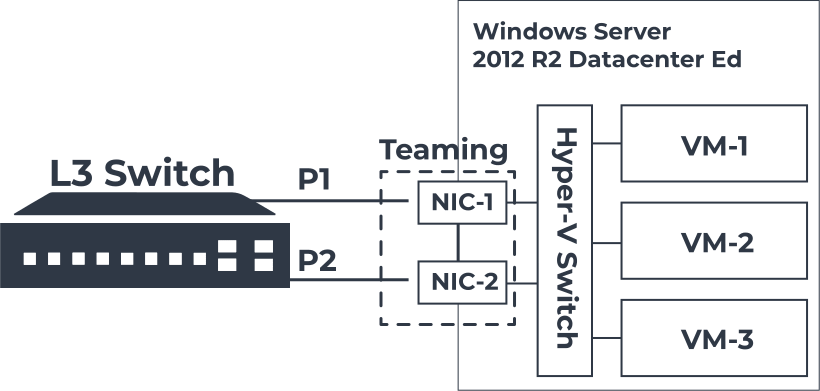
Network downtime costs money. When a single network card fails and takes your file server or Hyper-V host offline, you learn quickly why redundancy matters. NIC teaming gives Windows Server admins a built-in way to combine multiple network adapters into one resilient pipe—no third-party tools required. In this guide, I will walk you through every teaming mode, load-balancing option, and switch configuration you need to build a fault-tolerant network setup that actually works in production.
Table of Contents
- What Is NIC Teaming and Why Should You Care?
- Prerequisites Before You Start
- Understanding Teaming Modes
- Switch Independent Mode
- Static Teaming Mode
- LACP Mode
- Understanding Load Balancing Algorithms
- Address Hash
- Hyper-V Port
- Dynamic
- Switch-Side Configuration Explained
- Step-by-Step: Configure NIC Teaming via Server Manager
- Configure NIC Teaming with PowerShell
- Standby Adapter Configuration
- NIC Teaming for Hyper-V Hosts
- Best Practices and Troubleshooting
- Conclusion
What Is NIC Teaming and Why Should You Care?
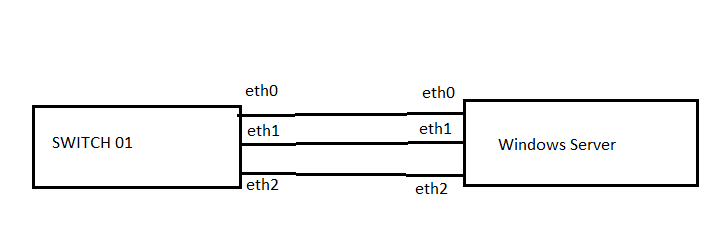
NIC teaming—also called Load Balancing and Failover (LBFO)—combines two or more physical network adapters into a single logical interface. Windows Server treats this team as one network card, which means applications and services see a single IP address and a single connection.
The benefits hit three areas:
Fault tolerance. If one physical NIC fails, traffic fails over to another member of the team. Users never notice the switch.
Bandwidth aggregation. You can combine the throughput of multiple adapters. Three 1 Gbps NICs in a team give you a 3 Gbps pipe—for both sending and receiving, depending on your configuration.
Simplified management. Instead of managing IP addresses across multiple adapters, you manage one team interface. Microsoft bundles this feature directly into Windows Server 2012 and later, so you do not need vendor-specific utilities.
Microsoft fully supports NIC teaming across any Ethernet adapter that carries the Windows Logo. You can team up to 32 physical adapters into one team, and you can run up to 32 teams on a single server.
Prerequisites Before You Start
Before you create your first team, verify these items:
- You run Windows Server 2012, 2012 R2, 2016, 2019, or 2022.
- All physical adapters in the team connect to the network and show as “Up” in Network Connections.
- You have administrative rights on the server.
- You know your switch make and model, because switch-dependent modes require matching configuration.
- You documented your current IP settings. Creating a team changes your network interface structure.
Important: Do not team RDMA adapters on Windows Server 2012 or 2012 R2. Microsoft added RDMA teaming support in Windows Server 2016. Wi-Fi, WWAN, and Bluetooth adapters cannot join a team either.
Understanding Teaming Modes
Windows Server offers three teaming modes. Your choice determines how much control the switch has and how traffic flows in both directions.
Switch Independent Mode
Switch Independent mode needs zero switch configuration. You can plug each team member into a different switch—even unmanaged switches—and Windows handles everything.
How it works: The host distributes outbound traffic across all team members using your chosen load-balancing algorithm. For inbound traffic, the switch sends everything to one MAC address. The host then maps that traffic to the correct adapter.
When to use it: Choose this mode when you lack managed switches, when you connect to multiple non-stacked switches, or when you want the simplest possible setup. Microsoft recommends Switch Independent with Dynamic load balancing for most deployments.
The catch: Inbound traffic for a single virtual machine or workload typically maxes out at the speed of one team member. If you run heavy inbound workloads on 1 Gbps links, consider upgrading to 10 Gbps or moving to LACP.
Static Teaming Mode
Static Teaming—also called Generic Teaming—requires you to configure the switch manually. You group specific switch ports into a Link Aggregation Group (LAG) and assign the server ports to that group.
How it works: Both the server and the switch know which ports belong to the team. They split traffic across all links without negotiating. This gives you true bidirectional load balancing.
When to use it: Use Static Teaming when your switch supports link aggregation but lacks LACP, or when you want to avoid the protocol overhead of LACP.
The catch: If you plug a cable into the wrong switch port, the team breaks. Static Teaming does not detect misconfigurations dynamically. You must document your port assignments carefully.
LACP Mode
LACP stands for Link Aggregation Control Protocol (IEEE 802.1ax). It dynamically negotiates the link between the server and the switch.
How it works: The server and switch exchange LACP packets to confirm they both support teaming. They agree on which ports form the team, and they monitor the health of each link through heartbeat messages. If a port fails, both sides detect it immediately and remove that port from the team.
When to use it: Choose LACP when you have managed switches that support it and you want the most robust failover detection. LACP also lets the switch load-balance inbound traffic across all team members.
The catch: LACP requires configuration on both sides. If the switch admin forgets to enable LACP on the port channel, the team will not form. Also, LACP does not work with Windows Server 2016 RDMA teaming because stateful offloads require all traffic for a given engine to arrive on the same NIC.
Understanding Load Balancing Algorithms
After you pick a teaming mode, you choose how the host distributes traffic. Windows Server offers three algorithms.
Address Hash
Address Hash creates a hash value from packet attributes—source and destination IP addresses, MAC addresses, and TCP/UDP port numbers. It then assigns traffic with the same hash to the same NIC.
Best for: Servers that send more data than they receive. File servers, web servers, and backup targets often fit this profile. Address Hash spreads outbound traffic evenly but leaves inbound traffic distribution to the switch.
Limitation: All special packets—ARP, ICMP, and IPv6 neighbor discovery—travel through the primary team member.
Hyper-V Port
Hyper-V Port ties each virtual machine to a specific physical NIC in the team. When a VM sends traffic, it always uses the same team member. The switch learns which MAC address lives on which port and directs inbound traffic accordingly.
Best for: Hyper-V hosts running many virtual machines. You get clean traffic separation per VM, and the switch handles inbound distribution naturally.
Limitation: A single VM cannot exceed the bandwidth of one physical adapter. If you have only a few VMs, some NICs may sit underutilized while others carry heavy loads.
Dynamic
Dynamic mode—introduced in Windows Server 2012 R2—combines the best of both worlds. It uses Address Hash for outbound traffic and Hyper-V Port behavior for inbound traffic. It also rebalances flows in real time if a team member fails or traffic patterns shift.
Best for: Almost every scenario. Microsoft recommends Dynamic as the default choice. It adapts to changing workloads without manual tuning.
Switch-Side Configuration Explained
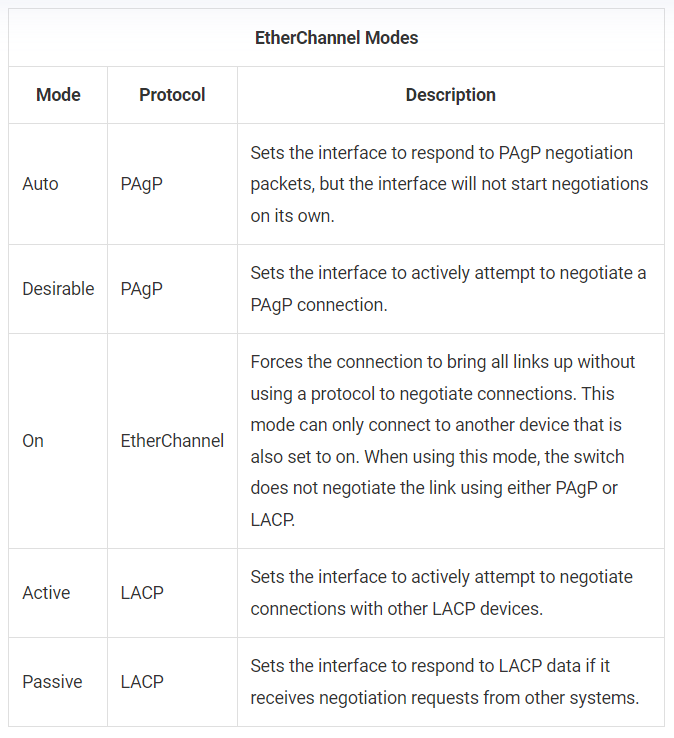
Your Windows Server teaming mode must match your switch configuration. If you mismatch them, you will see intermittent connectivity, broadcast storms, or complete network loss.
Cisco switches support three channel-group modes that map directly to Windows teaming modes:
On mode. The switch port joins the EtherChannel unconditionally. It does not negotiate. This matches Windows Static Teaming.
Active/Passive mode (LACP). The switch sends LACP packets to negotiate the link. Active means the switch initiates negotiation. Passive means the switch responds to LACP packets but does not start them. This matches Windows LACP teaming mode.
Desirable/Auto mode (PAgP). PAgP stands for Port Aggregation Protocol. Desirable initiates negotiation. Auto waits for the other side. PAgP works only between Cisco devices. Windows Server does not support PAgP, so never use Desirable or Auto when connecting to a Windows Server team.
| Windows Teaming Mode | Required Switch Configuration | Cisco Example |
|---|---|---|
| Switch Independent | None (any switch works) | No configuration needed |
| Static Teaming | Manual port channel (mode ON) | channel-group 1 mode on |
| LACP | LACP Active or Passive | channel-group 1 mode active |
Pro tip: If your server connects to two separate switches that do not stack, you must use Switch Independent mode. Switch-dependent modes require all team members to connect to the same switch or to a multi-chassis switch stack that shares one switch ID.
Step-by-Step: Configure NIC Teaming via Server Manager
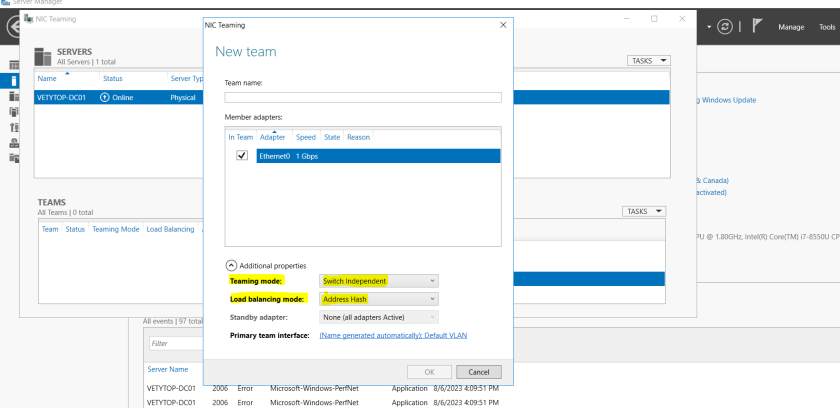
Follow these steps to build your first NIC team through the graphical interface.
Step 1: Open Server Manager and click Local Server in the left pane.
Step 2: Find the NIC Teaming property. It shows as Disabled by default. Click the word Disabled.
Step 3: The NIC Teaming dialog opens. In the bottom pane labeled Adapters and Interfaces, select the network adapters you want to team. Hold Ctrl to select multiple adapters.
Step 4: Right-click your selection and choose Add to New Team, or click TASKS in the top right and select Add to New Team.
Step 5: The New Team window appears. Enter a descriptive name such as PROD-TEAM-01.
Step 6: Expand Additional properties. Configure these three settings:
- Teaming mode: Choose Switch Independent, Static Teaming, or LACP.
- Load balancing mode: Choose Address Hash, Hyper-V Port, or Dynamic.
- Standby adapter: Choose None (all adapters active) or select one adapter to remain in standby.
Step 7: Click OK. Windows creates the team and installs the Multiplexor driver. This takes a few seconds.
Step 8: After creation, click the team name in the NIC Teaming dialog. Click the link next to Primary team interface to assign a VLAN if needed.
Step 9: Open Network Connections (ncpa.cpl). You will see a new adapter named after your team. Assign your IP address, subnet mask, gateway, and DNS to this adapter—not to the physical NICs.
Configure NIC Teaming with PowerShell
GUI works fine for one server. When you manage twenty hosts, PowerShell saves hours. The NetLbfo module handles all NIC teaming operations.
Creating a New Team
# Create a team with Switch Independent mode and Dynamic load balancing
New-NetLbfoTeam -Name "PROD-TEAM-01" `
    -TeamMembers "Ethernet","Ethernet 2" `
    -TeamingMode SwitchIndependent `
    -LoadBalancingAlgorithm Dynamic
# Create a team with LACP mode (requires switch-side LACP configuration)
New-NetLbfoTeam -Name "LACP-TEAM-01" `
-TeamMembers "NIC1","NIC2","NIC3" `
-TeamingMode LACP `
-LoadBalancingAlgorithm Dynamic# Create a team with one standby adapter
New-NetLbfoTeam -Name "STANDBY-TEAM" `
-TeamMembers "Ethernet","Ethernet 2","Ethernet 3" `
-TeamingMode SwitchIndependent `
-LoadBalancingAlgorithm Dynamic
# Set the standby adapter
Set-NetLbfoTeamMember -Name "Ethernet 3" -Team "STANDBY-TEAM" -AdministrativeMode StandbyAdding and Removing Team Members
# Add a new NIC to an existing team
Add-NetLbfoTeamMember -Name "Ethernet 4" -Team "PROD-TEAM-01"

# Remove a team entirely (breaks network connectivity—use iLO/iDRAC if remote)
Remove-NetLbfoTeam -Name "PROD-TEAM-01" -Confirm:$false
Setting VLAN and Checking Status
# Add a VLAN interface to the team (creates a sub-interface for VLAN 100)
Add-NetLbfoTeamNic -Team "PROD-TEAM-01" -VlanID 100 -Confirm:$false

# View all teams on the server
Get-NetLbfoTeam

# View detailed team member status
Get-NetLbfoTeamMember -Team "PROD-TEAM-01" | Format-Table Name, AdministrativeMode, OperationalState
Full Configuration Script for New Deployments
Save this script and run it on every new server to standardize your NIC teaming:
#requires -RunAsAdministrator

<#
.SYNOPSIS
    Standardizes NIC teaming on Windows Server.
.DESCRIPTION
    Creates a Switch Independent team with Dynamic load balancing.
    Adjust $TeamName, $TeamMembers, and $VlanID to match your environment.
#>

$TeamName = "PROD-TEAM-01"
$TeamMembers = @("Ethernet","Ethernet 2")
$VlanID = 0  # Set to 0 for no VLAN, or use your VLAN number

# Verify all team members exist
foreach ($nic in $TeamMembers) {
    if (-not (Get-NetAdapter -Name $nic -ErrorAction SilentlyContinue)) {
        Write-Error "Network adapter '$nic' not found. Exiting."
        exit 1
    }
}

# Remove existing team with the same name if present
$existingTeam = Get-NetLbfoTeam -Name $TeamName -ErrorAction SilentlyContinue
if ($existingTeam) {
    Write-Warning "Removing existing team: $TeamName"
    Remove-NetLbfoTeam -Name $TeamName -Confirm:$false
}

# Create the team
Write-Host "Creating team $TeamName with members: $($TeamMembers -join ', ')"
New-NetLbfoTeam -Name $TeamName -TeamMembers $TeamMembers `
    -TeamingMode SwitchIndependent -LoadBalancingAlgorithm Dynamic -Confirm:$false

# Add VLAN if specified
if ($VlanID -gt 0) {
    Write-Host "Adding VLAN $VlanID to team $TeamName"
    Add-NetLbfoTeamNic -Team $TeamName -VlanID $VlanID -Confirm:$false
}

# Display results
Get-NetLbfoTeam -Name $TeamName | Format-List *
Get-NetLbfoTeamMember -Team $TeamName | Format-Table Name, AdministrativeMode, OperationalState, TransmitLinkSpeed

Write-Host "Team $TeamName created successfully. Configure IP address on the team interface now."
Standby Adapter Configuration
A standby adapter sits idle until an active team member fails. You might use this when you have three NICs and want two active plus one hot spare.
When it makes sense: Standby adapters work best in Switch Independent mode with Address Hash load balancing. If you run a file server that sends far more data than it receives, you might dedicate two NICs to outbound traffic and keep one in reserve.
When to skip it: Microsoft advises against standby adapters in most modern setups. You already paid for the hardware, so you should use it. Dynamic load balancing handles failures gracefully without wasting a NIC. Think of it like building a four-lane highway and closing two lanes “just in case.”
If you still want a standby adapter, configure it in Server Manager under Additional properties > Standby adapter, or use the PowerShell example in the previous section.
NIC Teaming for Hyper-V Hosts
Hyper-V adds a layer of complexity. You can create a NIC team at the host level and then bind a Hyper-V Virtual Switch to that team. Virtual machines connect through the virtual switch and inherit the team’s redundancy.
Important rule: If you bind a Hyper-V Virtual Switch to a team, expose only the default team interface. Do not create additional VLAN-mode team interfaces on that team. The Hyper-V Virtual Switch manages VLANs itself, and adding team interfaces underneath breaks that model.
For Hyper-V specifically, Microsoft introduced Switch Embedded Teaming (SET) in Windows Server 2016. SET integrates teaming directly into the Hyper-V Virtual Switch rather than using the traditional LBFO model.
SET differences:
- Supports only Switch Independent mode.
- Supports only Dynamic and Hyper-V Port load balancing.
- Works with RDMA and SR-IOV.
- Requires PowerShell or System Center VMM to configure—not Server Manager.
# Create a Hyper-V switch with SET (requires at least Windows Server 2016)
New-VMSwitch -Name "SET-Switch" -NetAdapterName "Ethernet","Ethernet 2" `
    -EnableEmbeddedTeaming $true -AllowManagementOS $true

# Verify SET configuration
Get-VMSwitchTeam -Name "SET-Switch" | Format-List

# Change SET load balancing algorithm
Set-VMSwitchTeam -Name "SET-Switch" -LoadBalancingAlgorithm Dynamic
Traditional LBFO teaming still works fine on Hyper-V hosts. Use SET only when you need RDMA support or when you deploy Software-Defined Networking.
Best Practices and Troubleshooting
After building dozens of teams across different environments, I have settled on these rules:
Match speeds and duplex settings. All team members should run at identical speeds. Do not team a 1 Gbps adapter with a 10 Gbps adapter. Mismatched speeds cause unpredictable failover behavior.
Use identical hardware. While Windows allows mixing vendors, stick to the same NIC model, firmware, and driver version. This eliminates driver-level quirks and makes troubleshooting easier.
Document your switch ports. Label every cable and record which server NIC connects to which switch port. When a link fails at 2 AM, you will thank yourself.
Test failover before going live. Pull a cable during a maintenance window. Verify that ping continues, services stay up, and event logs show a clean failover. Plug the cable back in and confirm the team rebalances.
Monitor team health. Set up alerts for Event ID 16945 (team member failed) and Event ID 16946 (team member restored). Windows logs these in the System event log under source Microsoft-Windows-Netlbfo.
Prefer Dynamic load balancing. Unless you have a specific reason to choose Address Hash or Hyper-V Port, Dynamic adapts to your workload without manual tuning.
Use Switch Independent for simplicity. Unless your network team demands LACP or your switches require it, Switch Independent gives you the easiest deployment and the most flexibility across different switch hardware.
Common Issues and Fixes
Team shows “Degraded”: Check that all physical adapters link up. Run Get-NetLbfoTeamMember and verify each member shows Active. If one shows Failed, check the cable and switch port.
No connectivity after LACP team creation: Verify the switch port channel uses LACP Active or Passive. If the switch uses Static mode (ON), change your Windows team to Static Teaming.
VMs lose access when a team member fails: If you use Hyper-V Port load balancing, each VM ties to one physical NIC. Switch to Dynamic mode for faster recovery.
Inbound traffic uses only one NIC: This happens in Switch Independent mode. If you need true inbound load balancing, move to LACP or Static Teaming with a switch that supports it.
Conclusion
NIC teaming gives Windows Server administrators a powerful, built-in tool for network redundancy and performance. You do not need expensive third-party software or proprietary hardware. You simply need to understand three teaming modes—Switch Independent, Static Teaming, and LACP—and three load-balancing algorithms—Address Hash, Hyper-V Port, and Dynamic.
Start with Switch Independent and Dynamic for most servers. Move to LACP when you need switch-aware load balancing and your hardware supports it. Reserve Static Teaming for switches that lack LACP but still need link aggregation. Match your switch configuration exactly to your Windows teaming mode, test failover before production, and document everything.
With these principles, you will build network connections that survive cable cuts, NIC failures, and switch port errors without waking you up at night.
Want more articles and tutorials like this?
Get new tutorials, security alerts, and IT tips straight to your inbox.
That’s a really useful overview, especially the part about avoiding extra tools. I’ve found NIC teaming is essential for critical servers in my environment too.