RAID Explained: A Complete Guide to Every RAID Level for Beginners and Sysadmins
Storage drives fail. It is not a question of if, but when. If you manage servers, run a home lab, or simply want to protect your data, understanding RAID (Redundant Array of Independent Disks) is one of the smartest investments you can make. This guide breaks down every major RAID level, shows you how they work, and gives you hands-on Linux commands to build your own arrays.
RAID combines multiple physical disks into one logical unit to improve speed, add redundancy, or both. RAID 0 maximizes speed with zero protection, RAID 1 mirrors data for safety, RAID 5 and 6 use parity for balanced protection, and RAID 10 blends mirroring and striping for high-performance servers.
Table of Contents
- What Is RAID and Why Does It Matter?
- The Three Building Blocks of RAID
- RAID 0: Speed Without Safety
- RAID 1: Simple Mirroring for Critical Data
- RAID 5: The Sweet Spot for File Servers
- RAID 6: Double Parity for Extra Peace of Mind
- RAID 10: Performance Meets Redundancy
- Nested and Hybrid RAID Levels
- Software RAID vs. Hardware RAID
- How to Set Up RAID on Linux (Step-by-Step)
- Choosing the Right RAID Level for Your Workload
- RAID Is Not a Backup: What You Still Need to Do
- Conclusion
What Is RAID and Why Does It Matter?
RAID stands for Redundant Array of Independent Disks (some older sources say “Inexpensive Disks,” but the concept remains the same). Instead of trusting a single drive with your data, RAID spreads data across multiple drives. Depending on the level you choose, this delivers faster read/write speeds, fault tolerance against drive failures, or a mix of both.
RAID matters because hard drives and SSDs have physical limits. Mechanical drives wear out. SSDs have finite write cycles. When a drive dies in a RAID array, the system keeps running while you swap in a replacement. Without RAID, a single drive failure can mean hours of downtime—or permanent data loss.
The Three Building Blocks of RAID
Every RAID level mixes three basic techniques in different ways. Understanding these three ideas makes every RAID level easier to grasp.
Striping
Striping splits data into blocks and writes those blocks across multiple drives simultaneously. If you save a file to a two-drive striped array, half the file lands on Drive A and half on Drive B. Both drives work together, so read and write speeds increase. The downside? Striping alone offers zero redundancy. If one drive fails, the entire array fails because pieces of every file are missing.
Mirroring
Mirroring writes the exact same data to two or more drives at the same time. Drive A and Drive B become perfect clones. If Drive A dies, Drive B still has everything. Mirroring is simple, reliable, and fast for reads. The trade-off is capacity: you only get half your total disk space because every byte is stored twice.
Parity
Parity is a clever math trick. The RAID controller calculates a special checksum from your data and stores it across the array. If one drive fails, the controller uses the remaining data plus the parity checksum to reconstruct the missing information. Parity gives you redundancy without duplicating every file, so you keep more usable space than mirroring. The trade-off is slower write speeds because the system must calculate and write parity data on every save.
RAID 0: Speed Without Safety
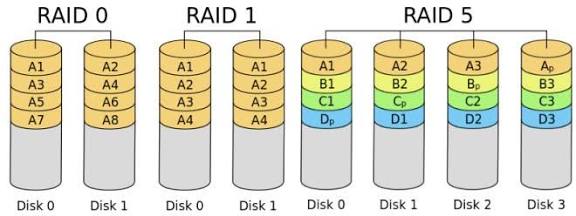
RAID 0 uses striping and nothing else. It requires at least two drives. The RAID controller splits every file into chunks and distributes those chunks across all drives in the array. Because multiple drives read and write at the same time, RAID 0 delivers the fastest performance of any standard RAID level.
How RAID 0 Works
Imagine you have two 1 TB drives. In RAID 0, they appear as a single 2 TB volume. When you copy a 2 GB video file, the controller writes 1 GB to Drive 1 and 1 GB to Drive 2 simultaneously. Both drives work in parallel, so the transfer finishes roughly twice as fast as a single drive.

The Risk You Must Accept
RAID 0 offers zero fault tolerance. If one drive fails, every file in the array becomes corrupted because pieces of those files live on the dead drive. There is no recovery. RAID 0 is fast, but it is also fragile.
When to Use RAID 0
Use RAID 0 only for temporary data that you can afford to lose. Video editors use it for scratch disks where raw footage gets copied, processed, and then moved to safer storage. Gamers sometimes use it for faster load times. Never use RAID 0 for important documents, photos, or anything you cannot recreate.
RAID 1: Simple Mirroring for Critical Data
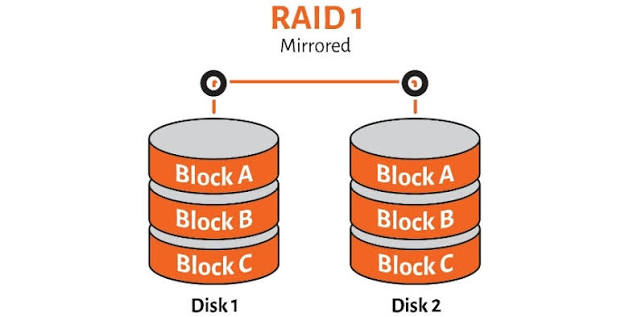
RAID 1 uses mirroring. It requires at least two drives, and every piece of data gets written to both drives at the same time. If one drive fails, the other keeps the system running without any data loss.
How RAID 1 Works
With two 1 TB drives in RAID 1, you get 1 TB of usable space. The RAID controller writes every block to both drives simultaneously. Read operations can pull data from either drive, which sometimes improves read speeds. Write speeds stay roughly the same as a single drive because both drives must finish writing before the operation completes.
Pros and Cons of RAID 1
RAID 1 is the simplest redundancy option. Recovery is straightforward: you replace the failed drive and copy data from the surviving mirror. The downside is capacity efficiency. You lose 50% of your raw storage because everything is duplicated. RAID 1 also does not speed up writes.
Best Use Cases for RAID 1
RAID 1 fits small business servers, boot drives, and any system where simplicity and data safety matter more than raw capacity. It works well for accounting databases, personal NAS devices, and operating system volumes where downtime is unacceptable.
RAID 5: The Sweet Spot for File Servers
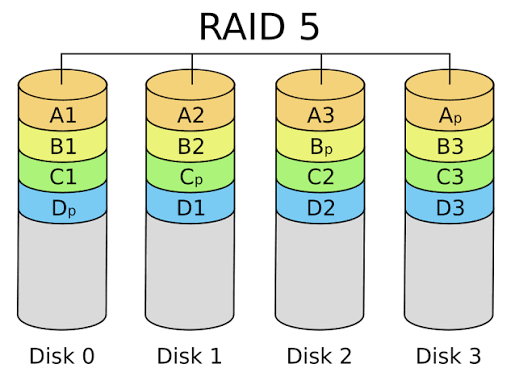
RAID 5 combines striping with distributed parity. It requires at least three drives. Data blocks stripe across all drives, and parity information rotates through the array so no single drive holds all the recovery data.
How RAID 5 Works
In a three-drive RAID 5 array, the controller writes data blocks to Drives 1 and 2, then stores parity on Drive 3. For the next set of blocks, the parity shifts to Drive 1, and data goes to Drives 2 and 3. This rotation continues across the array. If one drive fails, the controller reads the remaining data and parity blocks to rebuild the missing information.
Capacity and Performance
RAID 5 gives you (N - 1) / N usable capacity. With four 1 TB drives, you get 3 TB of usable space. One drive’s worth of capacity goes to parity. Read speeds are fast because multiple drives fetch data in parallel. Write speeds are slower than RAID 0 because the controller must calculate and write parity on every write operation.
The Rebuild Risk
RAID 5 can survive one drive failure. However, rebuilding a large array stresses the remaining drives. During a rebuild, which can take hours or days on multi-terabyte drives, the array runs in a degraded state. If a second drive fails during this window, all data is lost. This risk grows as drive capacities increase.
When RAID 5 Makes Sense
RAID 5 works well for file servers, media streaming, backup targets, and general-purpose storage where you want a balance of capacity, performance, and protection. It is cost-effective because you only sacrifice one drive’s worth of space for redundancy.
RAID 6: Double Parity for Extra Peace of Mind
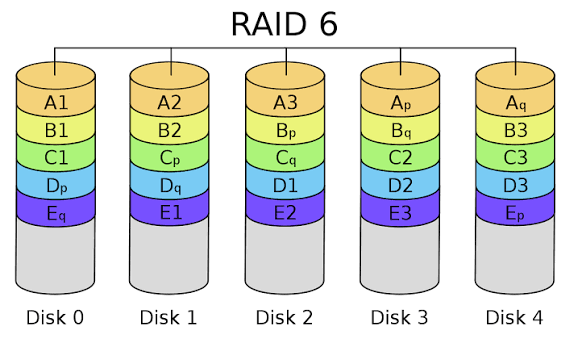
RAID 6 works like RAID 5, but it stores two sets of parity data instead of one. It requires at least four drives. This extra parity lets the array survive two simultaneous drive failures.
How RAID 6 Works
The controller calculates two independent parity values for every stripe of data. These parity blocks distribute across all drives, just like in RAID 5. If one drive fails, RAID 6 uses the first parity set to rebuild. If a second drive fails before the rebuild finishes, the second parity set saves the day.
Capacity and Performance Trade-Offs
RAID 6 gives you (N - 2) / N usable capacity. With six 1 TB drives, you get 4 TB of usable space. Two drives’ worth of capacity goes to parity. Write speeds are slower than RAID 5 because the controller must calculate and write two parity blocks for every write operation. Read speeds remain strong.
Why Choose RAID 6?
RAID 6 shines in large arrays with high-capacity drives. As drives get bigger, rebuild times stretch longer. A 16 TB drive can take days to rebuild. During that window, the remaining drives work hard and heat up, increasing the chance of a second failure. RAID 6 removes that anxiety by tolerating two failures. Enterprise storage systems, archival servers, and large NAS units often prefer RAID 6 for this reason.
RAID 10: Performance Meets Redundancy
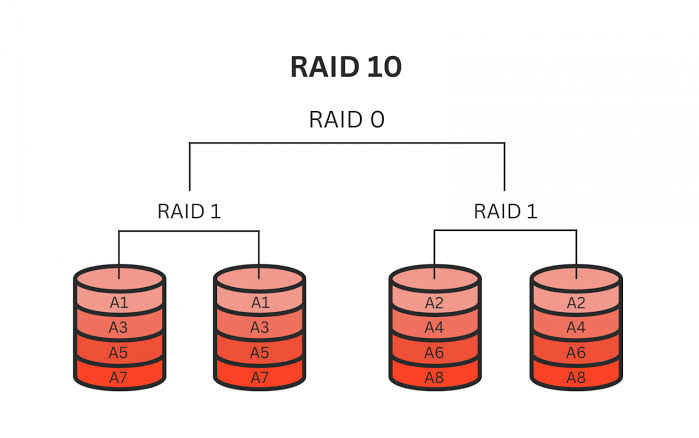
RAID 10 (also written as RAID 1+0) is a nested level. It creates multiple RAID 1 mirrored pairs, then stripes data across those pairs using RAID 0. It requires at least four drives and must use an even number of drives.
How RAID 10 Works
With four drives, the controller mirrors Drive 1 with Drive 2, and Drive 3 with Drive 4. These two mirrored pairs then form a striped array. When you write data, the controller stripes it across both mirror pairs. Each pair stores identical copies.
Fault Tolerance in RAID 10
RAID 10 can survive multiple drive failures—as long as both drives in the same mirrored pair do not die. In a four-drive setup, you could lose Drive 1 and Drive 3 simultaneously and still recover. But if you lose Drive 1 and Drive 2 (the same mirror pair), the array fails. The odds favor RAID 10 because drives in different pairs can fail without consequence.
Speed and Capacity
RAID 10 delivers excellent read and write speeds. Writes are faster than RAID 5 or 6 because there is no parity calculation—only mirroring and striping. Rebuilds are also fast because the controller simply copies data from the surviving mirror. Usable capacity is 50%, the same as RAID 1.
Best Use Cases for RAID 10
RAID 10 is the go-to choice for database servers, email servers, virtualization hosts, and any workload that demands both high I/O performance and strong redundancy. Web hosting providers and enterprises running heavy transactional databases rely on RAID 10 because it minimizes rebuild time and maximizes throughput.
Nested and Hybrid RAID Levels
Beyond the standard levels, administrators sometimes combine RAID types for specific needs.
RAID 50 (RAID 5+0)
RAID 50 stripes data across multiple RAID 5 arrays. For example, you could create two RAID 5 arrays of three drives each, then stripe them together. This setup improves performance and still tolerates one failure per RAID 5 group. It needs at least six drives.
RAID 60 (RAID 6+0)
RAID 60 stripes data across multiple RAID 6 arrays. Each RAID 6 group tolerates two failures. This configuration suits massive storage systems where both performance and extreme fault tolerance matter. It needs at least eight drives.
JBOD: Just a Bunch of Disks
JBOD is not technically RAID. It simply chains drives together into one large volume without striping, mirroring, or parity. You get 100% capacity, but zero redundancy. If any drive fails, you lose the data on that drive. JBOD works for non-critical bulk storage where capacity matters more than safety.
Software RAID vs. Hardware RAID
You can implement RAID in two ways, and the choice affects performance, cost, and flexibility.
Software RAID
The operating system manages the array. Linux uses mdadm. Windows offers Storage Spaces. Software RAID is cheaper because you do not need a special controller. It works well for general workloads. The downside is CPU overhead: your processor handles the RAID calculations, which can slow down other tasks during heavy I/O.
Hardware RAID
A dedicated RAID controller card manages the array. These cards have their own processors and cache memory. Hardware RAID offloads work from the main CPU, delivers faster performance, and often supports hot-swapping failed drives without shutting down. The downside is cost: good controller cards are expensive, and if the card itself fails, you may need an identical replacement to recover the array.
For most home labs and small businesses, software RAID is more than enough. Enterprises running heavy databases usually invest in hardware RAID for the extra speed and reliability.
How to Set Up RAID on Linux (Step-by-Step)
Linux makes RAID setup straightforward with the mdadm tool. The following examples show you how to create, verify, and manage arrays on a typical Ubuntu or RHEL system.
Step 1: Install mdadm
Most Linux distributions include mdadm by default. If it is missing, install it:
# On Debian/Ubuntu
sudo apt update && sudo apt install mdadm

# On RHEL/CentOS/Rocky Linux
sudo dnf install mdadm
Step 2: Identify Your Drives
List all attached block devices before you start:
lsblkYou should see drives like /dev/sdb, /dev/sdc, /dev/sdd. Never include your operating system drive in a RAID array. In the examples below, we use /dev/sdb, /dev/sdc, and /dev/sdd as data drives.
Step 3: Create a RAID Array
Create RAID 0 (2 drives, no redundancy)
sudo mdadm --create /dev/md0 --level=0 --raid-devices=2 /dev/sdb /dev/sdcCreate RAID 1 (2 drives, mirrored)
sudo mdadm --create /dev/md0 --level=1 --raid-devices=2 /dev/sdb /dev/sdcCreate RAID 5 (3+ drives, single parity)
sudo mdadm --create /dev/md0 --level=5 --raid-devices=3 /dev/sdb /dev/sdc /dev/sddCreate RAID 6 (4+ drives, double parity)
sudo mdadm --create /dev/md0 --level=6 --raid-devices=4 /dev/sdb /dev/sdc /dev/sdd /dev/sdeCreate RAID 10 (4+ drives, even number, nested)
sudo mdadm --create /dev/md0 --level=10 --raid-devices=4 /dev/sdb /dev/sdc /dev/sdd /dev/sdeStep 4: Monitor Array Status
Check the status of all RAID arrays:
cat /proc/mdstatFor detailed information about a specific array:
sudo mdadm --detail /dev/md0Step 5: Create a Filesystem
After creating the array, format it with your preferred filesystem:
# Create an XFS filesystem
sudo mkfs.xfs /dev/md0

# Or create an ext4 filesystem
sudo mkfs.ext4 /dev/md0
Step 6: Mount the Array
Create a mount point and mount the array:
sudo mkdir /mnt/raidstorage
sudo mount /dev/md0 /mnt/raidstorage
To mount the array automatically at boot, add an entry to /etc/fstab. First, find the UUID:
sudo blkid /dev/md0Then edit /etc/fstab:
sudo cp /etc/fstab /etc/fstab.backup
sudo nano /etc/fstab
Add a line like this (replace the UUID with your actual value):
UUID=your-uuid-here /mnt/raidstorage xfs defaults 0 0Step 7: Add a Hot Spare Drive
A hot spare sits idle until a drive fails, then automatically replaces it. This reduces downtime:
sudo mdadm --manage /dev/md0 --add /dev/sdfVerify the spare appears in the detail output:
sudo mdadm --detail /dev/md0Step 8: Simulate and Replace a Failed Drive
To test failure handling, mark a drive as faulty:
sudo mdadm --manage /dev/md0 --set-faulty /dev/sdbIf you have a hot spare, the array starts rebuilding automatically. To remove the failed drive and add a replacement:
sudo mdadm --manage /dev/md0 --remove /dev/sdb
sudo mdadm --manage /dev/md0 --add /dev/sdg
Step 9: Save the Configuration
Always save your RAID configuration so it persists after reboot:
sudo mdadm --detail --scan | sudo tee -a /etc/mdadm/mdadm.conf
sudo update-initramfs -u
Step 10: Remove an Array
If you need to delete an array, follow these steps carefully:
# Unmount the array
sudo umount /dev/md0

# Stop the array
sudo mdadm --stop /dev/md0

# Remove the array
sudo mdadm --remove /dev/md0

# Clear RAID metadata from each drive
sudo mdadm --zero-superblock /dev/sdb /dev/sdc /dev/sdd /dev/sde
Choosing the Right RAID Level for Your Workload
Picking a RAID level depends on four factors: how much speed you need, how much protection you want, how many drives you have, and your budget.
| RAID Level | Min Drives | Fault Tolerance | Usable Capacity | Best For |
|---|---|---|---|---|
| RAID 0 | 2 | None | 100% | Video editing scratch disks, temporary data |
| RAID 1 | 2 | 1 drive | 50% | Boot drives, small business servers, critical data |
| RAID 5 | 3 | 1 drive | (N-1)/N | File servers, general storage, media streaming |
| RAID 6 | 4 | 2 drives | (N-2)/N | Large NAS, archival storage, enterprise arrays |
| RAID 10 | 4 | 1 per mirror pair | 50% | Databases, email servers, virtualization hosts |
If you need maximum speed and do not care about losing data, RAID 0 is your answer. If you want simple protection for a small setup, RAID 1 is hard to beat. For balanced everyday storage, RAID 5 remains popular. If you run large arrays with high-capacity drives, RAID 6 removes the rebuild anxiety. For demanding databases and web servers, RAID 10 offers the best mix of speed and safety.
RAID Is Not a Backup: What You Still Need to Do
This point is critical: RAID protects against drive failure, not data loss. RAID will not save you from ransomware, accidental deletion, file corruption, or a power surge that fries your entire server. If you delete a file by mistake, RAID deletes it from every drive simultaneously.
You still need a real backup strategy. Follow the 3-2-1 rule: keep three copies of your data, on two different media types, with one copy stored offsite. Use RAID to keep your systems running when a drive dies. Use backups to recover when everything else goes wrong.
Conclusion
RAID is one of the most practical tools in any system administrator’s toolkit. From the blazing speed of RAID 0 to the bulletproof redundancy of RAID 6 and the balanced power of RAID 10, each level serves a specific purpose. The key is matching the RAID level to your actual needs—not just picking the one with the biggest numbers.
Start small. If you are new to RAID, build a RAID 1 mirror or a RAID 5 array in a virtual machine or a spare machine. Practice creating arrays, failing drives, and rebuilding them. The confidence you gain from hands-on practice is worth more than any guide.
Want more articles and tutorials like this?
Get new tutorials, security alerts, and IT tips straight to your inbox.
That’s a really helpful overview – I’ve been meaning to get into RAID setups to better protect my files. The explanation of the different levels was clear and easy to follow.