How to Configure VLAN Segmentation: A Practical Guide to Building Secure Enterprise Networks
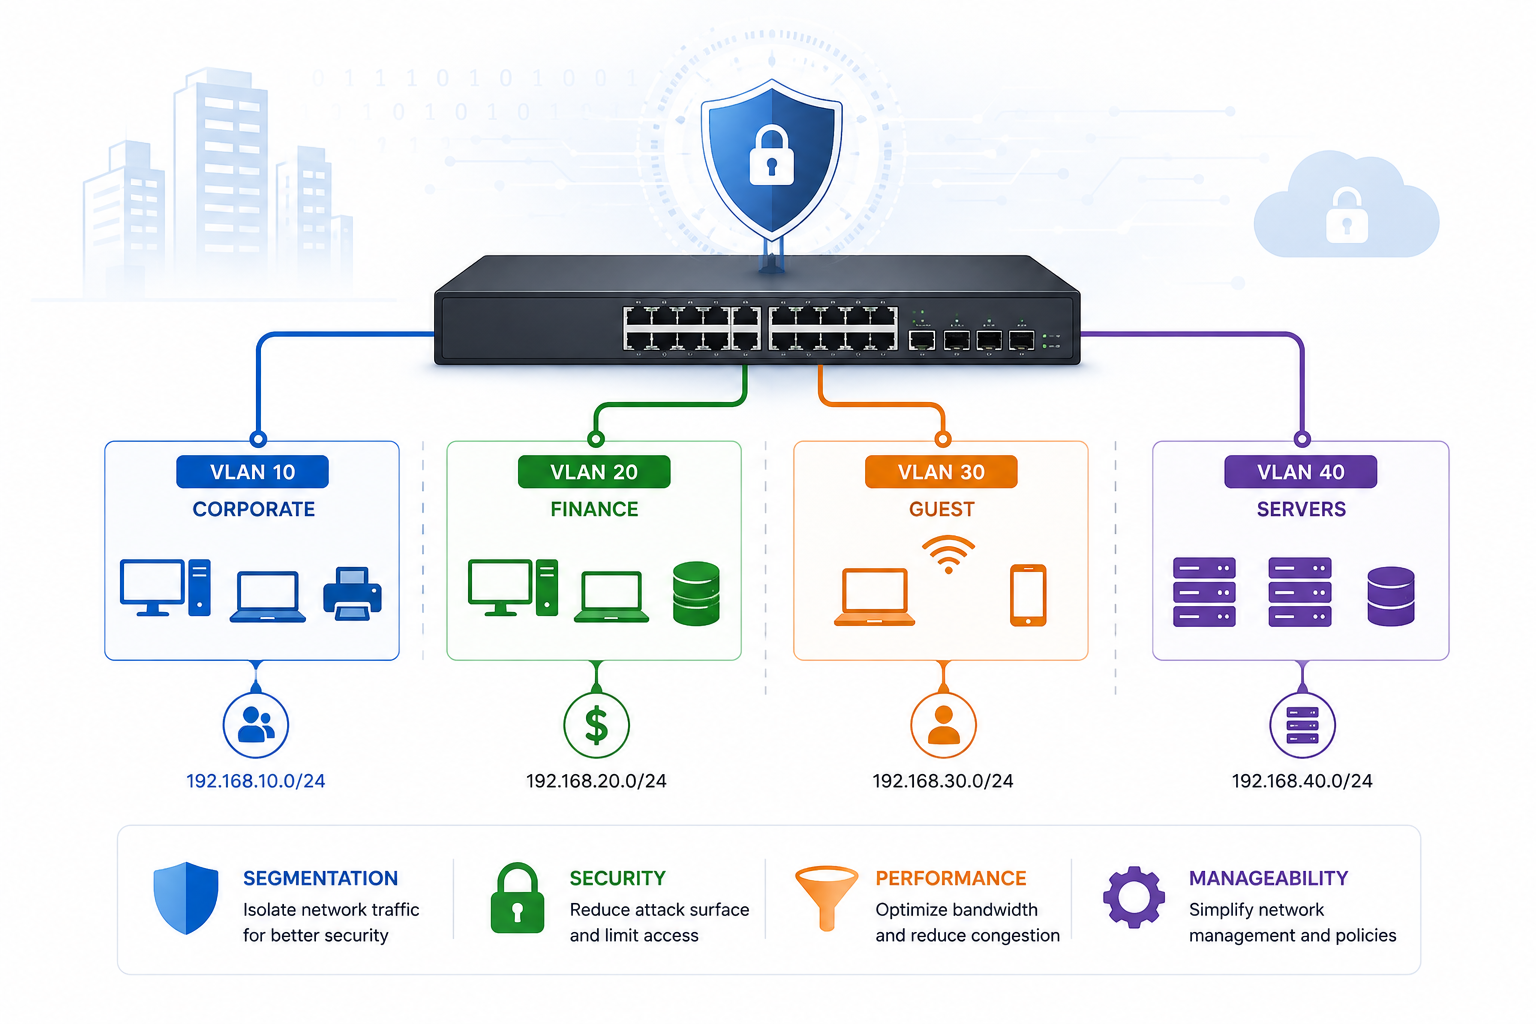
Flat networks create flat problems. When every device shares the same broadcast domain, a single compromised endpoint can reach every server, printer, and workstation without crossing a single security checkpoint. VLAN segmentation fixes this by splitting one physical network into multiple logical zones. This guide walks you through why VLANs matter, how to design them, and how to configure them with real-world examples.
VLAN segmentation divides your physical network into isolated logical zones, forcing all cross-zone traffic through a Layer 3 enforcement point where firewalls and ACLs can inspect and control it. This simple change dramatically reduces your attack surface, cuts broadcast noise, and helps you meet compliance requirements like PCI-DSS and HIPAA.
Table of Contents
- What Is VLAN Segmentation and Why Does It Matter?
- How VLAN Segmentation Protects Your Network
- Designing Your VLAN Architecture
- Configuring VLANs: Step-by-Step
- Enabling Communication Between VLANs
- Hardening Your VLAN Deployment
- Common VLAN Mistakes to Avoid
- Beyond VLANs: Microsegmentation and Zero Trust
- Conclusion
- Ready to Secure Your Network?
What Is VLAN Segmentation and Why Does It Matter?
A VLAN (Virtual Local Area Network) splits one physical switch infrastructure into multiple isolated broadcast domains. Devices in VLAN 10 cannot talk directly to devices in VLAN 20 at Layer 2. If they need to communicate, traffic must pass through a Layer 3 device.
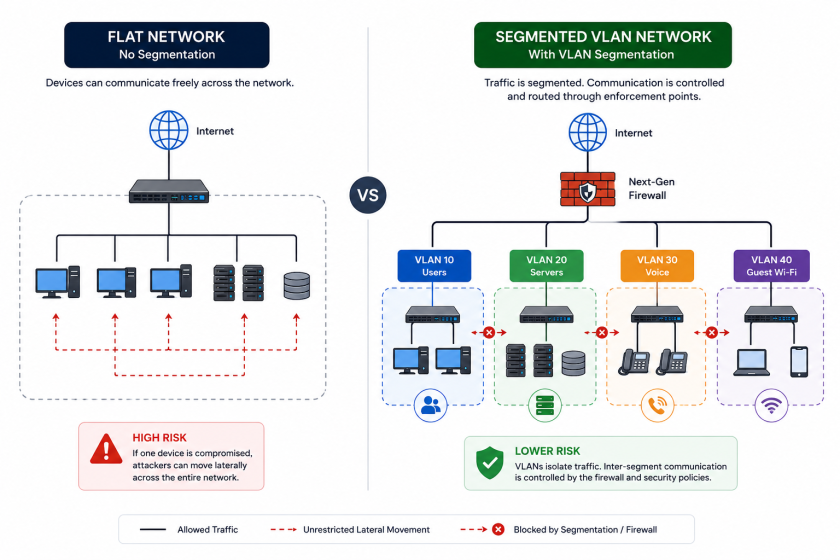
Think of VLANs as separate rooms inside the same building. You control who enters each room and what they can do once inside. Without VLANs, every device sits in one giant room. A compromised printer or infected laptop can broadcast to every other device. Attackers love flat networks because lateral movement becomes trivial.
With VLANs, you contain that damage. A compromised HR workstation stays in the HR VLAN. It cannot directly reach finance servers or domain controllers. The attacker must cross a routed boundary where your firewall can block, log, or inspect the traffic.
How VLAN Segmentation Protects Your Network
Containing Lateral Movement
Lateral movement is what happens after an attacker breaches your perimeter. They land on one device and hop from machine to machine until they reach something valuable. Verizon’s 2025 Data Breach Investigations Report shows that attackers commonly leverage stolen credentials and internal access to move deeper into compromised environments.
On a flat network, this movement happens at Layer 2. The attacker sends ARP requests, discovers neighbors, and probes for open shares. No firewall sees this traffic because it never leaves the broadcast domain.
VLAN segmentation breaks this chain. When the attacker’s compromised PC sits in VLAN 20 (HR) and your domain controllers live in VLAN 50 (Servers), the attacker cannot ARP-scan the servers. Their traffic must route through a Layer 3 gateway. That gateway can drop the packets or send them to an IDS for inspection.
![Diagram showing attacker contained within one VLAN] Figure 2: VLAN containment stops an attacker from reaching critical systems after initial compromise.Alt text: Security diagram showing an attacker stuck in the HR VLAN while other VLANs remain protected.
Cutting Broadcast Traffic
Broadcast traffic grows with the number of devices in a domain. Every ARP request, DHCP discovery, and NetBIOS announcement reaches every port in the VLAN. On a flat network with 500 devices, these broadcasts consume bandwidth and CPU cycles everywhere.
Segmenting into smaller VLANs shrinks each broadcast domain. If you split 500 devices across five VLANs of 100 devices each, each VLAN handles only its own broadcasts. Switch CPUs stay cooler. Endpoints waste less time processing irrelevant packets.
This matters most for latency-sensitive traffic like VoIP. Placing VoIP phones in their own VLAN isolates them from the broadcast noise of PCs, printers, and IoT devices.
Meeting Compliance Requirements
Regulatory frameworks explicitly require network segmentation. PCI-DSS mandates that the cardholder data environment (CDE) must be isolated from all other networks with documented firewall controls. HIPAA requires protected health information (PHI) systems to sit apart from general corporate infrastructure.
VLANs provide the network layer for this isolation. Auditors can verify that VLAN 100 (CDE) has no direct Layer 2 path to VLAN 10 (Corporate). Firewall logs can prove that only authorized traffic flows between them.
Designing Your VLAN Architecture
Common VLAN Design Patterns
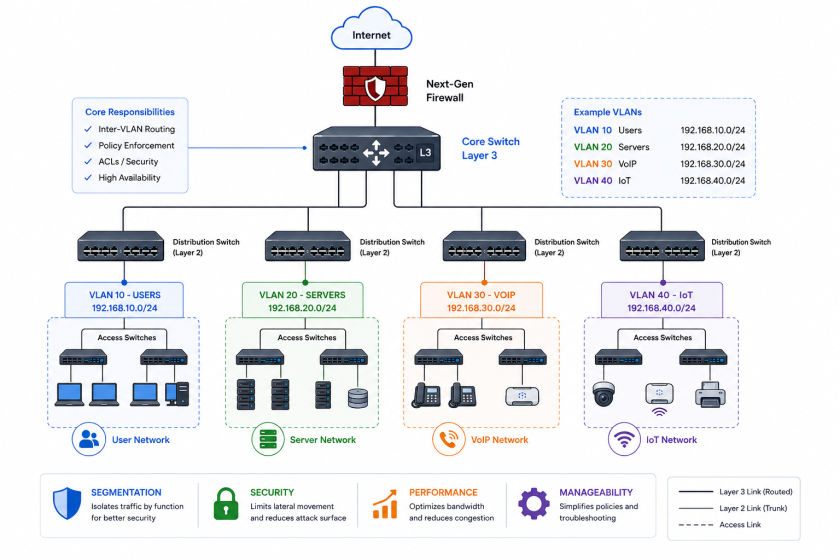
Most enterprises follow a function-based VLAN design. They group devices by role rather than by department. This approach scales better and creates cleaner security boundaries.
Here is a typical enterprise VLAN layout:
| VLAN ID | Purpose | Subnet | Notes |
|---|---|---|---|
| 10 | Management | 192.168.10.0/24 | Switches, APs, UPS |
| 20 | Corporate Users | 192.168.20.0/23 | Employee PCs and laptops |
| 30 | Servers | 192.168.30.0/24 | Domain controllers, databases |
| 40 | VoIP | 192.168.40.0/24 | IP phones and call managers |
| 50 | Guest Wi-Fi | 192.168.50.0/24 | Visitor devices, internet-only |
| 60 | IoT / CCTV | 192.168.60.0/24 | Cameras, sensors, smart devices |
| 70 | Printers | 192.168.70.0/24 | Network printers and MFPs |
| 80 | DMZ | 10.0.80.0/24 | Public-facing services |
This layout separates high-risk devices from sensitive systems. It also gives each function predictable IP addressing, which makes troubleshooting easier.
VLAN Numbering Best Practices
Stick to a numbering scheme that your whole team understands. Avoid VLAN 1 entirely. Cisco switches use VLAN 1 as the default native VLAN, and attackers know this. Many VLAN-hopping exploits target VLAN 1 specifically.
Keep your user and server VLANs in the 10-99 range for easy reading. Document every VLAN in a shared spreadsheet or IPAM tool so no one accidentally duplicates a subnet. Never place production devices in VLAN 1. Create a dedicated unused VLAN (like 999) and set it as your native VLAN on all trunks.
IP Subnet Planning
Each VLAN needs its own IP subnet. The default gateway for each VLAN lives on the Layer 3 switch or router that handles inter-VLAN routing.
Size your subnets for growth. A /24 (254 usable addresses) works well for most VLANs. Use /23 (510 addresses) for large user VLANs. Use /25 or /26 for small, sensitive segments like management or DMZ. Always leave gaps in your IP plan so you can expand later without renumbering everything.
Configuring VLANs: Step-by-Step
Creating VLANs on Cisco Switches
Start by creating the VLANs in the database. On modern Cisco IOS switches, you create VLANs directly from global configuration mode.
Switch(config)# vlan 10
Switch(config-vlan)# name Management
Switch(config-vlan)# exit

Switch(config)# vlan 20
Switch(config-vlan)# name Corporate_Users
Switch(config-vlan)# exit

Switch(config)# vlan 30
Switch(config-vlan)# name Servers
Switch(config-vlan)# exit

Switch(config)# vlan 40
Switch(config-vlan)# name VoIP
Switch(config-vlan)# exit

Switch(config)# vlan 50
Switch(config-vlan)# name Guest_WiFi
Switch(config-vlan)# exit

Switch(config)# vlan 999
Switch(config-vlan)# name Native_Unused
Switch(config-vlan)# exit
Verify your VLANs exist with the show vlan brief command.
Setting Up Trunk Ports with 802.1Q
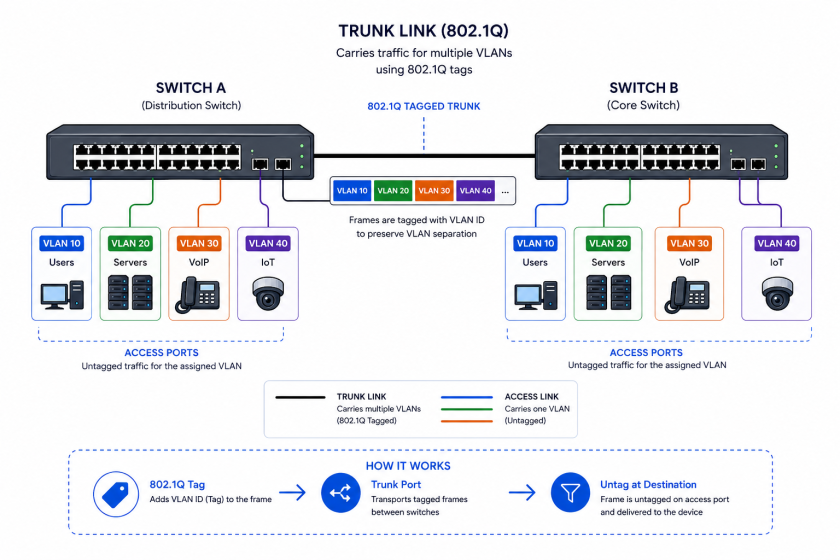
Trunk ports carry traffic for multiple VLANs between switches. The 802.1Q standard adds a 4-byte tag to each frame so the receiving switch knows which VLAN it belongs to.
Never allow all VLANs on a trunk by default. Explicitly list only the VLANs that need to cross that link. This limits the blast radius if someone compromises a switch or misconfigures a port.
Switch(config)# interface GigabitEthernet0/1
Switch(config-if)# description Trunk_to_Core_Switch
Switch(config-if)# switchport trunk encapsulation dot1q
Switch(config-if)# switchport mode trunk
Switch(config-if)# switchport trunk native vlan 999
Switch(config-if)# switchport trunk allowed vlan 10,20,30,40,50
Switch(config-if)# no shutdown
The switchport trunk native vlan 999 command moves untagged traffic to an unused VLAN. The switchport trunk allowed vlan command restricts this trunk to only the VLANs you specify.
Configuring Access Ports
Access ports belong to a single VLAN. Connect end devices like PCs, phones, and printers to access ports.
Switch(config)# interface range GigabitEthernet0/2-10
Switch(config-if-range)# description Corporate_User_Ports
Switch(config-if-range)# switchport mode access
Switch(config-if-range)# switchport access vlan 20
Switch(config-if-range)# switchport nonegotiate
Switch(config-if-range)# spanning-tree portfast
Switch(config-if-range)# no shutdown
The switchport nonegotiate command disables Dynamic Trunking Protocol (DTP). Without this, an attacker could trick the port into becoming a trunk by sending DTP packets. PortFast lets the port transition to forwarding immediately, which is safe for end-user ports but never use it on trunk or uplink ports.
For VoIP phones that share a port with a PC, use a voice VLAN:
Switch(config)# interface GigabitEthernet0/11
Switch(config-if)# description VoIP_Phone_with_PC
Switch(config-if)# switchport mode access
Switch(config-if)# switchport access vlan 20
Switch(config-if)# switchport voice vlan 40
Switch(config-if)# spanning-tree portfast
Switch(config-if)# no shutdown
The phone communicates on VLAN 40, while the PC plugged into the phone’s pass-through port stays on VLAN 20. The switch automatically applies QoS policies to the voice VLAN to protect call quality.
Enabling Communication Between VLANs
VLANs isolate devices at Layer 2, but most networks need some cross-VLAN communication. A user in VLAN 20 needs to reach a file server in VLAN 30. This requires Layer 3 routing.
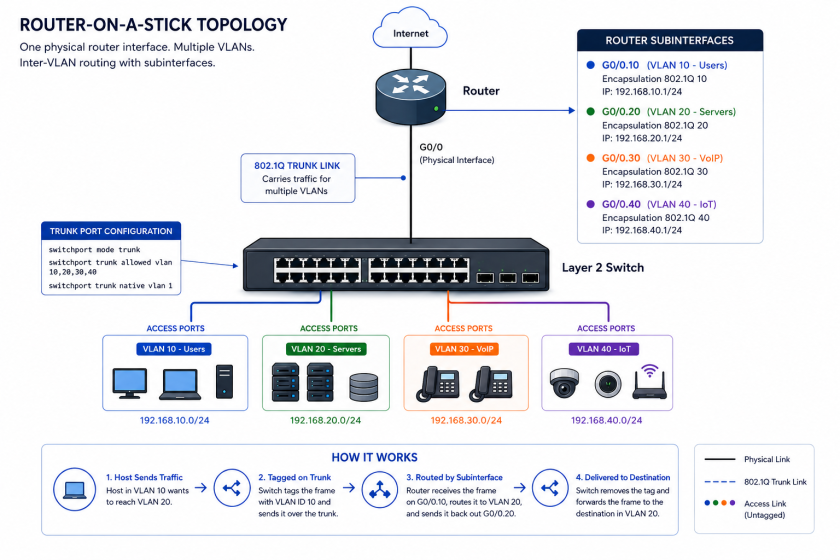
Router-on-a-Stick Setup
Small networks often use a single router with subinterfaces. One physical interface connects to the switch via an 802.1Q trunk. Virtual subinterfaces handle each VLAN.
Router(config)# interface GigabitEthernet0/0
Router(config-if)# no shutdown
Router(config-if)# exit

Router(config)# interface GigabitEthernet0/0.10
Router(config-subif)# encapsulation dot1Q 10
Router(config-subif)# ip address 192.168.10.1 255.255.255.0
Router(config-subif)# exit

Router(config)# interface GigabitEthernet0/0.20
Router(config-subif)# encapsulation dot1Q 20
Router(config-subif)# ip address 192.168.20.1 255.255.254.0
Router(config-subif)# exit

Router(config)# interface GigabitEthernet0/0.30
Router(config-subif)# encapsulation dot1Q 30
Router(config-subif)# ip address 192.168.30.1 255.255.255.0
Router(config-subif)# exit
Verify routing works with show ip route. Router-on-a-stick works well for small sites but creates a single point of failure.
Layer 3 Switch with SVIs
Enterprise networks prefer Layer 3 switches for inter-VLAN routing. They route at hardware speed with lower latency than routers. You create Switch Virtual Interfaces (SVIs), one per VLAN, and the switch routes between them internally.
CoreSwitch(config)# ip routing
CoreSwitch(config)# interface Vlan10
CoreSwitch(config-if)# ip address 192.168.10.1 255.255.255.0
CoreSwitch(config-if)# no shutdown
CoreSwitch(config-if)# exit

CoreSwitch(config)# interface Vlan20
CoreSwitch(config-if)# ip address 192.168.20.1 255.255.254.0
CoreSwitch(config-if)# no shutdown
CoreSwitch(config-if)# exit

CoreSwitch(config)# interface Vlan30
CoreSwitch(config-if)# ip address 192.168.30.1 255.255.255.0
CoreSwitch(config-if)# no shutdown
CoreSwitch(config-if)# exit
The ip routing command enables Layer 3 functionality. Without it, the switch treats SVIs as management interfaces only. Each SVI needs at least one active access or trunk port in that VLAN, or the interface stays down.
For high availability, use two Layer 3 switches with HSRP or VRRP. If one switch fails, the other takes over the gateway IP address within seconds.
Hardening Your VLAN Deployment
Native VLAN Security
The native VLAN carries untagged traffic across a trunk. By default, Cisco uses VLAN 1. Attackers exploit this with double-tagging attacks that hop from the native VLAN into other VLANs.
Fix this in three steps. First, create an unused VLAN for native traffic. Second, set the native VLAN on every trunk. Third, prune VLAN 1 from all trunks.
Switch(config)# vlan 999
Switch(config-vlan)# name Native_Unused
Switch(config-vlan)# exit

Switch(config)# interface range GigabitEthernet0/1-4
Switch(config-if-range)# switchport trunk native vlan 999
Switch(config-if-range)# switchport trunk allowed vlan remove 1
Never assign devices to VLAN 999. Its only purpose is to catch untagged traffic that should not exist on your network.
ACLs and Firewall Policies
VLANs create boundaries, but you still need rules that define what can cross them. Apply ACLs on SVIs to enforce least-privilege access.
Here is an example ACL that lets corporate users reach servers on HTTPS and DNS only:
CoreSwitch(config)# ip access-list extended VLAN20_to_VLAN30
CoreSwitch(config-ext-nacl)# permit tcp 192.168.20.0 0.0.1.255 192.168.30.0 0.0.0.255 eq 443
CoreSwitch(config-ext-nacl)# permit udp 192.168.20.0 0.0.1.255 192.168.30.0 0.0.0.255 eq 53
CoreSwitch(config-ext-nacl)# permit tcp 192.168.20.0 0.0.1.255 192.168.30.0 0.0.0.255 eq 53
CoreSwitch(config-ext-nacl)# deny ip 192.168.20.0 0.0.1.255 192.168.30.0 0.0.0.255 log
CoreSwitch(config-ext-nacl)# exit

CoreSwitch(config)# interface Vlan20
CoreSwitch(config-if)# ip access-group VLAN20_to_VLAN30 in
The log keyword sends denied packets to your syslog server. Review these logs regularly to spot misconfigurations or malicious probes.
For guest Wi-Fi, apply a much stricter policy. Guest devices should only reach the internet. Block them from all internal RFC 1918 addresses:
CoreSwitch(config)# ip access-list extended Guest_Outbound
CoreSwitch(config-ext-nacl)# deny ip 192.168.50.0 0.0.0.255 10.0.0.0 0.255.255.255
CoreSwitch(config-ext-nacl)# deny ip 192.168.50.0 0.0.0.255 172.16.0.0 0.15.255.255
CoreSwitch(config-ext-nacl)# deny ip 192.168.50.0 0.0.0.255 192.168.0.0 0.0.255.255
CoreSwitch(config-ext-nacl)# permit ip 192.168.50.0 0.0.0.255 any
CoreSwitch(config-ext-nacl)# exit

CoreSwitch(config)# interface Vlan50
CoreSwitch(config-if)# ip access-group Guest_Outbound in
Common VLAN Mistakes to Avoid
Even experienced engineers make these errors. Watch for them during design and implementation.
Leaving VLAN 1 in production. VLAN 1 carries control traffic like CDP, VTP, and PAgP. Putting user devices there exposes them to unnecessary risk. Create dedicated VLANs for every function.
Allowing all VLANs on every trunk. Default trunk behavior carries every VLAN. This wastes bandwidth and expands the attack surface. Use explicit allowed VLAN lists on every trunk.
Forgetting to secure the native VLAN. If you leave it at VLAN 1, attackers can hop VLANs with crafted double-tagged frames. Change the native VLAN to an unused ID and prune VLAN 1.
Routing between VLANs without inspection. Simply enabling ip routing lets all VLANs talk freely. This defeats the purpose of segmentation. Apply ACLs or route traffic through a firewall for cross-zone flows.
Neglecting documentation. Without a master spreadsheet or IPAM tool, you will forget which VLAN serves which purpose. Document every VLAN ID, name, subnet, gateway, and allowed traffic flows.
Oversizing subnets. A /16 subnet in a single VLAN gives you 65,000 broadcast recipients. Size subnets for actual device counts plus reasonable growth. A /24 or /23 handles most use cases.
Beyond VLANs: Microsegmentation and Zero Trust
VLANs provide coarse-grained segmentation. They divide your network into zones, but every device inside a zone trusts every other device. If an attacker compromises one server in the server VLAN, they can reach all servers in that VLAN without crossing a firewall.
Microsegmentation solves this by enforcing policies at the workload level. Instead of trusting an entire VLAN, you create rules between individual devices or applications. A web server can reach its application tier on port 8080, but it cannot reach the database directly.
Gartner predicts that 60% of enterprises working toward Zero Trust will use more than one form of microsegmentation by 2026, up from less than 5% in 2023. The technology has matured, and vendors now offer agentless options.
VLANs and microsegmentation work together. VLANs provide the macro boundaries and reduce broadcast domains. Microsegmentation adds granular east-west controls inside those boundaries. Start with VLANs to gain immediate improvement. Add microsegmentation as your security posture matures.
Conclusion
VLAN segmentation transforms a flat, risky network into a structured environment where you control who talks to whom. It shrinks broadcast domains, contains lateral movement, and creates the foundation for compliance. The configurations in this guide give you a starting point you can adapt to your own switches and routers.
Remember that VLANs alone do not secure your network. They create boundaries, but you must enforce policies at those boundaries with ACLs, firewalls, and monitoring. Change your native VLAN, prune unnecessary trunk traffic, and document everything. Then layer on microsegmentation and Zero Trust principles as your organization grows.
Network security is not a one-time project. It is a continuous process of segmentation, inspection, and refinement. Start with VLANs today, and build from there.
Want more articles and tutorials like this?
Get new tutorials, security alerts, and IT tips straight to your inbox.