How to Configure a Cisco Switch with a RADIUS Server: A Complete Guide for Network Admins
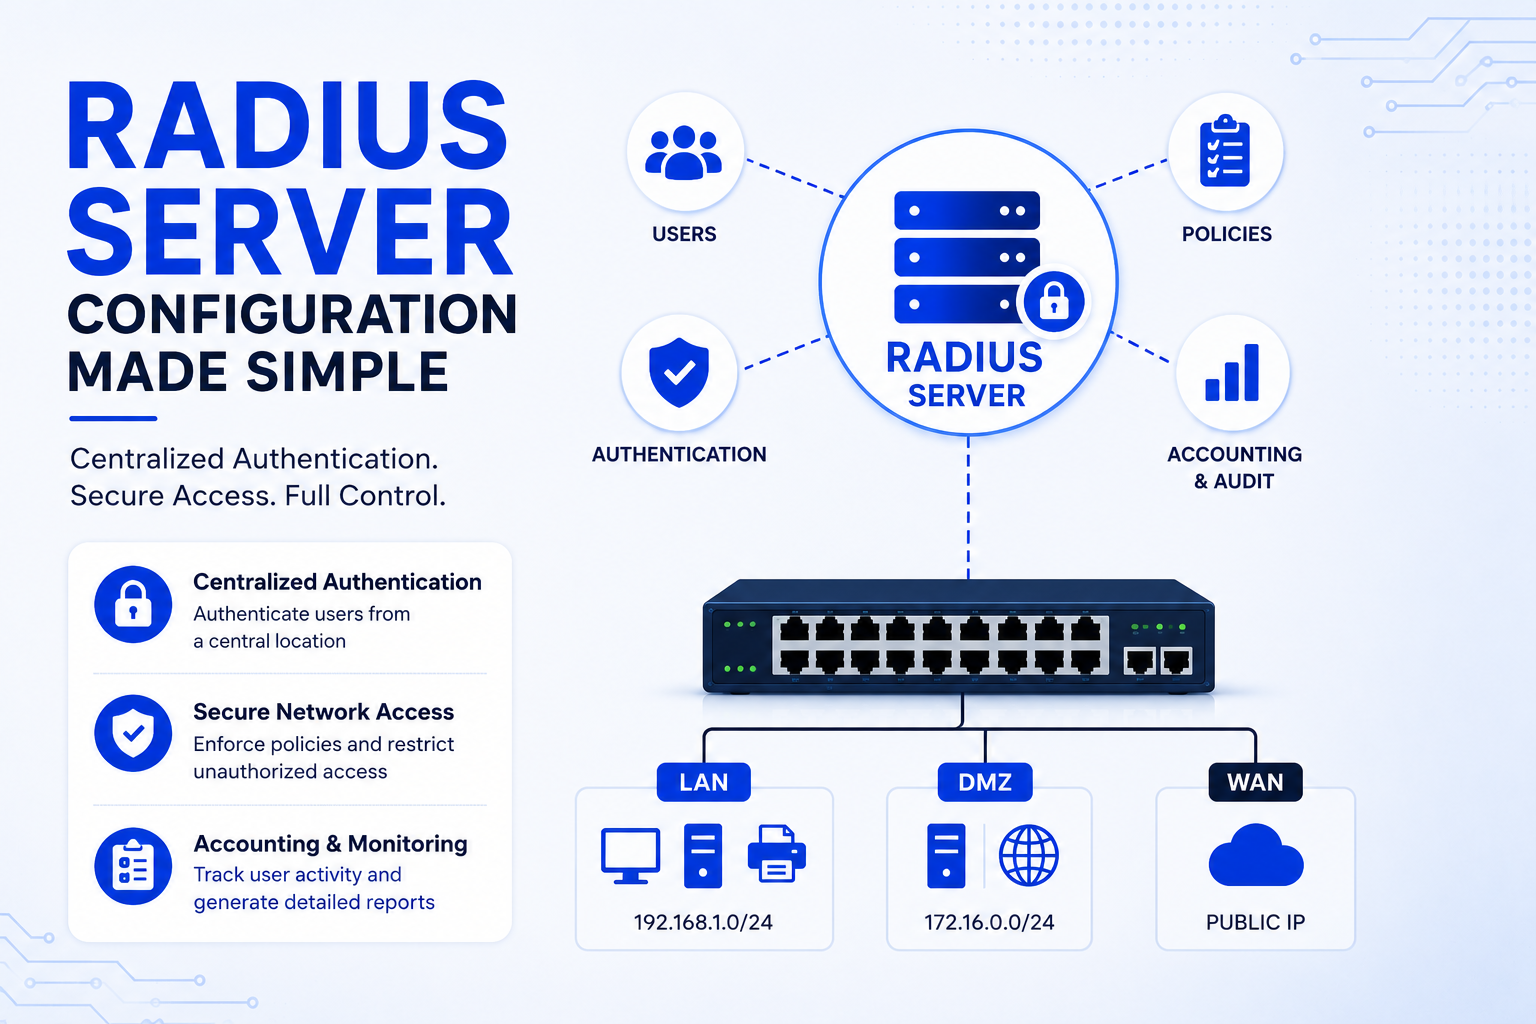
Managing access across dozens of switches with local credentials quickly becomes a nightmare. One password change means logging into every device manually. This post walks you through configuring a Cisco switch to authenticate users through a central RADIUS server, giving you centralized control, stronger security, and detailed audit trails.
Table of Contents
- What Is RADIUS and Why Should You Care?
- RADIUS vs. TACACS+: Which One Fits Your Network?
- Prerequisites Before You Start
- Step-by-Step: Configuring the Switch for RADIUS Authentication
- Setting Up Authorization and Fallback Methods
- Enabling Accounting to Track User Activity
- Configuring the Source Interface for RADIUS Traffic
- Verifying Your RADIUS Configuration
- Troubleshooting Common RADIUS Issues
- Best Practices for Production Deployments
- Extending RADIUS to 802.1X Port-Based Authentication
- Conclusion
What Is RADIUS and Why Should You Care?
RADIUS stands for Remote Authentication Dial-In User Service. Despite the “dial-in” name, modern networks use RADIUS to control who can log into switches, routers, wireless access points, and VPN concentrators. It acts as a centralized gatekeeper.
When someone tries to access your switch, the device forwards the username and password to a RADIUS server. The server checks the credentials against its database and replies with either an Access-Accept or Access-Reject message. The switch then grants or denies access based on that response.
RADIUS runs over UDP ports 1812 for authentication and 1813 for accounting. It encrypts only the password field in each packet, leaving other information like the username in plaintext. While this sounds less secure than full-packet encryption, RADIUS remains the industry standard because it works across virtually every vendor’s equipment.
Using RADIUS transforms how you manage network access. Instead of maintaining separate user accounts on every switch, you maintain one central user database. When an engineer leaves the company, you delete one account on the RADIUS server instead of logging into thirty switches to remove their credentials.
RADIUS vs. TACACS+: Which One Fits Your Network?
Network admins often debate whether to use RADIUS or TACACS+ for AAA services. Both protocols provide authentication, authorization, and accounting, but they serve different purposes.
RADIUS combines authentication and authorization into a single process. It excels at controlling network access for end users connecting through Wi-Fi, VPNs, or Ethernet ports. RADIUS uses UDP, which makes it lightweight and fast, but it does not guarantee packet delivery. It encrypts only the password field.
TACACS+ separates authentication, authorization, and accounting into three distinct processes. It uses TCP port 49, which guarantees reliable delivery. TACACS+ encrypts the entire packet payload, not just the password. It also provides command-level authorization, meaning you can control exactly which CLI commands each user can execute.
Choose RADIUS when:
- You manage a multi-vendor environment
- You need to authenticate end users for network access (Wi-Fi, VPN, 802.1X)
- You want a lightweight, fast protocol
- You operate on a tighter budget
Choose TACACS+ when:
- You manage Cisco-centric infrastructure
- You need granular control over administrative commands
- You require full-packet encryption
- You need detailed audit trails for compliance
Many large organizations deploy both protocols simultaneously. They use TACACS+ for device administration and RADIUS for end-user network access. This hybrid approach leverages the strengths of each protocol.
Prerequisites Before You Start
Before you type a single command on your switch, gather the following information:
- RADIUS server IP address — The switch needs to know where to send authentication requests.
- Shared secret key — Both the switch and the RADIUS server must share an identical encryption key. Keep this key complex and store it securely.
- Management VLAN IP address — The switch must have an IP address in a VLAN that can reach the RADIUS server. If the server sits on VLAN 10, your switch needs an interface on VLAN 10.
- Local fallback credentials — Always configure a local username as a backup. If the RADIUS server becomes unreachable, you still need a way into the switch.
- Console access — If something goes wrong during configuration, you need physical console access to recover the device.
Step-by-Step: Configuring the Switch for RADIUS Authentication
Step 1: Set Up Local Credentials as a Safety Net
Always start by creating local user accounts. If the RADIUS server fails or becomes unreachable, these local accounts let you regain access to the switch.
SW01(config)# username admin privilege 15 secret YourStrongPassword123!
SW01(config)# enable secret YourEnableSecret456!
The privilege 15 level grants full administrative rights. The enable secret command secures privileged EXEC mode. Never use enable password because it stores the password in weak, reversible encryption.
Next, secure the console line so that anyone connecting physically must authenticate:
SW01(config)# line con 0
SW01(config-line)# login local
SW01(config-line)# exit
And secure the virtual terminal lines for remote SSH or Telnet access:
SW01(config)# line vty 0 15
SW01(config-line)# login local
SW01(config-line)# transport input ssh
SW01(config-line)# exit
Restricting remote access to SSH only eliminates the security risks of Telnet, which sends passwords in plaintext.
Step 2: Enable AAA Globally
The aaa new-model command activates the AAA framework on your Cisco switch. Without this command, none of the subsequent AAA configurations will take effect.
SW01(config)# aaa new-modelOnce you enter this command, the switch immediately begins enforcing AAA policies. If you have not configured any authentication methods yet, you could lock yourself out. That is why setting up local credentials first matters so much.
Step 3: Define the RADIUS Server
Now tell the switch where your RADIUS server lives and what shared secret to use:
SW01(config)# radius server GNS3-RADIUS
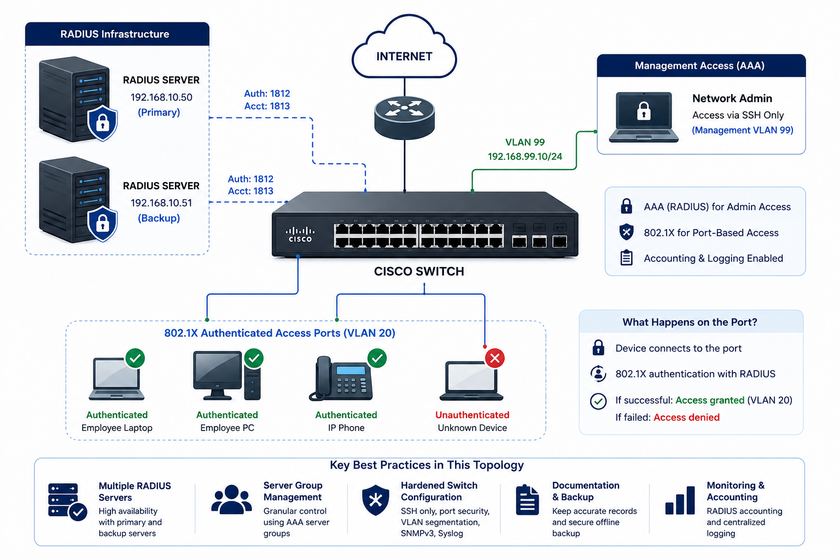
SW01(config-radius-server)# address ipv4 192.168.10.50 auth-port 1812 acct-port 1813
SW01(config-radius-server)# key YourSharedSecretKey!
SW01(config-radius-server)# exit
Modern Cisco IOS versions use the radius server subcommand structure. Older IOS versions use the legacy radius-server host syntax:
SW01(config)# radius-server host 192.168.10.50 key YourSharedSecretKey!Both approaches achieve the same result. The auth-port 1812 and acct-port 1813 parameters specify the standard RADIUS ports. If your RADIUS server uses custom ports, adjust these values accordingly.
Important: The IP address you use for the RADIUS client configuration on the server side must match the source IP address that the switch uses to send RADIUS packets. If your switch sends traffic from VLAN 20 (192.168.1.1), then the RADIUS server must list 192.168.1.1 as the client IP address, not some other interface address.
Setting Up Authorization and Fallback Methods
Step 4: Configure Login Authentication
Create an authentication method list that tries RADIUS first, then falls back to the local database:
SW01(config)# aaa authentication login default group radius localThis command tells the switch: “When someone tries to log in, first ask the RADIUS server. If the RADIUS server does not respond, check the local username database.”
The default keyword applies this method list to all login attempts automatically. You can also create named lists for specific lines or interfaces, but the default list covers most scenarios.
If you want to create a named list for console access specifically, you could use:
SW01(config)# aaa authentication login CONSOLE-ACCESS group radius local
SW01(config)# line con 0
SW01(config-line)# login authentication CONSOLE-ACCESS
Step 5: Configure EXEC Authorization
Authentication verifies who the user is. Authorization determines what the user can do. For administrative access to the switch, you typically want authorized users to enter privileged EXEC mode automatically:
SW01(config)# aaa authorization exec default group radius localThis command checks the RADIUS server for authorization attributes. Some RADIUS servers, like Cisco ISE, can return privilege level information in the Access-Accept message. If the RADIUS server does not respond, the switch falls back to local authorization.
Enabling Accounting to Track User Activity
Accounting logs what users do while connected to the switch. This data proves invaluable for security audits, compliance reporting, and troubleshooting.
Step 6: Configure EXEC Accounting
Log when users start and end their management sessions:
SW01(config)# aaa accounting exec default start-stop group radiusThe start-stop keyword sends a “start” record when the session begins and a “stop” record when it ends. This captures session duration, which IP address the user connected from, and what username they used.
Step 7: Configure System Accounting
Track system-level events like reloads and configuration changes:
SW01(config)# aaa accounting system default start-stop group radiusStep 8: Configure Command Accounting
Log every command that users type into the CLI:
SW01(config)# aaa accounting commands 15 default start-stop group radiusThis command captures all commands entered at privilege level 15. You can create separate accounting records for different privilege levels if needed. For example, commands 1 would log all user-level commands, while commands 15 logs all privileged commands.
Note: Command accounting generates significant log volume in busy environments. Monitor your RADIUS server’s storage capacity and consider log rotation policies.
Configuring the Source Interface for RADIUS Traffic
The switch must use an IP address that the RADIUS server recognizes as a valid client. If the switch has multiple VLAN interfaces, it might send RADIUS packets from an unexpected source IP, causing authentication failures.
Force the switch to use a specific interface for all RADIUS communication:
plain
SW01(config)# ip radius source-interface vlan 10This command ensures that all RADIUS packets originate from the VLAN 10 interface IP address. Make sure this IP address matches the client IP configured on your RADIUS server.
If you manage switches across different VLANs, consider using a dedicated management VLAN for all device-to-server communication. This approach simplifies firewall rules and access control lists.
Verifying Your RADIUS Configuration
After applying the configuration, verify that everything works correctly before considering the deployment complete.
Check RADIUS Server Statistics
This command shows packet counts, timeouts, and failures:
SW01# show radius statisticsLook for these key indicators:
- Access-Requests should increment when someone attempts to log in
- Access-Accepts should increment for successful authentications
- Access-Rejects should increment for failed credentials
- Timeouts should remain low; high timeouts indicate network or server issues
Check Active User Sessions
See who currently has access to the switch:
SW01# show users wideThis output displays usernames, connection methods (console or vty), idle times, and source IP addresses. If RADIUS authentication works, you should see the actual username instead of generic entries.
Check AAA Configuration Summary
Review your entire AAA setup with:
SW01# show aaa sessions
SW01# show aaa accounting
These commands help you confirm that accounting records are being generated and sent to the RADIUS server.
Test Authentication Explicitly
Cisco provides a hidden gem for testing RADIUS without actually logging in:
SW01# test aaa group radius username testuser password testpass new-codeThis command sends a test authentication request to the RADIUS server and shows you the response. Use it during initial setup to verify connectivity and credential validation without risking a lockout.
Troubleshooting Common RADIUS Issues
Even with careful configuration, RADIUS deployments sometimes hit snags. Here are the most common problems and how to fix them.
Issue 1: Authentication Fails Silently
Symptom: Users cannot log in, and the switch does not fall back to local authentication.
Fix: Check that you configured aaa authentication login default group radius local with the local fallback method. Without it, a RADIUS server failure locks everyone out.
Issue 2: RADIUS Server Does Not Receive Requests
Symptom:show radius statistics shows zero Access-Requests.
Fix: Verify IP connectivity with ping from the switch to the RADIUS server. Confirm the source interface with ip radius source-interface. Check that no access control lists block UDP ports 1812 and 1813.
Issue 3: Shared Secret Mismatch
Symptom: The RADIUS server receives requests but responds with Access-Reject for valid credentials.
Fix: Compare the shared secret on both the switch and the server. Even a single extra space or different capitalization breaks authentication. Regenerate the secret and reconfigure both sides.
Issue 4: Authorization Denies Privileged Access
Symptom: Users authenticate successfully but land in user EXEC mode instead of privileged EXEC mode.
Fix: Verify aaa authorization exec default group radius local is configured. Check if your RADIUS server sends the correct privilege level attributes. Cisco ISE and Windows NPS handle this differently.
Issue 5: Accounting Records Never Arrive
Symptom: The RADIUS server shows no accounting data.
Fix: Confirm that aaa accounting commands include the correct server group. Verify the accounting port (1813) is open. Some RADIUS servers require separate accounting client configurations.
Best Practices for Production Deployments
Use Multiple RADIUS Servers
Never rely on a single RADIUS server. Configure at least two servers for redundancy:
SW01(config)# radius server PRIMARY-RADIUS
SW01(config-radius-server)# address ipv4 192.168.10.50 auth-port 1812 acct-port 1813
SW01(config-radius-server)# key SecretKey1
SW01(config-radius-server)# exit

SW01(config)# radius server BACKUP-RADIUS
SW01(config-radius-server)# address ipv4 192.168.10.51 auth-port 1812 acct-port 1813
SW01(config-radius-server)# key SecretKey2
SW01(config-radius-server)# exit
The switch automatically tries the primary server first. If it does not respond within the timeout period, it fails over to the backup.
Define Server Groups for Granular Control
Create named server groups to apply different RADIUS servers to different services:
SW01(config)# aaa group server radius MGMT-SERVERS
SW01(config-sg-radius)# server name PRIMARY-RADIUS
SW01(config-sg-radius)# server name BACKUP-RADIUS
SW01(config-sg-radius)# exit

SW01(config)# aaa authentication login default group MGMT-SERVERS local
Harden the Switch Beyond AAA
RADIUS authentication forms just one layer of your security strategy. Complement it with these measures:
- Disable Telnet: Only allow SSH for remote access
- Enable port security: Prevent unauthorized devices from connecting
- Use VLAN segmentation: Isolate management traffic from user traffic
- Configure a dedicated management VLAN: Keep administrative access separate
- Enable SNMPv3: Replace insecure SNMPv1 and SNMPv2c
- Set up syslog forwarding: Centralize log collection for analysis
Document Your Configuration
Maintain accurate documentation of your AAA setup. Include:
- RADIUS server IP addresses and roles
- Shared secret storage location (use a password manager, never plaintext files)
- Local fallback account credentials (stored offline in a physical safe)
- VLAN assignments and source interfaces
- Accounting log retention policies
Extending RADIUS to 802.1X Port-Based Authentication
The configuration we covered so far handles administrative access to the switch itself. You can extend the same RADIUS infrastructure to control which end devices connect to your network ports through 802.1X.
Enable 802.1X Globally
SW01(config)# aaa new-model
SW01(config)# aaa authentication dot1x default group radius
SW01(config)# dot1x system-auth-control
Configure Access Ports for 802.1X
SW01(config)# interface range gigabitethernet0/1 - 24
SW01(config-if-range)# switchport mode access
SW01(config-if-range)# switchport access vlan 20
SW01(config-if-range)# authentication port-control auto
SW01(config-if-range)# dot1x pae authenticator
SW01(config-if-range)# spanning-tree portfast
SW01(config-if-range)# exit
The authentication port-control auto command forces the port to authenticate devices through 802.1X before granting network access. Unauthenticated devices cannot pass traffic.
Enable 802.1X Accounting
SW01(config)# aaa accounting dot1x default start-stop group radiusThis logs when devices connect and disconnect, including session duration and data usage. It helps you track which devices accessed the network and when.
802.1X with RADIUS provides powerful network access control. It prevents rogue devices from connecting, enforces compliance policies, and creates detailed connection records for security investigations.
Conclusion
Configuring a Cisco switch with a RADIUS server transforms how you manage network access. You move from scattered local credentials to a centralized, auditable authentication system. You gain the ability to track who logs in, what commands they run, and how long they stay connected.
Start by enabling AAA and creating local fallback accounts. Define your RADIUS server with the correct IP address, ports, and shared secret. Configure authentication to try RADIUS first and fall back to local credentials. Add authorization to control privilege levels and accounting to log all activity. Verify everything with show radius statistics and show users wide before calling the deployment complete.
Remember that RADIUS works best as part of a broader security strategy. Combine it with SSH-only access, VLAN segmentation, port security, and regular auditing. Document your setup thoroughly and test failover scenarios to ensure your network stays accessible even when the primary RADIUS server goes offline.
Want more articles and tutorials like this?
Get new tutorials, security alerts, and IT tips straight to your inbox.
That’s a really helpful overview; I’ve run into similar issues trying to manage larger networks with individual logins.