How to Configure a Cisco Switch with a TACACS+ Server: A Complete Guide
Managing user access across dozens of network switches with local accounts is a nightmare. Every time someone leaves the team, you log into each device and scrub their credentials manually. TACACS+ solves this by centralizing authentication, authorization, and accounting on a single Linux server. In this guide, you will build a TACACS+ server from scratch and configure a Cisco switch to use it for all administrative access.
Table of Contents
- What Is TACACS+ and Why Should You Care?
- TACACS+ vs RADIUS: Picking the Right Tool
- Building Your TACACS+ Server on Linux
- Preparing Your Cisco Switch for AAA
- Configuring Authentication on the Switch
- Setting Up Authorization
- Enabling Accounting for Audit Trails
- Troubleshooting Common Issues
- Security Best Practices Worth Following
- Conclusion
What Is TACACS+ and Why Should You Care?
TACACS+ stands for Terminal Access Controller Access-Control System Plus. Cisco originally developed this protocol, and it has since become the industry standard for securing administrative access to network devices. Unlike basic local authentication, where every switch stores its own username and password database, TACACS+ pushes all authentication requests to a central server.
This centralization brings three major benefits. First, you manage one user database instead of fifty. When an engineer joins or leaves your team, you update a single configuration file on the TACACS+ server rather than logging into every switch, router, and firewall. Second, TACACS+ separates authentication, authorization, and accounting into three independent exchanges. This separation lets you control not just who logs in, but exactly what commands they can run, and logs every action they take. Third, TACACS+ encrypts the entire packet body, not just the password field, giving you stronger protection than older alternatives.
If you run a network with more than a handful of devices, TACACS+ pays for itself in reduced management overhead and stronger security posture.
TACACS+ vs RADIUS: Picking the Right Tool
Before you commit to TACACS+, you should understand how it compares to RADIUS. Both protocols handle AAA, but they serve different populations.
RADIUS authenticates network users, the people and devices that use your Wi-Fi, VPN, or broadband connection. It runs over UDP on ports 1812 and 1813, combines authentication and authorization into a single exchange, and encrypts only the password field. RADIUS handles high transaction volumes well, which makes it ideal for subscriber authentication.
TACACS+ authenticates network administrators, the engineers who log into switches, routers, and firewalls to make changes. It runs over TCP on port 49, separates authentication, authorization, and accounting into independent exchanges, and encrypts the entire packet. This design allows per-command authorization, meaning the switch can ask the TACACS+ server whether a specific user may run a specific command before executing it.
For device administration, TACACS+ is the clear winner. RADIUS cannot authorize individual commands, and it lacks the detailed audit trail that compliance frameworks like PCI-DSS and NIST require.
Building Your TACACS+ Server on Linux
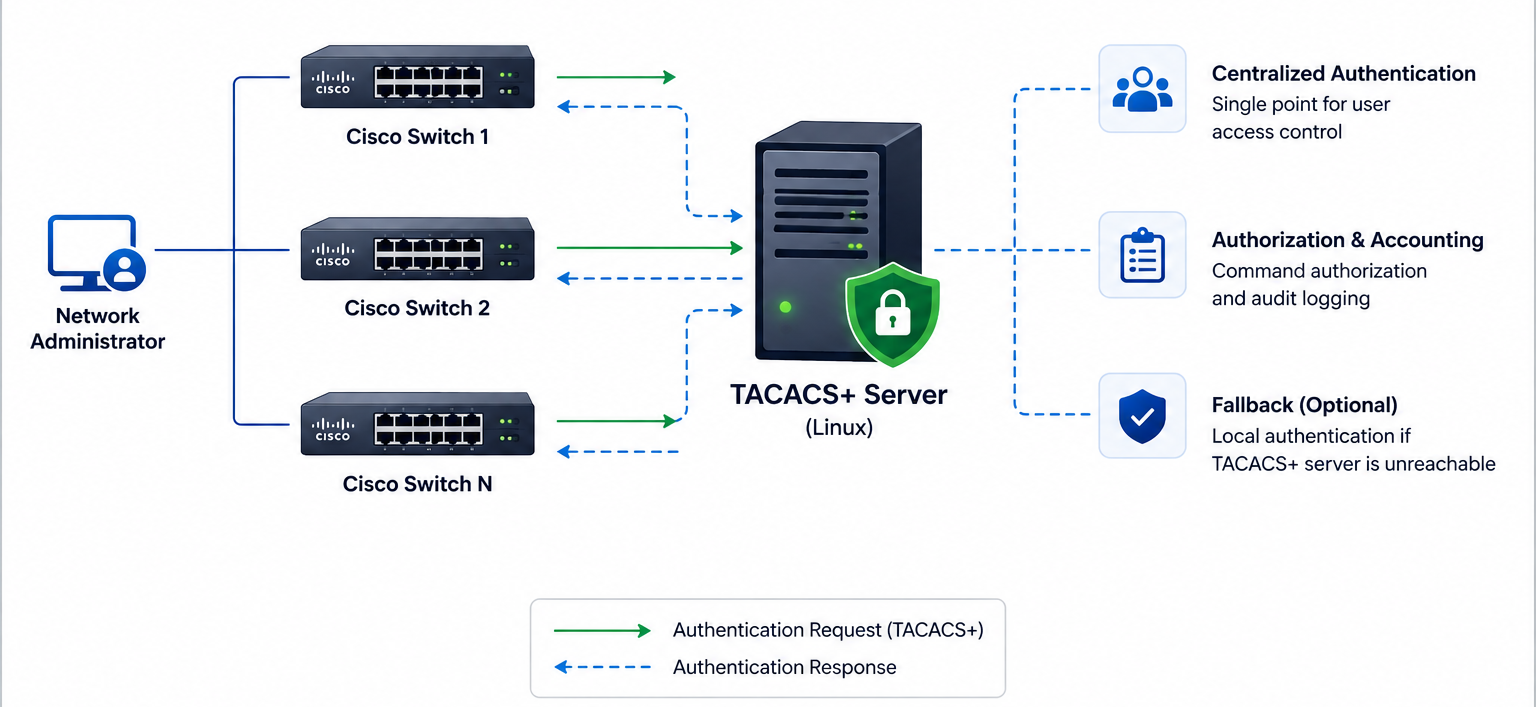
You can run a TACACS+ server on any Linux distribution. Ubuntu and CentOS both offer straightforward installation paths.
Installing the TACACS+ Package
For Ubuntu, open a terminal and run:
sudo apt-get update
sudo apt-get install tacacs+
For CentOS, create a new repository file first:
cd /etc/yum.repos.d/
sudo vim nux-misc.repo
Add these lines to the file:
[nux-misc]
name=Nux Misc
baseurl=http://li.nux.ro/download/nux/misc/el6/x86_64/
enabled=0
gpgcheck=1
gpgkey=http://li.nux.ro/download/nux/RPM-GPG-KEY-nux.ro
Save the file and install with:
sudo yum --enablerepo=nux-misc install tac_plusAfter installation, verify that the service exists:
ps -ef | grep tac_plusOn Ubuntu, the configuration file sits at /etc/tacacs+/tac_plus.conf. On CentOS, you will find it at /etc/tac_plus.conf.
Securing Passwords with tac_pwd
Never store passwords in plain text. The tacacs+ package includes a utility called tac_pwd that encrypts passwords using DES.
To encrypt a password, run:
tac_pwd
Password to be encrypted: YourSecurePassword123
The tool outputs an encrypted string like VFj4MGmISJNmE. Copy this string, you will paste it into the configuration file for each user.
Crafting the tac_plus.conf File
Before you edit the configuration file, back up the original:
sudo cp /etc/tacacs+/tac_plus.conf /etc/tacacs+/tac_plus.conf.oldNow open the file in your preferred editor. A practical configuration includes the shared key, user definitions, group definitions, and accounting settings. Here is a complete example:
# TACACS+ Server Configuration
# Define the shared secret key
key = "gn3"

# Set the accounting log location
accounting file = /var/log/tac_plus.acct

# Define user groups with different privilege levels
group = admin {
    default service = permit
    service = exec {
        priv-lvl = 15
    }
}

group = readonly {
    default service = deny
    service = exec {
        priv-lvl = 1
    }
    cmd = show { permit .* }
    cmd = exit { permit .* }
}

# Define individual users
user = mdahmani {
    login = des VFj4MGmISJNmE
    member = admin
}

user = helpdesk {
    login = cleartext cisco
    member = readonly
}

# Global enable password for level 15
user = $enab15$ {
    login = des VFj4MGmISJNmE
}
The key directive sets the shared secret that every network device must use to communicate with this server. The accounting file directive tells TACACS+ where to write audit logs. The group blocks define roles. The admin group grants full privilege level 15 access, while the readonly group restricts users to show commands and exit. The user blocks assign individuals to groups and store their encrypted passwords.
Starting and Verifying the Service
After saving the configuration file, restart the TACACS+ service:
sudo systemctl restart tacacs+
sudo systemctl status tacacs+
Check the logs for any syntax errors. If the service fails to start, the error message usually points to the exact line number in the configuration file that caused the problem.
To test authentication from another Linux machine, install the TACACS+ client:
sudo pip install tacacs_plusThen run a test authentication script:
from tacacs_plus.client import TACACSClient
from tacacs_plus.flags import TAC_PLUS_AUTHEN_TYPE_ASCII

client = TACACSClient('192.168.1.200', 49, 'gn3', timeout=10)
auth = client.authenticate('mdahmani', 'YourSecurePassword123', TAC_PLUS_AUTHEN_TYPE_ASCII)
print(auth.valid)
Replace the IP address, shared key, username, and password with your actual values.
Preparing Your Cisco Switch for AAA
With the TACACS+ server running, you can now point your Cisco switch at it. Connect to the switch console and enter global configuration mode.
Enabling AAA New Model
The first command you must run enables the AAA framework on the switch:
SW01(config)# aaa new-modelCisco warns that this command immediately applies local authentication to all lines except the console. If you have an active SSH session open, you could get locked out if no local user exists. Always configure a local fallback account before enabling aaa new-model if you are working remotely.
Setting Up Local Fallback Accounts
Local accounts serve two purposes. First, they let you log in if the TACACS+ server becomes unreachable. Second, they provide a backup path during initial setup while you test the TACACS+ configuration.
Create a local user with full privileges:
SW01(config)# username mdahmani privilege 15 secret YourLocalFallbackPassword
SW01(config)# enable secret YourEnableSecretPassword
The privilege 15 parameter grants this user immediate access to privileged EXEC mode without requiring the enable password. The secret keyword hashes the password with SHA-256, which is stronger than the older password command.
Set the console line to use the local database as a last resort:
SW01(config)# line console 0
SW01(config-line)# password cisco
SW01(config-line)# login
SW01(config-line)# exit
Defining the TACACS+ Server
Next, tell the switch where your TACACS+ server lives:
SW01(config)# tacacs server your_server
SW01(config-server-tacacs)# address ipv4 192.168.1.200
SW01(config-server-tacacs)# key gn3
SW01(config-server-tacacs)# exit
The address command points to your Linux TACACS+ server IP. The key must match exactly the key you set in tac_plus.conf. Even a single extra space will break authentication.
Grouping Servers for Redundancy
If you run multiple TACACS+ servers for high availability, group them together:
SW01(config)# aaa group server tacacs+ tacacs_group
SW01(config-sg-tacacs)# server name your_server
SW01(config-sg-tacacs)# exit
For a second server, repeat the server definition and add it to the same group:
SW01(config)# tacacs server your_server_02
SW01(config-server-tacacs)# address ipv4 192.168.1.201
SW01(config-server-tacacs)# key gn3
SW01(config-server-tacacs)# exit

SW01(config)# aaa group server tacacs+ tacacs_group
SW01(config-sg-tacacs)# server name your_server_02
SW01(config-sg-tacacs)# exit
You can also specify which interface the switch uses to source TACACS+ packets:
SW01(config)# ip tacacs source-interface Vlan100Configuring Authentication on the Switch
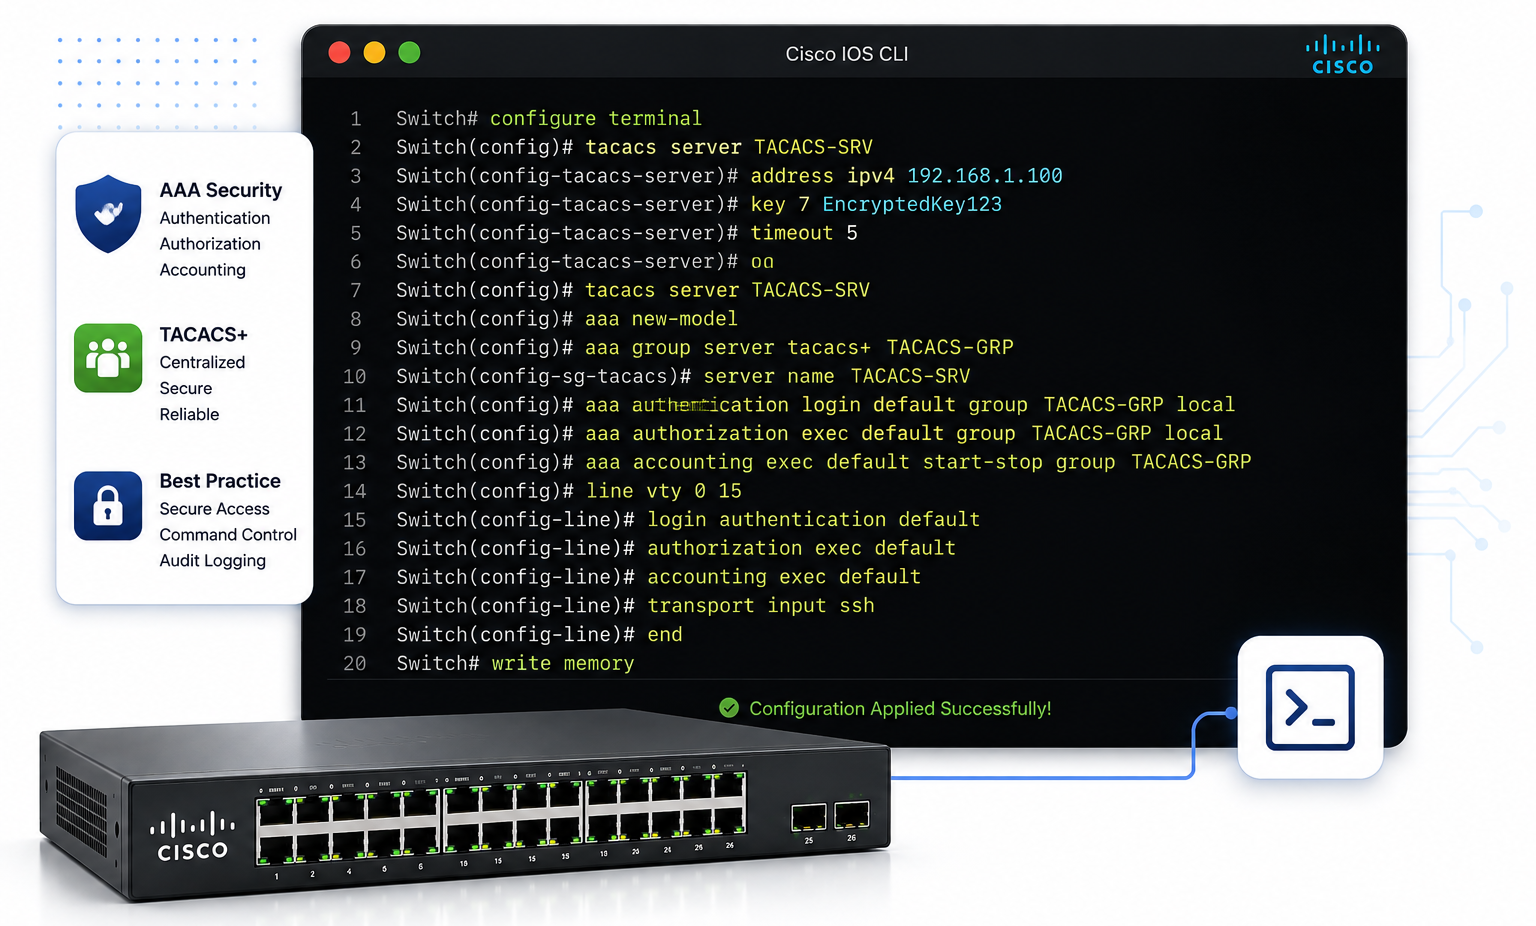
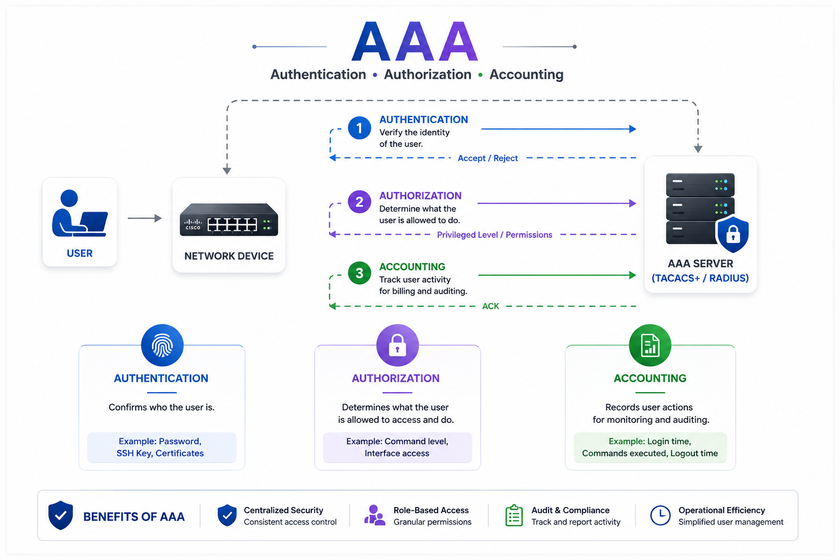
Authentication answers the question: who are you? The switch verifies the username and password against the TACACS+ server before granting access.
Login Authentication
Create a default login authentication method list that tries TACACS+ first, then falls back to the local user database:
SW01(config)# aaa authentication login default group tacacs_group localThe default keyword means this method list applies automatically to all lines. The group tacacs_group parameter tells the switch to query the TACACS+ servers you defined earlier. The local parameter at the end means that if all TACACS+ servers are unreachable, the switch checks its local username database.
Apply this to your VTY lines for remote access:
SW01(config)# line vty 0 4
SW01(config-line)# transport input ssh
SW01(config-line)# login authentication default
SW01(config-line)# exit
I strongly recommend using SSH instead of Telnet. Telnet sends passwords in plain text, which defeats the purpose of encrypting your TACACS+ traffic.
Enable Mode Authentication
When a user types enable to enter privileged EXEC mode, the switch should verify that action too:
SW01(config)# aaa authentication enable default group tacacs_group enableThis tries TACACS+ first, then falls back to the local enable password if the server is down.
Setting Up Authorization
Authorization answers the question: what can you do? TACACS+ shines here because it supports per-command authorization.
EXEC Authorization
EXEC authorization controls what privilege level a user receives after logging in:
SW01(config)# aaa authorization exec default group tacacs_group localWhen mdahmani logs in and belongs to the admin group on the TACACS+ server, the server sends back priv-lvl=15 in the authorization response. The switch places the user directly into privileged EXEC mode. A readonly group member gets priv-lvl=1 and stays in user EXEC mode.
You can verify this behavior after logging in:
SW01# show privilege
Current privilege level is 15
Command Authorization
For the highest level of control, enable command authorization:
SW01(config)# aaa authorization commands 15 default group tacacs_group localWith this in place, if a user tries to run a debug command and the TACACS+ server has not explicitly permitted it, the switch rejects the command:
SW01# debug ip packet
Command authorization failed.
This granular control is invaluable in production environments where a single wrong command can bring down the network.
By default, Cisco does not perform authorization on the console line. If you want the same restrictions on console access, add:
SW01(config)# aaa authorization consoleEnabling Accounting for Audit Trails
Accounting answers the question: what did you do? Every login, logout, and command can be logged to the TACACS+ server for later review.
Enable EXEC session accounting:
SW01(config)# aaa accounting exec default start-stop group tacacs_groupThis sends a start record when the user begins a session and a stop record when they exit. The TACACS+ server writes these records to the accounting file you configured in tac_plus.conf.
Enable command accounting for privilege level 15:
SW01(config)# aaa accounting commands 15 default start-stop group tacacs_groupNow every command a level-15 user types gets logged with their username, timestamp, and the exact command string. When something breaks at 2 AM, you can open the accounting log and see exactly who made the last change.
Troubleshooting Common Issues
Even with careful configuration, things go wrong. Here are the most common problems and how to fix them.
Authentication Timeouts
If users see authentication timeouts when logging in, check network connectivity first. Can the switch reach the TACACS+ server on TCP port 49?
SW01# telnet 192.168.1.200 49If the connection fails, check routing, firewalls, and ACLs. Verify that the TACACS+ service is actually running on the server with sudo systemctl status tacacs+.
Shared Key Mismatches
A mismatched shared key is the silent killer of TACACS+ setups. The switch and server must use the exact same key, including case and any special characters. If authentication fails immediately without even trying the local fallback, suspect a key mismatch.
On the switch, verify your configuration:
SW01# show tacacsThis displays all defined TACACS+ servers, their IP addresses, keys, and status. Look for servers marked as down or with error counters increasing.
Local Fallback Not Working
If the TACACS+ server is down but local fallback still fails, make sure your method list includes local at the end:
SW01(config)# aaa authentication login default group tacacs_group localAlso verify that the local username exists and the password is correct. Remember that aaa new-model immediately enforces authentication, so create local users before enabling it.
Security Best Practices Worth Following
Getting TACACS+ working is only the beginning. To build a truly secure administrative access framework, follow these additional practices.
Use Individual User Accounts
Never share a single admin account among multiple engineers. TACACS+ gives you the ability to assign unique credentials to every person, and you should take advantage of it. Shared accounts make auditing impossible because you cannot tell who ran a specific command.
Enforce Role-Based Access Control
Map your TACACS+ groups to real job roles. The help desk gets read-only access. Junior network engineers get interface configuration rights. Senior engineers get full privilege level 15. This principle of least privilege limits the damage from compromised credentials or honest mistakes.
Place the TACACS+ Server on a Dedicated Management VLAN
Your TACACS+ server is a high-value target. Isolate it on a dedicated management VLAN that only network devices and authorized administrators can reach. Use firewall rules or ACLs to block all unnecessary traffic to the server.
Enable SSH and Disable Telnet
Telnet sends everything, including passwords, in plain text. Always use SSH for remote administrative access. On every switch, run:
SW01(config)# line vty 0 15
SW01(config-line)# transport input ssh
SW01(config-line)# exit
SW01(config)# crypto key generate rsa modulus 2048
Forward Accounting Logs to a SIEM
The local accounting file on your TACACS+ server is useful, but it is not enough for enterprise environments. Configure your Linux server to forward syslog messages to a centralized SIEM platform. This gives you real-time alerting, long-term retention, and correlation with other security events.
On the TACACS+ server, you can use rsyslog to forward logs:
echo '*.* @your-siem-server:514' | sudo tee -a /etc/rsyslog.d/50-default.conf
sudo systemctl restart rsyslog
Plan for High Availability
A single TACACS+ server creates a single point of failure. If it goes down and you have not configured local fallback correctly, you could lock yourself out of every switch simultaneously. Run at least two TACACS+ servers and define both in your switch server group. Consider placing the primary server in your main data center and the secondary in a DR site.
Conclusion
Centralizing administrative access with TACACS+ transforms how you manage network security. Instead of scattering local accounts across every switch, you maintain one clean user database on a Linux server. You control who can log in, what commands they can run, and you log every action for compliance and troubleshooting.
This guide walked you through the complete setup: installing the TACACS+ package on Linux, configuring tac_plus.conf with encrypted passwords and role-based groups, then configuring your Cisco switch with AAA new-model, server definitions, authentication, authorization, and accounting. You also learned how to add local fallback accounts so you never lock yourself out, and how to troubleshoot the most common issues that appear during deployment.
Start small. Set up one TACACS+ server in your lab, configure a test switch, and verify that authentication, authorization, and accounting all work as expected. Once you are comfortable, roll it out to your production switches one site at a time. The time you invest now will save you hours of manual user management later and give you the audit trail your security team needs.
Want more articles and tutorials like this?
Get new tutorials, security alerts, and IT tips straight to your inbox.